Wood flooring remains at the peak of its popularity as it is warm and durable. However, over time, under the influence of many factors, it can begin to sag. Agree, this can cause a lot of trouble, as well as spoil the appearance of the floor.
Based on this, the question arises of how to properly level the wooden floor? We did a little research and found out that leveling the floor with plywood is a great solution.
After reading this article, you will find out the main causes of floor irregularities, learn how to independently determine their size. In addition, you will learn what to look for when choosing plywood for alignment. And be sure to choose the option that suits you for leveling the floor.
The content of the article:
- Causes of unevenness in a wooden floor
- Determination of the condition of the floor covering
- Choosing the right plywood
-
Popular plywood floor leveling schemes
- Option 1 - installing plywood on a base
- Option 2 - fix minor irregularities
- Option 3 - arranging a mini-lag
- Option 4 - lathing from point supports
- Tools required for the job
- Conclusions and useful video on the topic
Causes of unevenness in a wooden floor
In the process of flooring, wooden logs are initially installed, which will serve as an even base for flooring. Then a strong thread is pulled between them, which will serve as a beacon for installing the rest of the lags. The extreme joists must be installed at the same level, otherwise the floor will have a slope.
If the distance between the logs is incorrectly calculated, for example, if the distance between the logs is too large, deflections may appear in the floor covering.
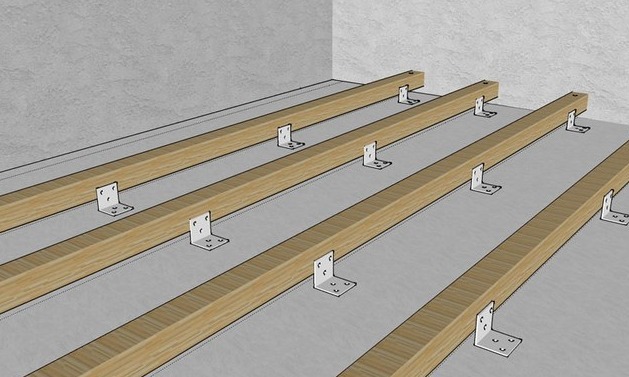
When installing the base, you need to pay attention to the correct fixing of the logs, if it is not enough to fasten the logs, then they can shrink, which will also lead to the sagging of the wood
When choosing wood, you need to pay attention to the degree of its moisture. The board should not be overdried or too damp.
The influence of room temperature and humidity can also cause uneven floors. When the humidity rises, the wood floor grows in size, and when it dries, it shrinks. Over time, this can cause gaps to appear between the boards.
If the wood is not treated with antiseptics and paints and varnishes, this also leads to deformation or even destruction of floor coverings.
When laying the floor, an important role is played by its hydro and thermal insulation. Correctly selected waterproofing materials will ensure the dryness of the floor, and, therefore, will significantly affect the period of its high-quality operation.
Determination of the condition of the floor covering
When assessing the condition of a wooden floor, it is very important to identify the degree of its damage, to inspect it for the presence of fungus, rot, dips and squeaks. If there is damage, it must be repaired.
If no such shortcomings are found, then we further evaluate the size of the unevenness of the floor. The unevenness of the floor means bumps or deflections.
To do this, you need to prepare: a bubble level at least two meters long, a rule (aluminum rail) or just a flat long rail.
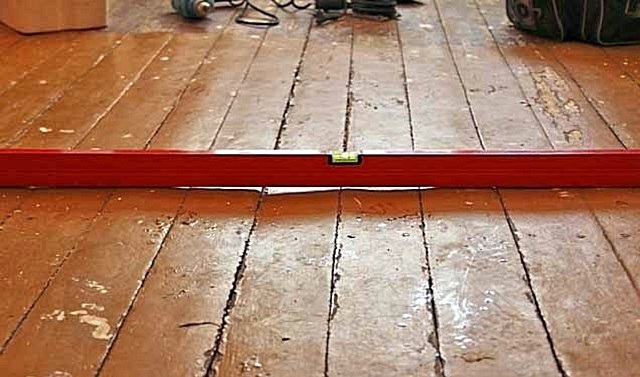
The level must be applied with its end to the floor and the amount of unevenness in the floor must be measured, depending on the result, the leveling method is selected
It is worth noting that wood is not resistant to moisture, so "wet" leveling methods such as cement screed or special floor leveling mixtures will not work.
Plain plywood is best suited for leveling wood floors. It is resistant to stress and is considered a fairly environmentally friendly material.
Choosing the right plywood
Plywood is a material that is produced by gluing veneer sheets in a perpendicular direction. The thickness of this material depends on the number of veneer layers.
Pros of using plywood to level wood floors:
- environmental friendliness of the material;
- natural appearance;
- acceptable cost;
- strength;
- moisture resistance;
- a wide variety of species.
When choosing plywood, be sure to pay attention to its labeling.
Plywood differs and is marked depending on the production method:
- FC - used in residential premises. High moisture resistance. The amount of harmful substances is in the permissible norm. Suitable for children's rooms, living rooms, etc.
- FBA - can be used in bedrooms, children's rooms. Low moisture resistance.
- FSF - toxic substances are used in production, therefore, use in residential premises is undesirable.
- FB - the cost is higher due to the addition of a special varnish. High moisture resistance. Perfect for bathroom and toilet.
There are four main grades of plywood.
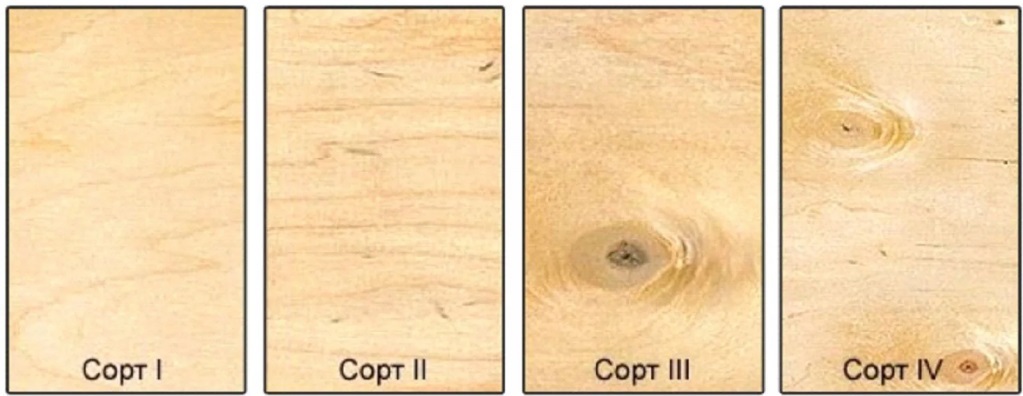
Plywood grades differ only in cost and appearance, while the strength is almost the same in all grades
Plywood of the first grade has the highest cost. If the material will serve as a front coating, then it must be dry, calibrated - sanded on both sides, and its thickness will be strictly maintained over the entire plane. Among other things, plywood that is used as a finishing floor covering must have a beautiful face.
If you plan to roll up tiles, laminate or linoleum, then the front side does not matter.
Popular plywood floor leveling schemes
The thickness of the plywood is selected based on a suitable leveling method. Next, we will talk about the most popular ways to level the floor with plywood and figure out how to carry out the leveling work yourself.
Option 1 - installing plywood on a base
It is used when the unevenness of the floor is insignificant (1-5 mm).
The leveling material is the backing (polyethylene foam, non-woven, etc.).
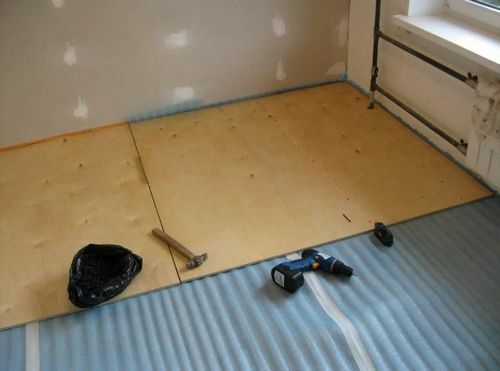
First of all, you need to lay a backing on the floor under the plywood and, if necessary, glue it together with tape
To level the floor in this way, you need to take plywood with a thickness of 8-10 mm. Before installing the plywood on the floor, you need to stand in the room for at least two days.
If the plywood will serve as the finishing coat of the floor, then to give it an aesthetic appearance, it must be cut into symmetrical squares. The main thing is to minimize material waste when cutting.
If the plywood, after leveling the floor, will be covered with linoleum, tiles or other materials, then it can be laid in whole sheets without wasting time on sawing.
It is imperative to leave a gap between the slab and the wall of 5-10 mm - this is a thermal gap for expansion.
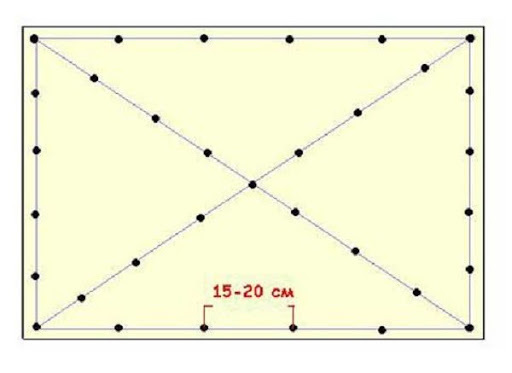
It is necessary to fasten plywood sheets to the floor using self-tapping screws, having previously drilled holes in the plywood along the diameter of the self-tapping screw body and sweep under the cap
To fix the plywood, you will need 30-50 self-tapping screws per 1 sq. M. After mounting, the caps of the screws can be hidden under a thin layer of putty.
Installing plywood to the floor is the easiest and least time consuming way to level a wooden floor.
Option 2 - fix minor irregularities
If, when assessing the size of the unevenness of the floor, a slope or a difference of up to 15 mm is found, then two options can be used to level the floor.
Easy way to align
First you need to level the old flooring as much as possible. The protruding parts of the floor must be knocked down using an ax or a plane. In places of deflections, we fix the lining with nails or self-tapping screws.
To level the floor in this way, plywood must be chosen with a greater thickness - from 16 mm. A backing is also needed in this version.
When carrying out the installation, do not forget about the distance from the wall of 5-10 mm. Plywood sheets are also fastened with self-tapping screws, after having drilled holes in the plywood along the diameter of the self-tapping screw body and sweep under the cap.
Alignment with tape support
This option is used if the slope of the floor needs to be leveled over the entire plane or partially in different planes.
This is the most time consuming process, since it is required to align the transition from the lowest to the highest part of the floor.
First, using the level, you need to define a plane with a zero level. Next, a lathing is built from a wooden bar.
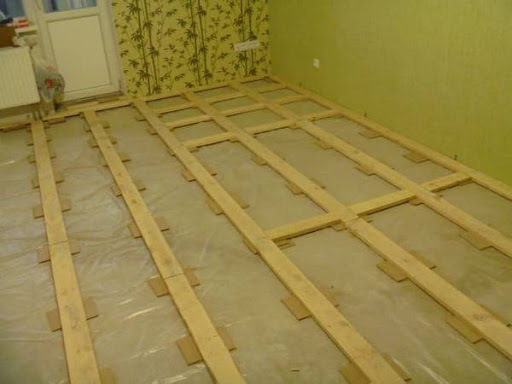
The lathing from a bar includes cells from longitudinal logs and crossbars, the cell and the pitch of the log should be 40-45 cm in size
The cell should be built taking into account the fact that a sheet of plywood will be attached to it. Therefore, before building the lathing, it is necessary to mark the location of the plywood.
To achieve the same height, the structure of the lathing must be leveled using pads of different thicknesses for the timber.
Plywood of different thicknesses, slats or bars can be used as the material for the lining. In addition, a gap of 30 mm must be left between the slab and the wall.
After leveling, the battens are fixed to the floor with dowels. When this work is done, you can start attaching the plywood to the crate. This is done, as in the previous methods, using self-tapping screws.
Option 3 - arranging a mini-lag
It will be advisable to use this method if the differences are quite significant - up to 80 mm.
Mini logs are wooden pads and slats. They are installed both along and across the boards.
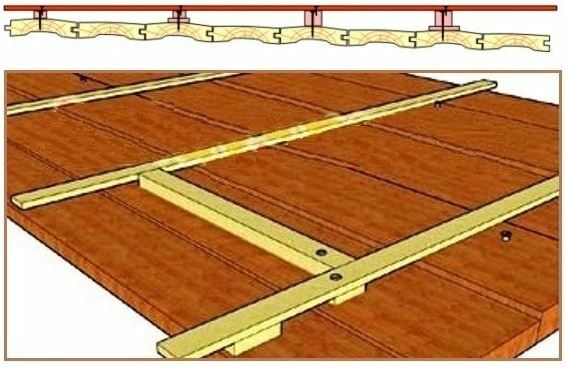
For this method, you need to choose different shapes of wooden slats for support, so that all plywood boards are on the same level.
Plywood for this method must be selected with a thickness of 16 mm. It should be noted right away that the method is not easy, as it requires separate calculations for each support element separately. Therefore, if you have doubts about your own abilities, it is better to seek help from specialists.
Option 4 - lathing from point supports
If the height differences on the floor are insignificant, then you can use a crate made of point supports.
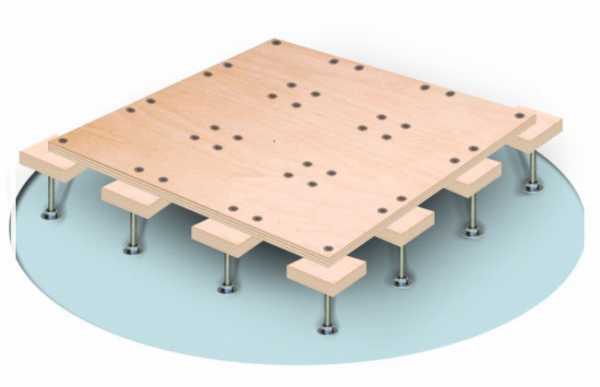
For this method, a grid of plywood supports is made pointwise, with a mesh size of 30-35 cm, after which the plywood is attached to the point support
Plywood should be taken with a thickness of 12-14 mm. Compared to the mini-lag lathing method, this method is less reliable and stable, but it is done faster and requires less cost.
It can be used for small spaces. If the area of the room is large, then it is better to use other methods of leveling the floor.
Tools required for the job
All of the above work can be done by hand. And everyone can do it, the main thing is to prepare materials and tools for work in advance.
Here is a list of tools that will be required for work:
- jigsaw or hand-held circular saw;
- electric drill;
- screwdriver;
- hacksaw;
- tape measure or ruler;
- level or rule;
- plane;
- axe;
- hammer;
- countersink;
- putty knife;
- sanding bar with sandpaper (grain 240, 320) for sanding.
Be aware of safety precautions when using power tools. In addition, floor ventilation should not be neglected.
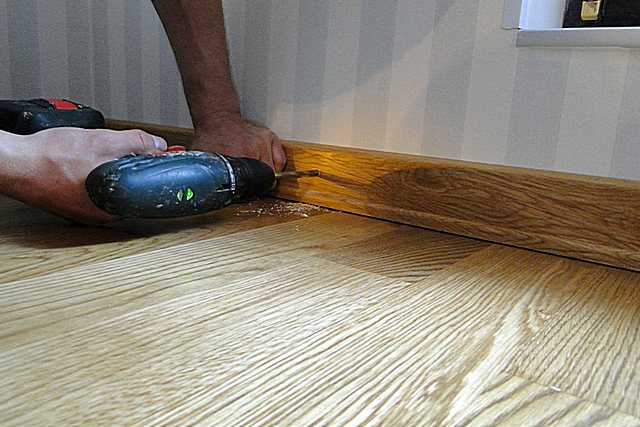
After carrying out all the finishing work and installing the plinth, you need to drill holes with a diameter of 10 mm in it, after a certain distance. This is done to ventilate the wooden floor.
Ventilation of the underground space will protect the floor from dampness, the appearance of fungus, mold, which means it will extend its service life.
Conclusions and useful video on the topic
Leveling the old wooden floor with plywood with irregularities of 5-7 cm:
As you can see, there is nothing difficult in leveling a wooden floor with plywood. The main thing is to correctly determine the size of the unevenness of the coating and choose the appropriate method. Almost any base can be leveled with plywood. And adherence to the correct technology of work allows you to get a strong and reliable base for any floor covering.
Have you ever had to level the wooden floor yourself with plywood? Please tell our readers what method you used and were there any difficulties in the process of carrying out the work? Leave your comments, upload photos of the workflow, participate in the discussion. The communication block is located under the article.


