The gas boilers offered for sale are oriented and tuned for the processing of main gas. But in this case, what about the owners of private houses, which are not supplied with a natural gas supply system? After all, you need to live in normal civilized conditions with an operating heating system now.
Everything is extremely simple - switching the boiler to liquefied gas will allow you to heat the house and heat sanitary water using a group of cylinders or a gas holder. To achieve this goal, your unit will have to be slightly altered and readjusted to different fuel pressure parameters. We will tell you in detail how this work is done.
The content of the article:
- Reasons and principles of boiler alteration
-
Stages of re-equipment of the Baxi boiler
- Injector replacement procedure
- The process of adjusting the pressure "folk remedies"
- Conversion steps with torch change
- Safety recommendations
- Conclusions and useful video on the topic
Reasons and principles of boiler alteration
From the first lines, we want to warn you that the work on re-equipping the boiler for transfer to a different type of fuel must be carried out by a foreman of the organization with which a contract for the supply of gas and maintenance has been concluded equipment.
However, any owner should know the essence and stages of the process for elementary control of the actions of the invited performers. And doubts about their competence sometimes quite justifiably creep in. Therefore, it is better to follow the implementation of the procedure, on which, by the way, the safety of the house and households depends.
Image gallery
Photo from
The transfer of the boiler to work from liquefied gas sources is required if the laying of the main system to the house is postponed for an indefinite period or is impossible for technical reasons
The source of liquefied gas required for the operation of an autonomous heating system is either a group of cylinders or a gas holder
Boilers up to 35 kW can operate from one cylinder, but it is better to connect to a group of 2-4 pieces. So you will have to refuel much less often.
If a floor boiler is installed for the heating device of the house, and a boiler is included in the circuit to prepare hot water, then it is better to put a gas holder to supply the equipment with gas
Connecting the boiler to LPG cylinders
Installation of a group of gas cylinders
Low-power gas equipment operation
Stand-alone system with floor standing boiler
It also happens that a gas service representative cannot get to a remote place in any way. In this situation, the home master, of course, will try to do everything with his own hands. But for the result of the efforts of an inexperienced craftsman in the gas field, he himself will bear responsibility, and the manufacturer's guarantees will be canceled.
By purchasing a gas boiler for domestic use, we get an apparatus configured to process the main fuel option. The centralized gas pipeline supplies us with a mixture of combustible gases, in which methane predominates. The main gas enters the devices with a natural density and a pressure of 21 mbar.
Liquefied gas is an exaggerated name for a mixture of propane with butane, in which either the first or the second component can prevail. It may contain mainly butane with a slight admixture of propane, or vice versa, 99% propane.
The density of the liquefied mixture increases 600 times. The pressure does not rise by that much, but it is still higher than that of fossil fuel, 30-31 mbar.
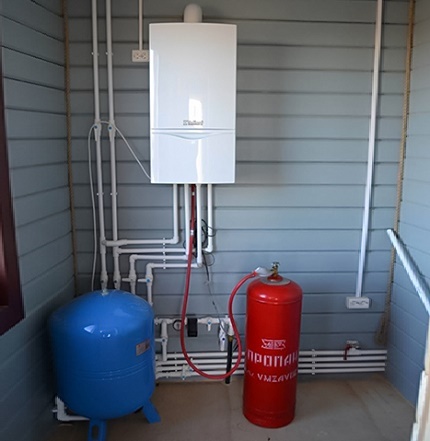
To obtain liquefied gas, the pressure of propane and butane is increased by about 600 times. This procedure provides an opportunity to reduce the volume of fuel and store it in a liquefied state before use.
The types of gases on which boilers operate are standardized. They are assigned codes that the manufacturer indicates in the technical documentation. Thus, the main gas consumption by the boiler is marked with the G20 code. The ability of the boiler to operate from a liquefied mixture with a predominance of butane is denoted by G30, from a mixture with a predominance of propane - G31.
In order for the blue fuel to fulfill its important duties, the gas flows through the nozzles into the combustion chamber. There, gas is mixed with air with the help of a burner in proportions optimal for a particular type of fuel. This means that the gas must be supplied to the burner in the volume necessary for normal combustion.
Normal mixture formation is possible when the diameter of the nozzles is suitable for its implementation. The size of the feed holes determines how much gas under a certain pressure enters the combustion chamber for a given volume of air. That is why nozzles with different cross-sections are installed for liquefied mixtures and for main gas.
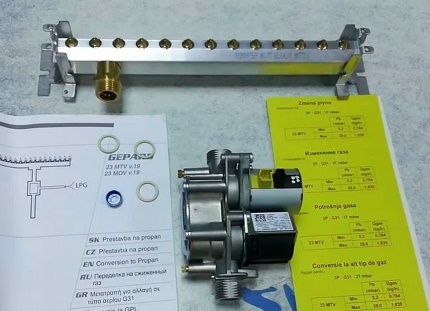
To switch to the consumption of liquefied gas, it is not necessary to radically alter the equipment, and even more so to buy a new unit. You just need to change either only the nozzles, or the manifold (ramp) with nozzles
Note that the cross-section of the nozzles is determined not only by the type of gas, but also by the power of the boiler itself. For your information, for the operation of a 10 kW unit operating in maximum operating mode, main gas needs 1.2 m³ / h, liquefied mixture of any kind, 0.86 kg / h.
The more powerful the equipment, the more fuel is required to operate it. The larger must be the size of the injectors that let the blue fuel into the combustion chamber. Their cross-section is clearly calculated and strictly regulated by the manufacturer, who produce burners with nozzles of a given diameter for a series of boilers with a given power.
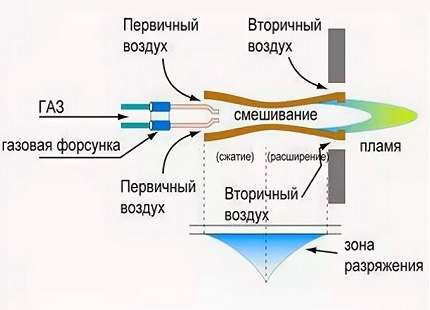
During the flow of gas from the nozzle, the gas is mixed with a portion of the air required for the normal combustion process. Both components must be supplied to the combustion chamber in precisely adjusted proportions.
So how can you still switch to liquefied gas, if you did not initially guess to buy liquefied gas boiler? That's right, replace either the entire manifold with the entire set of nozzles, or just the nozzles, leaving the manifold in place. The second option is not possible in all boilers.
In addition to replacing the devices for supplying liquefied gas, it will also be necessary to reconfigure the burner of a gas boiler with an electronic type of control. This is necessary for the complete delivery of air in the volume required for the process of uninterrupted combustion. The new settings will also ensure that the gas supply is interrupted in the event of a risky situation.
You will also need to install a reducer designed to regulate the pressure of the gaseous fuel. TO gas reducer one or a group of cylinders can be connected. It may be necessary to change the gas valve if necessary.
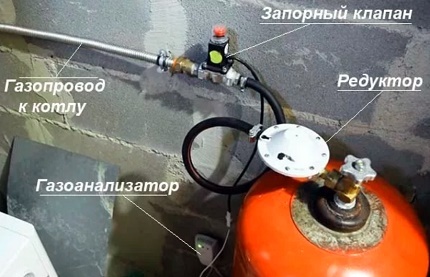
To connect the boiler to cylinders or a gas holder, it is necessary to adjust the reducer to the operating value of the gas pressure. Sometimes it is also necessary to change the gas valve in the boiler if it is not suitable for supplying gas at the required pressure
In any situation, before ordering a contractor to translate a wall or floor gas boiler for liquid fuel, it is worth consulting the gas service that oversees your equipment and gas supply to your facility.
There they will tell you which devices should be purchased for translation. They will calculate how much the modernization will cost you together with the payment of the master.
Stages of re-equipment of the Baxi boiler
In order to get a full-fledged and full-fledged idea of how to remodel the boiler for work on a gas cylinder, consider an example of transferring a wall-mounted double-circuit unit of the brand Baxi.
Injector replacement procedure
In most boilers with the Baxi logo, there is no need to completely change the burner, just rearrange the nozzles. To do this, they must be purchased in advance, focusing on the power of the apparatus and the type of gas. In this example, you will need 0.77 mm injectors to switch to G31 fuel.
The price of a set of nozzles for these boilers is about 2.5 thousand rubles. rub. In a set, produced for several similar models of boilers, there are 17 of them and another spring. You will need to change 15 nozzles, 2 spare ones will come in handy in case of unsuccessful actions.
Image gallery
Photo from
In order to gain access to the gas injectors, remove the front panel from the unit, then remove the cover from the closed combustion chamber
Unscrew the two screws to the right and left of the burner. The photo shows the one on the right
Factory-installed injectors designed to operate on main gas are unscrewed with a head using a knob
We put new injectors in place of the unscrewed ones. Tighten tightly using a knob, being careful not to damage
Step 1: Removing the combustion chamber cover
Step 2: Dismantle the gas burner
Step 3: Unscrewing the main gas injectors
Step 4: Installing new nozzles by screwing in
And we will act like this:
- Disconnect the boiler volatile devices from the power supply. We turn off the unit and turn off the taps on the pipes that directly supply gas and water to the unit.
- We remove the front panel from the boiler, then we separate the screen of the closed combustion chamber located behind it.
- We unscrew the screws holding the cover of the closed combustion chamber. It is located just behind the screen.
- We disconnect the wires of two electrodes: one from the flame control, the second from the ignition system.
- We remove the burner. In order to remove it, unscrew the two Phillips head screws holding the device. They stand to the right and left, fixing the burner on the ramp.
- We unscrew the injectors with a knob without dismantling and removing the ramp. Pliers should not be used in this matter. They can deform the nozzles without much effort. The nozzles of the nozzles are thin and extremely accurate in design, there is no point in spoiling it - they can also come in handy.
- Instead of the unscrewed nozzles, we install new devices designed for the supply of liquefied gas, and we connect the electrodes for the lighter and the flame control system.
- We return the burner to its original place. Its position will be "prompted" by the guides.
With the installation of the burner, all conversion procedures are complete. It remains to assemble the previously separated parts of the unit and fix the cover, the screen with the outer panel in the reverse order to that in which they were disassembled.

After the alteration, all disconnected devices and dismantled parts of the gas boiler are installed in their original places in the reverse order
But that's not all, the most serious and delicate work lies ahead - tuning.
The process of adjusting the pressure "folk remedies"
This stage is often available only to representatives of the gas service. Indeed, not every home craftsman has a pressure gauge that recognizes pressure readings in the range from 3 to 40 millibars. Buying a meter for a one-time job is not very reasonable, it is easier to use the services of a master who has this device in his arsenal.
But domestic inventors have found a way to measure the data of the gas pressure in the system. We also managed to find a device capable of correctly displaying atmospheric pressure. Believe it or not, this is an ordinary blood pressure monitor, which the older generation in your family probably stocked up with.
And it doesn't matter if you have a dial gauge or an electronic blood pressure meter at your disposal. Both options are fine. Most of them respond well to deviations of 3 mbar (i.e. in millibars).
The only drawback is that not all devices are equipped with a corresponding scale in mbar divisions. But there is a scale with divisions by mm of mercury, and on the Internet there are a sufficient number of programs that convert all comparable physical units of measurement.
For our own convenience, we will make a plate with the conversion of units of measurement, then we will boldly proceed with reconfiguring the boiler automation to operate on a liquefied gas mixture.
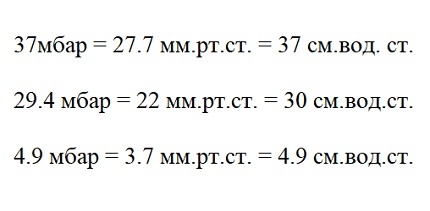
In order to configure the boiler to operate on liquefied gas using a tonometer, a table with pressure values in different units of measurement is useful.
In the example proposed for consideration, at the inlet to the unit, the pressure should be 37 mbar. We set the pressure limits for the operation of the burner to 4.9 mbar at a minimum, 29.4 mbar at a maximum.
We need to first readjust the pressure before entering the wall mounted gas boiler. In our country, everything was designed for the use of main gas supplied at a pressure of 27-28 mbar. Now we adjust the gas tank reducer or a group of cylinders to the 37 mbar we need.
We make the settings in the following order:
- We remove the lower fitting of the gas valve, in fact, we release the gas entry point into the system to adjust the dynamic pressure.
- We connect the tonometer. We simply disconnect the electronic meter from the tonometer reading system, after which we connect it with a narrow hose to the gas injection point, and immediately hook the pointer with the pear hose.
- We adjust the pressure to the parameters we need, taking into account that the device will show us mm Hg. This means that we need to expose 27.7 mm.
Note that the arrow version of the tonometer in this case is much more convenient. The super-precision that the electronic system is trying to demonstrate is completely unnecessary here. In addition, it is easier to catch tenths with a switch apparatus that works without unnecessary "fuss".
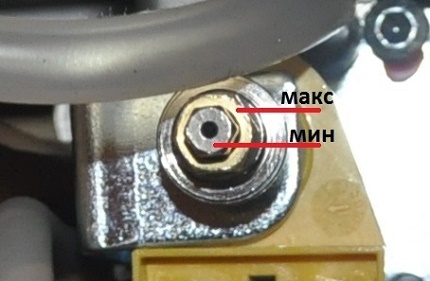
Adjust the maximum pressure of the Baksi gas boiler using such a nut. Moving it clockwise, increase the value, in the opposite direction, decrease
Next, we proceed to readjust the pressure of the gas entering the burner directly:
- Unscrew the upper fitting from the gas valve. We connect a tonometer to the freed hole.
- We start the boiler so that it works with the maximum settings for the characteristics of hot water and coolant.
- We adjust the upper and lower limits for heating the coolant and sanitary water by turning the adjusting nut to the left and right.
Turn the adjustment nut carefully around its own axis. We twist it clockwise to increase, against - to decrease. We use a knob with a head. We act this way until the values coincide with the translated values in mm Hg 22 mm for the upper limit, 3.7 mm for the lower limit.
Image gallery
Photo from
To set the required value of gas pressure at the inlet to the device, unscrew the lower valve union. We connect the tonometer hose to it
After setting the pressure value at the boiler inlet, unscrew the upper union. We connect a tonometer to it to adjust the pressure at the inlet to the burner
We start the boiler, after which we adjust the values of the water heating temperature for sanitary and hygienic purposes and the heating system
To adjust the operation of the boiler at minimum pressure, remove the wire connected to it from the modulator, then make the adjustment
Step 1: Connecting the tonometer to the lower nipple
Step 2: Connecting the Tonometer to the Upper Valve Connection
Step 3: Setting the temperature for water and heating medium
Step 4: Setting the boiler to operate at minimum power
We define tenths on a scale literally "by eye". To set 3.7 mm, find about the middle between 3 and 4, then slightly shift the reading to 4. Well, you can say, and set up.
Now we twist the fitting and assemble the boiler, after which we start and check its operation. The error of the adjustment made in the example did not exceed 1%, which is really great for home performance.
Likewise, all retrofitting and reconfiguration work is carried out on many two-circuit wall-mounted units. These devices include products from Airfel, for example, the Digifel and Digifel DUO models.
Conversion steps with torch change
The design of a number of boilers is arranged in such a way that there is no point in turning out the nozzles separately. For them, manufacturers produce modules designed for liquefied gas. You can easily change the burner module, for example, in the Navien Deluxe boiler.
All work consists in replacing the manifold with injectors with exactly the same device, but with holes of a different size. The fact that it will be factory-made is a definite plus, guaranteeing the tightness of the gas pipelines. There is no need to doubt its further safe operation.
Conversion and conversion work in this case is carried out as follows:
- Disconnect the unit from the power supply and turn off the valve on the gas supply pipe.
- Remove the front panel from the boiler body.
- Disconnect the electrodes connected to the ignition system.
- We dismantle the gas supply pipe located within the boiler, having previously unscrewed the 4 screws holding it.
- Remove the cover installed on the closed combustion chamber. To do this, unscrew 11 screws.
- We dismantle the overheating protection sensor together with the bracket intended for it.
- We remove the manifold together with the nozzles attached to it. To remove it, unscrew the two screws to the right and left of the device.
- We install on the new collector to be installed a sealing ring that seals the inlet of the gas pipe. We mount the new manifold in its original place and fix it with screws.
- The microswitch, the fifth from the bottom, is translated to the right. So we reconfigure the device to work with liquefied gas.
After these simple manipulations, we assemble the boiler, observing the reverse sequence. In the same way, alteration and reconfiguration of most floor-standing gas boilers is carried out, especially if they are of the condensing type. This version of boilers is most often even designed for translation.
The following photo selection will help you visually familiarize yourself with the procedure for replacing a manifold with gas nozzles and setting up a boiler:
Image gallery
Photo from
To convert the boiler for operation on liquefied gas, we buy a collector with nozzles of the size recommended by the manufacturer
In order to remove the old manifold with nozzles and replace it with a new one, we disassemble the boiler. First, dismantle the front panel
To remove the cover of the closed chamber, first disconnect the wires from the gas boiler ignition system
Remove the gas supply pipe to the burner that interferes with reaching the collector. To do this, unscrew four screws.
We remove the sensor of the protection device against overtemperature during the operation of the boiler. It is not detachable
We unscrew the screw holding the bracket from the protection system sensor. It interferes with removing the cover from the burner. Dismantle the holder
In order to remove the cover from a closed gas burner, unscrew 11 pieces of screws
Carefully "picking up" the edge of the cover from the closed burner, we push it out of its original place, trying not to deform
Step 1: Buying a replacement manifold
Step 2: Removing the front panel of the boiler
Step 3: Disconnect the ignition wires
Step 4: Dismantling the gas supply pipe to the burner
Step 5: Removing the overheat protection sensor
Step 6: Unscrewing the sensor bracket
Step 7: Removing the screws from the burner cover
Step 8: Separating the closed burner cover
Now all that remains is to change the manifold and set up the gas unit to operate from cylinders or a gas holder:
Image gallery
Photo from
We examine the space of the combustion chamber. Smoked walls are a good sign, which means that the manufacturer checked the operation of the unit
Having unscrewed two screws to the left and right of the manifold, we remove it to put another device in its place
Having removed the sealing ring from the previous collector, we move it to the installed device. We connect it
The fifth microswitch from the bottom, located on the control board, is shifted to the right. Configuration complete
Step 9: Inspecting the interior of the combustion chamber
Step 10: Disconnecting the Natural Gas Manifold
Step 11: Installing the LPG manifold
Step 12: Setting the boiler to LPG
However, you should be aware that both of the above modification techniques are generally not implemented with all models of units. There are boilers that you shouldn't even try to convert to liquefied gas, especially units that have been produced for a long time.
In any case, before planning the rework and translation, you need to ask the representatives of the company that performed the first launch if such a project can be implemented. It is also worth studying the passport of the gas processing equipment and the manufacturer's recommendations. Usually there is a possibility.
Safety recommendations
The conversion of the boiler and its reconfiguration to the consumption of liquefied gas dictates the need to "reconfigure" your attitude to the device for supplying and storing blue fuel.
Be sure to remember that:
- Cylinders or gasholders, which are gas storage tanks that supply fuel to household equipment as needed, need to be refilled periodically.
- To refuel a group of cylinders or a gas holder with gas, you need to contact certified organizations that have equipment for fixing the weight of gas in the cylinder and its real volume in the gas holder.
- Closed gas tanks are filled to 85% of the useful volume of the vessel. This reserve is necessary in the event of thermal expansion of the fuel to avoid an explosion.
A non-hazardous but sensitive situation when replenishing stocks of liquefied blue fuel is filling with a liquid with a density that differs from the density of the previous liquid. Due to this difference, the residual liquefied gas may not mix with the newly filled batch.
In the reservoir, from the density difference, a kind of two non-connecting sectors is formed, in each of which liquefied gas circulates. However, after a short period, convective heat transfer will occur at the boundary of the sectors. After equalizing the temperatures, the densities will equalize and the liquids will be able to mix.
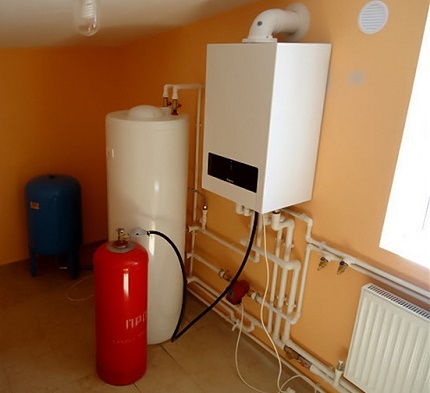
Liquefied gas, like main gas, is a highly flammable, combustible liquid with a high flame propagation speed. In order to avoid catastrophic situations, you should strictly follow the operating rules and fill the cylinders no more than 85%
Usually this process, meaning direct mixing, is accompanied by intensive evaporation of liquefied gas. To avoid the associated losses, mixing devices should be used during the filling process. But it is better to choose a method that allows you to exclude the above phenomenon.
Replenishment of cylinders and a gas tank with blue fuel in general is a process that requires increased attention, otherwise the problems can be very serious and even catastrophic. Rapid spreading and evaporation of the liquefied gas mixture is recognized as a significant problem.
If not violated rules for safe operation equipment consuming gas, the main methane rarely explodes. This happens only with significant leaks, if the technical state of the gas in the surrounding space changes dramatically. For example, in a kitchen with obvious signs of a leak, instead of compulsory ventilation, they turn on the light.
Liquefied gas, when expanding in a closed vessel from external heating, will necessarily explode if sufficient space is not left in the tank for its expansion. Blue fuel burns extremely intensely. As the gas is rapidly absorbed by the atmosphere, the combustion zone expands at a high rate.
Conclusions and useful video on the topic
The following video will acquaint you with the organization of heating on liquefied gas and the procedure for transferring the boiler to its consumption:
The technical and technological essence of transferring the boiler to the consumption of a gas mixture in liquefied the state needs to be known both to independent home craftsmen and customers of workers' services gas service.
It should be remembered that the second option is preferable, since the gas is explosive, toxic and flammable. In addition, third party intervention will invalidate the hardware warranty.


