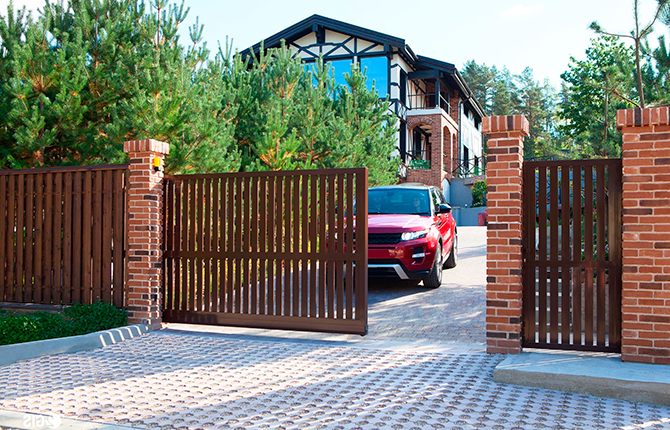
Sliding gates are an alternative to classic swing gates. The structure consists of guides, shield, frame, rollers, electric drive (optional). There are a lot of details, but still it's not a problem to make a sliding gate with your own hands if you know the basic nuances. The sliding mechanism has several advantages - safety, simple control system, convenient automation.
The content of the article:
- The device and principle of operation of sliding gates
-
Features of the design of the structure
- Drawings for manufacturing
- Height and width data
- Counterweight calculation
- Calculation of the strength of the fittings
- General rules for the selection of components and fittings depending on the weight of the gate
- Additional calculations
- Restrictions on the installation of sliding gates
-
Manufacturing of cantilever sliding gates and installation steps
- Materials and tools
- Preparation of parts for the rollback mechanism
- Brick pillars
- Pit marking and excavation
- Manufacturing of embedded structures
- Installation of the embedded element in the pit
- Wiring for gate automation
- Pit concreting
- Welding
- Fixing the knurled end roller
- Bracket Upper Guide Stopper Fasteners
- Sash manufacturing
- Painting and installation
- Adjusting the position of the roller bearings
- Installation of automation
- The final stage
- Sliding gate
- Service
- Common mistakes
The device and principle of operation of sliding gates
The structure got its name because of the opening method. The door leaf moves along the fence, that is, in the plane of the doorway, thereby taking up less space.
There are three types of sliding gates:
- rail;
- suspended;
- console.
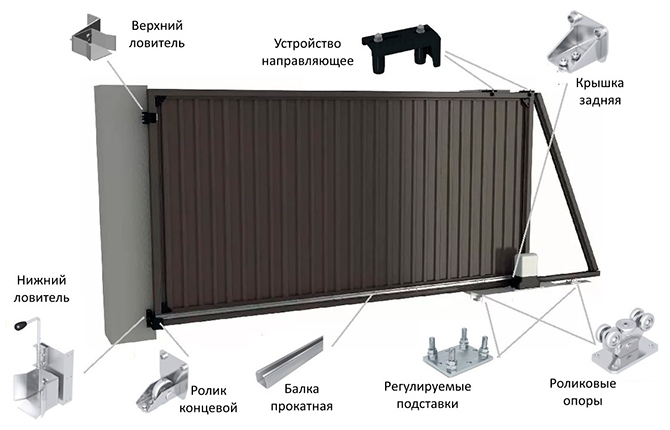
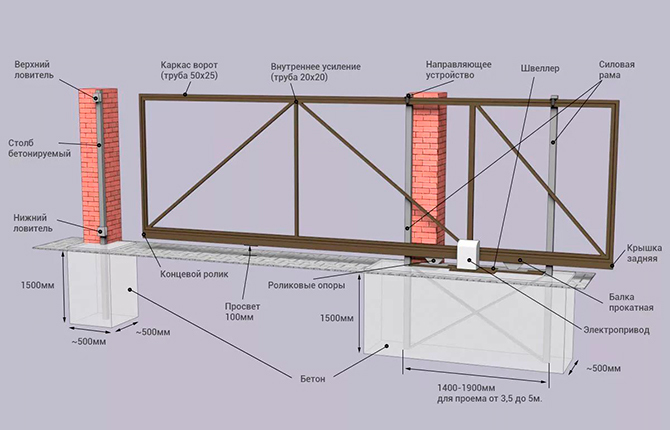
In the design of sliding gates, there are rollers on the rail located in the lower part. The whole structure rests on them, with their help, the canvas moves. The roller support goes to the rail laid in the road surface. In the upper part, the gate is held by a bracket on which the side rollers are fixed.
The rollback of such gates is equal to the width of the opening.
Disadvantages of the design:
- the rail is located across the entire width of the passage;
- the latter is always clogged with mud, and in winter with snow and ice, which is fraught with problems with opening the gate. Therefore, the rail must be cleaned periodically. It is possible to install a heating cable, which solves the problem of icing, but this increases installation costs, plus additional costs for electricity.
In the design of the second, there is an upper beam, along which the gate moves on rollers. It is she who limits the height of the passage. Although it is possible to install a gate with a removable top beam. But this complicates the design and reduces its reliability. A removable beam is also an increase in financial costs. The width of the gate is equal to the length of the rollback.
Sliding gates of the third type are most often used today. It's all about the roller supports, which are located outside the opening area, and it is not limited by anything. The design uses the same bracket as in the first version.
Sliding gates of this type are 1.5 times longer than the opening width. The additional part serves as a counterweight to the main structure, has a trapezoid or triangle configuration. It increases the space for the gate to move. A more powerful foundation is being built for this variety.
Read also: How to make a garage door with your own hands: diagrams and step-by-step instructions.
Two more elements are added to the device of the cantilever sliding gates - the upper and lower catchers. They keep the canvas in balance when it is closed. Elements are located on the opposite pillar of the gateway. At the same time, there is a shelf in the lower catcher, on which the console rests when closed.
Features of the design of the structure
To create a drawing, two parameters are used: the width of the opening and the height of the sliding gate. The latter is important purely in operational quality if suspended models are made. In other cases the size is selected taking into account the design appearance.
In the future, we will consider the console version, as is often used in private housing construction.
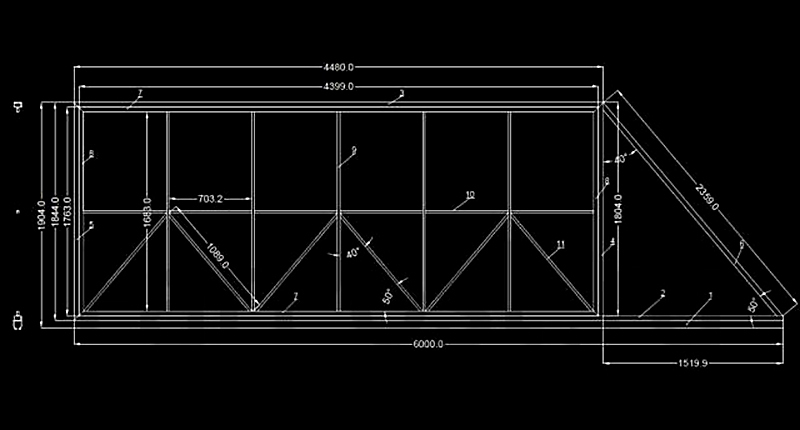
Drawings for manufacturing
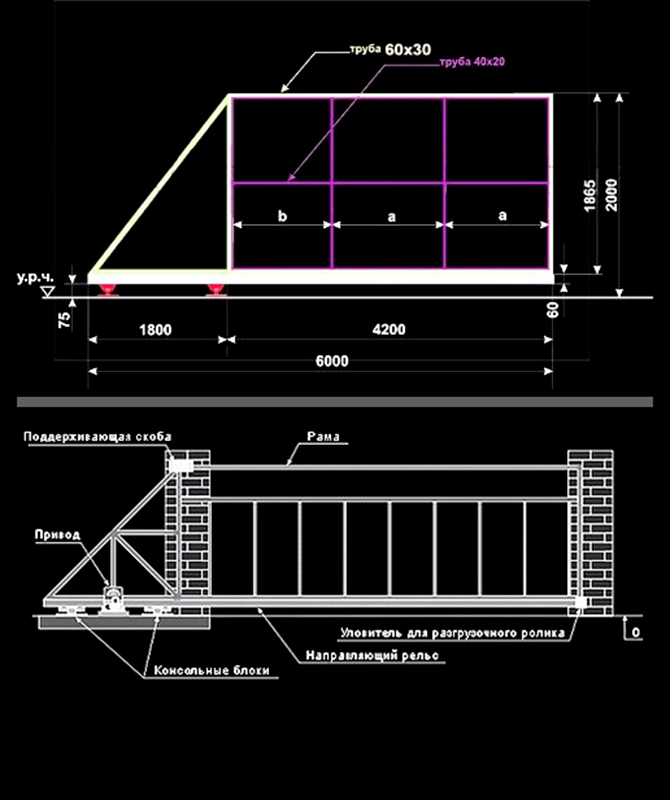
The drawings of sliding gates must be approached from the standpoint of simplicity of design. It has two important elements:
- cantilever beam;
- two roller bearings.
The first rests against the second and moves along their location. The gates themselves are mounted on top of the beam, usually using electric welding. The rollers are installed outside the opening.
Both of these elements are finished products. These can be purchased at a hardware store. Depending on the weight of the doors themselves, consoles and rollers of different sections and sizes are sold. Although we must pay tribute to the craftsmen who offer consoles and roller carriages manufactured do it yourself.
The cantilever door leaf is a frame sheathed with some kind of flat material. Today, corrugated board is often used. We have a detailed article on how how to make a gate with your own hands from corrugated board. Previously, they were sheathed with boards or metal sheets. One of the popular options is a frame with forged steel decorative elements. It is he who reduces such an indicator as the windage of the gate, which affects the reliability. That is, the lower the windage, the higher the reliability.
For the manufacture of the frame, a profiled pipe of different cross-section is used: external with a large cross-section, for internal filling with a smaller one.
You can make a sliding gate with your own hands according to the ready-made drawings below. They can be taken as a basis, taking into account the dimensions of the structure.
Diagrams of cantilever sliding gates are understandable to a person who does not even have a special technical education. The main thing is to correctly make the required measurements, which will be needed in calculating the dimensions of the gate structure.
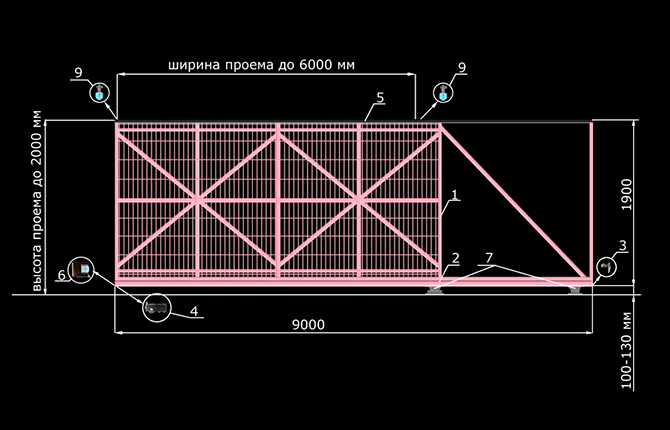


Height and width data
First of all, the width of the gate is determined, which depends on the width of the opening, that is, on the distance between the entry pillars. The last parameter is calculated taking into account the width of the car (the distance between the side-view mirrors). And 30-50 cm is added to this size on each side.
The gates themselves must be made more by 10 cm on each side, so that they cover not only the opening, but also some of the pillars. In this way, it is possible to ensure that no gaps remain between it and the pillars when viewed from a side view of the structure.
When calculating the width, they take into account how the car will enter the site. If the road hits the gate, then the calculation remains unchanged. The same will happen when entering at an angle of 90º. If at a smaller angle, then the distance between the posts must be increased.
It's all about reducing the gap between the machine and the posts. And if the road is dirty or there is snow on it, then there is a high probability that the car will skid when sliding. In this case, a small gap may not save you from hitting the pole. Therefore, the width of the opening in this particular case must be further increased on each side by 10-20 cm.
About the height of the sliding gates - there is an opinion that this size should correspond to the height of the fence. Outside, such a structure looks more aesthetically pleasing. Although each is determined with this parameter independently. But the higher the height, the heavier the sliding gates themselves, plus the higher the windage. Accordingly, the cost of the structure and the complexity of its assembly increase.
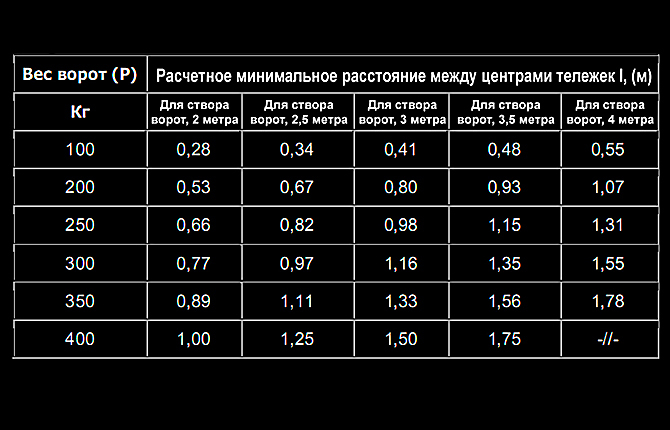
Counterweight calculation
As indicated above, the length of the counterweight is equal to half the width of the opening. If the sliding gates are not heavy (300-400 kg), then the length can be taken at the rate of one third of the width of the entrance.
The same size can be used if the counterweight configuration is rectangle.
Calculation of the strength of the fittings
The strength of the fittings is the main indicator that affects the service life of sliding gates.
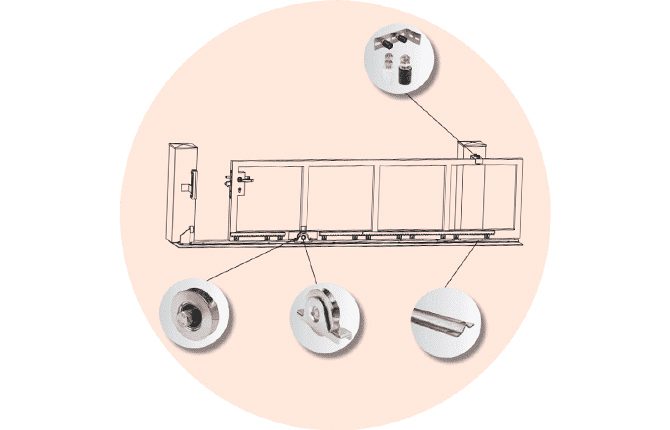
The accessories include:
- two roller bearings;
- lower supporting beam;
- two catchers;
- a supporting bracket located on the post, on which the rollers are mounted.
This is usually sold as a set. Manufacturers offer different models of components that differ from each other in the thickness of the material. The choice depends on the weight of the sliding gate.
Approaching the calculation of sliding gates, one must take into account not only the dimensions of the structure, but also the weight of the material from which it will be assembled.
General rules for the selection of components and fittings depending on the weight of the gate
Sliding gates with different sizes are, first of all, a different weight of the product. It is according to the last parameter that components are selected, which differ in technical and operational characteristics. Below are the characteristics of the fittings for different cantilever doors from the "ALUTECH" company.
1100-1500 kg
The heaviest gates that are not installed on private sites. They are installed at production facilities.
Hardware specifications:
- Rollers. Suggested dimensions: 190x480x175 mm. The diameter of the rollers is 100 mm. It is taken into account that the first support will withstand a load of 3.4 tons, the second 1.5 tons.
- Bottom catcher made of 5 mm thick steel. Suggested sizes: 188x153x100 mm.
- Top catcher made of 4 mm thick steel. The dimensions are the same.
- Support beam. Made of 5 mm thick steel. Height and width - 130x135 mm.
800-1000 kg
All the same sizes in order:
- Rollers - 100x251x138.5 mm. The diameter of the wheels is 61 mm.
- Bottom catcher - steel thickness 4 mm. Dimensions: 140x101x95 mm.
- Upper catcher - 3.5 mm thick.
- Support beam - 4.5 mm thick. Dimensions of height and width: 89x74.
600-700 kg
Hardware specifications in the same order:
- Rollers - 80x167x112 mm. The diameter of the wheels is 55 mm.
- Bottom catcher - metal thickness 3.5 mm. Dimensions: 100x82x80 mm.
- Upper catcher - thickness 3-3.5 mm.
- Support beam - 3.5-4 mm thick. Height, width: 70x60 mm.
300-500 kg
Hardware specifications:
- Rollers - 178x90x117.8 mm. The diameter of the wheels is 43 mm.
- The dimensions of the bottom catcher are 100x96x67 mm. Metal thickness - 3 mm.
- Upper catcher - thickness 3 mm.
- Support beam - wall thickness 3.6 mm. Dimensions 60x55 mm.
The only thing that you need to pay special attention to is the material from which the components are made. It should be a high-strength steel, for example, S355 grade.
Additional calculations
For the construction of foundations for cantilever sliding gates, three options are used. One has the shape of the letter "P". That is, these are two recessed pillars on which the concrete tape rests. And this whole structure must be monolithic and reinforced. In this case, the depth of the pillars should be greater than the depth of soil freezing.
This is a rather complex and time-consuming option, therefore, in private housing construction, either a buried tape or two free-standing pillars are used. In all three cases, a channel is placed on top of the foundation structure, which becomes a support or base for the rollers of the sliding gates. It is attached to a reinforcing lattice laid in the prepared formwork under the foundation. Fastening method - electric welding.
As for the size of the foundation itself, then:
- the depth of the laying is the depth of freezing of the soil in the area of \ u200b \ u200bthe construction of the house, plus 10-15 cm;
- the length is equal to the length of the counterweight.
The width is more difficult. This parameter will depend on the width of the entrance opening. The larger the latter, the wider the foundation.
Restrictions on the installation of sliding gates
There are no special restrictions for the installation of sliding gates. Situations may simply arise that interfere with the installation work. For example:
- A tree grows on the rollback line of the structure, which must be removed. To sleep or not, the developer decides.
- If air or underground communications are laid in the gate area.
- There is some kind of building in the rollback zone. It could even be a neighbor's fence.
- Non-straightness of the relief.
Manufacturing of cantilever sliding gates and installation steps
A step-by-step instruction for the manufacture and installation of do-it-yourself sliding gates is a sequence of construction operations:
- Determination of the size of the gate, taking into account the width of the passage.
- Creation of a drawing of a canvas. Determination of its weight, taking into account the frame and sheathing.
- Selection and purchase of accessories.
- Installation of support pillars. They can be metal, from a metal profile or assembled from masonry material: brick, concrete blocks, stone.
- Foundation construction: marking, earthworks, installation of a reinforced grating with a channel welded to it, pouring a concrete solution.
- Installation of fittings. Roller supports are attached to the channel even before it is connected to the reinforcement cage and concrete is poured.
- Installation of sliding gates.
- Painting of the structure.
Materials and tools
Here it is necessary to make a division according to the construction work carried out. This is the assembly of the frame of the door leaf and the construction of the foundation. Therefore, for the first construction operation, materials will be required:
- Profiled pipes. One of the options - a section of 60x40x2 mm is used to assemble the frame. Section 40x20x2 mm for internal elements of the canvas.
- Sheathing of sliding gates: corrugated board, boards, steel sheet, etc.
To assemble the frame:
- Welding machine.
- The corner with which the angles of the joints of the profile pipes are set.
- Clamps for fixing frame elements.
For the construction of the foundation for sliding gates, the following materials are needed:
- Cement, crushed stone and sand for mixing concrete mortar.
- Channel No. 20 for base for rollers. This is not the only option.
- Steel reinforcement with a diameter of 10-12 mm for a reinforcing grid.
From tools for mixing concrete - shovels and a concrete mixer. For digging up soil - shovels, crowbars.
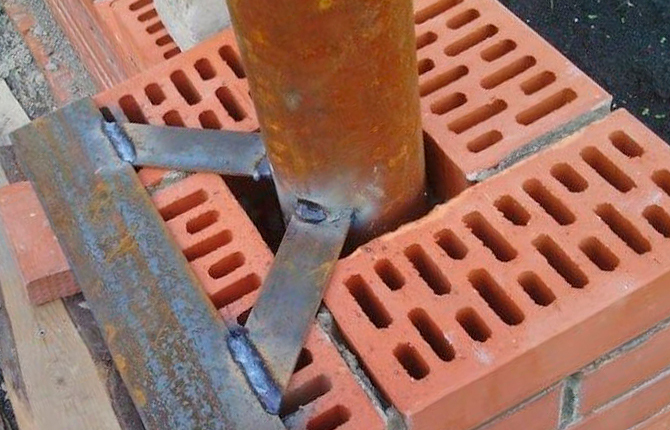
There is one more element that will be required - mortgages. These are steel corners that are inserted into brick or block masonry at the level of installation of traps and support brackets. It is clear that if the pillars are steel pipes or other rolled metal, then the mortgages do not need to be attached to them. The hardware itself is directly attached by welding to metal surfaces.
Preparation of parts for the rollback mechanism
At this stage, you need to prepare the support beam and rollers. Roller supports are either ready-made or self-made elements. They just need to be installed on a channel support and welded to it. The distance between the rollers depends on two parameters of the design of the sliding cantilever gates: weight, dimensions.
Brick pillars
The support posts for the gate can be made entirely of brick. But there is a safer option. To do this, a profile pipe or a regular one with a round section is installed as a base, and then it is lined with brick. Embedded parts are also welded to the pipe.
Like all supporting structures, pillars are load-bearing elements. Therefore, a solid foundation of concrete of a grade not lower than M300 is poured under it. The optimum laying depth is below the level of soil freezing.
For each post:
- a well is dug;
- the bottom is covered with coarse sand with a layer of 10-15 cm, but it can be replaced with fine-grained crushed stone;
- a reinforcing frame made of reinforcement with a diameter of 10-12 mm and a cross-section in the form of a triangle or square is inserted inside;
- concrete is poured, which after that must stand for 28 days to gain brand strength. After this time, the structure can be loaded.
It is at the stage of formation of the reinforcement cage that it is necessary to install a profile pipe in the pit by welding it to the frame. The pipe must be aligned strictly vertically.
Brick cladding is carried out using standard technology, as shown in the photo below. Here you can clearly see how embedded parts are attached to the pipe.
Pit marking and excavation
The foundation for the channel and roller supports is selected taking into account the bearing capacity of the soil. The simplest option is columnar For this:
- At least two wells are made with a garden drill with a diameter of 200 mm. It all depends on the length of the counterweight. With a drill, everything is easier, faster and more convenient.
- Reinforcing frames made of reinforcement are installed inside. The section can be round, square or triangular.
- A channel support is welded to the frames. Welding can be carried out before the installation of the reinforcement structures.
- Pouring concrete mortar into wells.
The strip foundation for sliding gates is more difficult to make. There will be a lot of earthworks here.
Marking is done on the ground:
- pit length - the length of the gate counterweight;
- width depends on the length of the gate structure;
- depth - below the depth of freezing of the soil by 10-15 cm.
The soil is removed with the help of shovels, if we are talking about hand-made work.
Manufacturing of embedded structures
Usually, a strip foundation is reinforced with reinforcing structures in the form of two grids installed vertically and connected by jumpers from the same reinforcement as the entire frame. The mesh size of the gratings depends on the loads to which the foundation is subjected. Rebar diameter - 10-12 mm.
The embedded structure is assembled outside the foundation trench. A channel support is immediately welded to it. To strengthen the latter, you can additionally weld several reinforcing bars.
Installation of the embedded element in the pit
There are two requirements here:
- The entire embedded structure is installed so that the channel is tightly pressed against the support post.
- The channel should be located strictly horizontally.
Wiring for gate automation
If it was decided to automate the sliding gates for the convenience of opening and closing, then even at the stage of forming the foundation, it is necessary to lay electrical wiring to the electric motor and the automation system. To do this, use the cable that is included, or purchase it according to the recommendations of the manufacturer of the opening mechanism.
The wire must be laid in a protective pipe - it can be plastic or metal. It is important here that moisture does not get inside. Therefore, the ends of the pipe are sealed.
The place of laying is the foundation. The pipe is attached to the reinforcement cage.
Pit concreting
For this stage of installation of sliding gates, a concrete solution of a grade not lower than M300 is used. The concrete is poured after installing the embedded structure and placing the channel horizontally: in the transverse and longitudinal directions at the same time.
The mixture is poured with tamping using a deep vibrator to remove air that has got into the solution during mixing. Air bubbles reduce the strength of the concrete structure.
Welding
At this stage, roller carriages are welded to the support channel. The place of installation of the latter is determined in advance. Welding is carried out around the entire perimeter, because the rollers are subjected to heavy loads, especially bending.
It is important to correctly position the first roller near the support post. Usually it is 10 cm from the support along the channel.
It is best to disassemble the roller carriage before welding. It consists of two parts:
- support with adjusting bolts;
- rollers fixed on a metal stand.
First, the first is welded to the channel support, then the second is put on it, or rather on the bolts, pressing it with nuts.
Fixing the knurled end roller
This is the bottom catcher of the gate on rollers, which is installed on the pole opposite to the rollers. For this, a support bracket is placed on the roller carriages. A trap is mounted 10-15 cm above it. This is where the embedded part inserted into the brickwork should be installed.
Fixation is done by electric welding.
Bracket Upper Guide Stopper Fasteners
Everything is the same here as with the bottom element. Fastening is carried out to the mortgage by electric welding. The only thing is that welding is carried out pointwise in case something needs to be changed in the location of the catcher. This is often the case when the final adjustment of the sliding gates is made with roller bearings.
Sash manufacturing
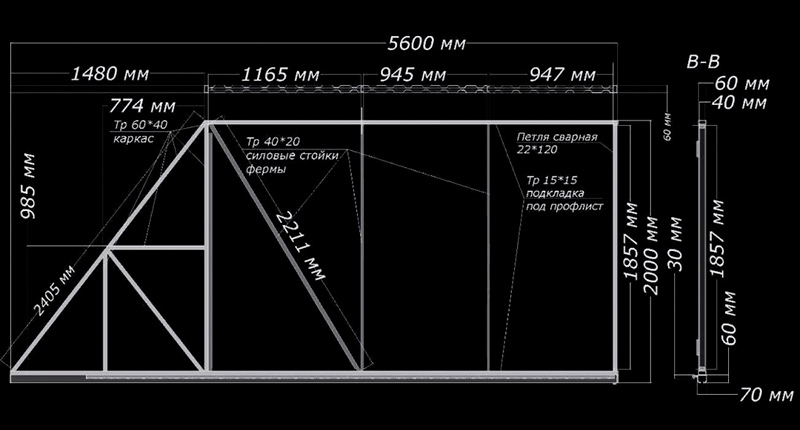
The sliding gate leaf consists of two parts: a leaf and a counterweight. The latter is not sewn up with a finishing material, so it is assembled from one frame. The sash is sheathed, so this is a two-frame product.
The outer one is made of a profiled pipe of a larger cross-section. It is a supporting structure. The inner one is assembled from a pipe of a smaller section. It is to it that the finish of the gate is attached. Several crossbars made of the same material will increase the rigidity of the structure, which is important during intensive operation of the structure.
As soon as the canvas is ready, a support console is attached to it, or rather, to its lower profile. Electric welding is also used here.
Painting and installation
After assembling the canvas:
- all welding joints are processed with a grinder or grinder;
- the structure is degreased;
- a primer is applied;
- colored.
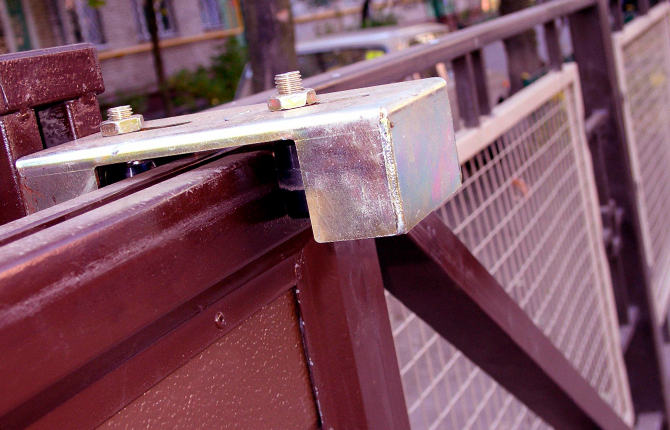
After the paint has dried, the gate is practically put on rollers, which should be inside the support beam. At the top, the frame is inserted into the support bracket, as shown in the photo below. Do-it-yourself sliding gate frame installation is a simple process.
Adjusting the position of the roller bearings
After the installation of sliding gates has been completed, it is necessary to adjust the roller carriages. It should be noted that the carriages are not welded to the support channel. They are fastened with studs or bolts that are welded to the support. Because after installing the gate, it is necessary to align them with the opening.
There are four types of alignment:
- Height. This makes it possible to install the structure above the roadway in the required parameters. If automatic gates are used, then such an adjustment allows you to set the required clearance between the gear of the electric drive mechanism and the rack.
- Across. This allows the installation to be carried out, in which the gap between the frame and the plane of the opening is maintained.
- Along. Carriages are aligned on one axis.
- Horizontality in a plane that is perpendicular to the plane of the opening. This is the only way to guarantee the verticality of the door.
Installation of automation
The mechanism for automatic opening and closing of sliding gates includes:
- electric drive with gear;
- rack;
- two limit switches that turn off the drive when the gate reaches one of the end positions;
- signal lamp.
A mounting frame is mounted under the drive next to the support rail. It is attached to it with four bolts. The toothed rack is welded to the side of the support beam along the entire length of the latter. This operation is done with the gate open.
Next, the installation of two limit switches is carried out. One at the edge of the gate works for opening, at the rear at the front edge of the counterweight for closing.
The final stage
The gate is finished here. The most budgetary option for finishing material is corrugated board. It is cut to length so that it completely covers the inner frame of the gate structure. The sheets are overlapped in one wave. Fastening is done with self-tapping screws for metal with a wide washer.
Instead of corrugated board, you can use boards, sandwich panels, sheet metal.
Sliding gate
Installing a wicket in a sliding gate is a tempting offer, but such a decision is associated with a number of unpleasant nuances:
- It is inconvenient to enter such a gate. This is due to the height of the lower part of the frame, over which you will have to step over. It is very inconvenient to drag a bicycle or a cart through such a gate.
- It is also a problem for a tall person to enter the wicket opening; you will have to bend over strongly.
- The cut-out part reduces the rigidity of the door structure.
- Two types of handles are installed in the gate of a sliding gate: recessed, it is also hidden, or small. Both are not the most convenient options.
Therefore, it is better to install a wicket next to a sliding gate as a separate functional element.
Service
If manual sliding gates were made, that is, without automation and a drive, then periodic maintenance is reduced to the elimination of areas of metal corrosion and lubrication of rotating parts - rollers. These procedures will extend the service life of the door and ensure smooth movement without distortion.
If an electric drive is added to the structure, then the number of preventive measures increases:
- cleaning the rack and pinion from dirt;
- cleaning of photocells and limit switches;
- voltage check.
It is impossible to lubricate the rack and pinion, they will quickly become overgrown with dirt.
Common mistakes
It is not difficult to make cantilever sliding gates with your own hands. But if you lose sight of some points, you can end up with a design that after some time will not work correctly.
Common mistakes:
- Measurements were made incorrectly, which affected the dimensions of the sliding gates.
- The foundation for the roller carriages has been poured incorrectly. Particular attention should be paid to the depth of the burial. A shallow structure in the process of heaving of the soil will begin to deform and shift. This is a guarantee that the gate cannot move along the rollers.
- If the counterweight was made short. Balance is an important indicator of sliding gate operation. If the weight of the canvas is not balanced, then the whole structure will “nod off”. This situation can affect the rollers, which will be subjected to high bending loads.
- The door leaf must be rigid. This is the only way to resist the deformations that the structure undergoes under the influence of wind and loads. Therefore, stiffeners are an important element. You can't make a gate without them.
- You cannot mount the rollers without an adjusting platform.
- The section of the support rail must correspond to the length of the gate and its weight. An incorrectly selected ratio will lead to deformation of the rail and rapid wear of the roller carriages.
The simplicity of the design of sliding gates is fraught with many nuances, on which the quality of the product depends. Neglecting any of them, you can lose money invested in the construction. After all, improper work and operation leads to the appearance of unpleasant moments that lead to breakdowns in the future.
And what do you think is the best proven over the years classics in the form of swing gates, or sliding gates? Share your opinion in the comments. Save the article to bookmarks, share it on social networks.