Content
- 1 Criteria for the selection of foam
- 2 Advantages and disadvantages of the material
-
3 Technology of facade insulation with foam
- 3.1 Wall preparation
- 3.2 Installation of the start profile
- 3.3 Installation of foam boards
- 3.4 Waterproof reinforced layer
- 3.5 Install perforated corners
- 3.6 Main reinforcing layer
- 3.7 Plastering
- 3.8 Painting
- 4 Video
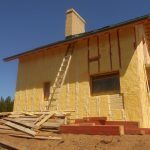
High-quality insulation of the facade of the house is of great importance in harsh climates, constantly rising prices for energy and electricity. Today, there are many options for thermal insulation, but the facade insulation with foam whose technology is not particularly difficult to install on its own, is the most popular of them.
Criteria for the selection of foam
Polystyrene insulation materials are the most common materials to date. This group includes polystyrene, as well as a more modern and durable extruded expanded polystyrene, the most famous brand of which is Penoplex, which over time has become common noun.

Penoplex is made in the form of sheets with a thickness of 2 to 10 cm and a size of 0.6 x 1.2 m. The choice of thickness and density of the plates depends on the climatic zone.
The higher the density, the higher the numerical indication of the brand. So, the least dense foam is PBS-15. Most often, the insulation of facades with penoplex, the technology of which is described below, is made by the brands PBS-15 (for buildings made of wood or brick), PBS-25 (for insulation of walls made of concrete). In regions with a harsh climate, the technology for insulating the facade with penoplex involves the use of the PBS-35, 50 brand. In addition to the choice of density and thickness of the plates, the following criteria exist:- size and weight of polystyrene foam boards;
- coefficient of heat conductivity and moisture absorption;
- manufacturing firm;
- selection by cost;
- indicators of compressive strength.


Advantages and disadvantages of the material
Insulation of facades with expanded polystyrene allows successfully solving such problems as heat preservation in the cold season and coolness in the hot season, as well as protecting the integrity of the ceilings.
The advantages of penoplex are:
- in comparison with foam plastic, polystyrene and mineral wool, which insulate the facade of the house, foam foam has a lower thermal conductivity;
- profitability of material consumption, respectively, and cash. By comparison, insulating facades with polystyrene requires a much greater consumption of material;
- increased moisture resistance;
- resistance to mechanical and chemical influences;
- long service life;
- environmental safety of the material;
- simplicity in installation and processing;
- not subject to rotting processes, the occurrence of fungus and mold;
- a light weight;
- the versatility of the material allows it to be used for any type of surface.
In addition, the material is not completely non-flammable, but it refers to self-extinguishing polymers that do not allow the spread of fire.
Among the disadvantages, it can be noted that the high density of the material complicates the cutting process. Since the material is vapor tight, the technology of facade insulation with expanded polystyrene must necessarily include the creation of small air gaps, especially on wooden walls, otherwise moisture accumulates under the heater, leading to destruction surface. One of the disadvantages can also be considered the instability of the foam complex to organic solvents.

Technology of facade insulation with foam
Thanks to special recesses located at the edges of the foam plates, they are firmly connected to each other, preventing the formation of cold bridges. The technology of facade insulation with extruded polystyrene foam is as simple as the facade insulation with foam, but the material consumption is much lower. When warming the facade, it is necessary to follow step-by-step instructions, as a result of which high-quality and reliable protection of the exterior walls of the house is formed.


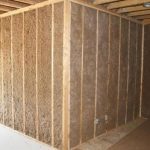
Wall preparation
Thermal insulation of the facade with penoplex will not be durable and strong if tight adhesion of the insulation material to the wall is not ensured. To achieve this, it is necessary to properly prepare the surface. To do this, first remove any dirt, dust, oil stains, the remnants of the old coating, all layers of which are cleaned until there is only a concrete or brick base. On the walls there should not be the slightest trace of vegetation, fungus, moss, mold. To do this, after cleaning the surface, it is necessary to treat it with special bactericidal solutions.
After the walls have dried, it is necessary to smooth out the existing small ledges or sag of the masonry mortar, and treat cracks and cracks with a primer and cover with cement mortar.

Using the level, the evenness of the walls is checked. If the deviations are more than 20 mm, they should be leveled using plaster, after which it is necessary to wait for it to completely dry, this can take up to four weeks. All metal elements on the wall, which subsequently appear under the insulation, must be coated with an anti-corrosion compound.
After the work done, the walls are carefully primed for better adhesion, and places with increased absorbency are treated several times. The next stage of work begins after the primer has dried.

Installation of the start profile
The installation of the starting profile is required, first of all, to set the level for the initial row of foam sheets and to serve as a support. It will also protect the lower end side of the plates from the effects of various harmful factors, both weather and physical. The width of the starting profile and the foam plate must match.
A flat horizontal line is measured with a laser. Penoplex is recommended to be spread 20 or 30 cm below the floor level of the first floor so that there is no dampness and freezing. The profile is attached to the wall with dowels in increments of 30-50 cm. The points of its attachment should fit snugly against the wall, but without metal wasting. Neighboring profiles are connected to each other by means of special connecting elements inserted into the gap between them.
Corners are formed with special corner elements or by joining straight profiles, for this they are cut at an angle of 45 degrees. When installing a foam complex with a thickness of 80 mm or more to lay the first row of tiles, temporary supports are installed to prevent sagging.


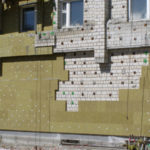
Installation of foam boards
After the profile is fixed, foam tile is cut. Around the door and window openings is a solid tile. The method of laying the slabs should be carried out on the principle of brickwork. The adhesive solution for laying is designed for use at an air temperature of at least + 5 ° C, otherwise reliable adhesion of the plate to the wall will not be achieved.

The base row of tiles is laid first on the starting profile, while the edge of the plate should abut against the bounding edge of the profile. Next, each plate must be pressed tightly to the surface with its alignment vertically and horizontally, while combining the joints. The adhesive protruding from the gaps must be removed immediately.

After laying each tile, check and adjustment with the help of a level is carried out. After the tiles are pasted, it is necessary to allow them to dry for at least three days. Then, the final fixation of the thermal insulation is made using dowels, which are installed in the corners of the tile and in the center. The gaps between the tiles are filled with scraps of foam and sealed with foam. After the foam dries, and its residues in the gaps are removed, you can immediately begin to create a reinforced layer.

Waterproof reinforced layer
A reinforced layer of fiberglass mesh will become a reliable basis for future protective coating with plaster. Before the main reinforcement, decorative and protective, it is necessary to apply a waterproof reinforced layer of mesh strips dimensions of 20x30 cm or 30x50 cm, which are installed near the outer corners perpendicular to the diagonals of the door and window openings.

In order to create good adhesion, the smooth surface of the foam sheets should be treated with a needle roller, emery cloth or a metal brush, and then apply a primer layer to it. First, the slopes are reinforced: a layer of glue 4-5 mm thick is applied to them so that the mesh cloth is completely immersed in it. Then the facades are reinforced so that the edges of the mesh overlap each other by 10 cm. After the glue dries, apply another layer of it. In places where the insulation is adjacent to window or doorways, an abutment profile with a sealing tape is mounted.


Install perforated corners
Strengthening of the corners of the facade, ribs of openings, other protruding elements is carried out using perforated corner profiles. They come in plastic and aluminum, as well as with a mesh pre-attached to them.

Installation is done by applying glue on both sides of the corner so that it touches the grid. Then it is firmly pressed to the insulation with a spatula, recessed into the adhesive layer, the excess of which is then removed. The angle level is set vertically and horizontally. The perforated corners are joined end-to-end, while part of the shelf and mesh are cut from its edge at an angle of 45 degrees. A cheaper reinforcement option is reinforcement with strips of mesh bent over by a corner. To do this, cut strips of mesh in the direction across the roll with a width of 30 cm and bend along. However, this option is not applicable for the insulation of private houses or the first floors of a building, since there is a risk of not sustaining the mechanical impact.

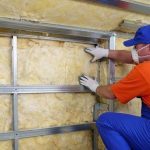
Main reinforcing layer
After reinforcement with the corners, the main reinforcement stage begins, which covers the entire facade. The reinforcing mesh is laid on tiles covered with a protective layer. It must be cut into strips of equal height and pressed onto the wall surface previously coated with a 2 mm adhesive layer. With a large length, you can glue them vertically, attaching them at a certain height with nails. The canvas needs to be smoothed, starting from the middle to the edges, removing excess glue. After this, a second coat of glue should be applied.
The edges of the mesh should overlap each other by 10 cm, otherwise cracks may form at the joints. If, at the same time, these areas are left without applying glue, and the solution is subsequently applied to two sheets of mesh at the same time, thus, the joints under the decorating layer will not be noticeable. After applying the main reinforcing layer, the insulation should be covered with another leveling layer with a thickness of 3 mm with a wide spatula.

Plastering
Three days after applying the reinforcing layer, decorative plaster can be applied. First, a primer solution, preferably containing quartz sand, is applied to the surface of the facade. It will create a rough surface that provides good adhesion and reduces moisture absorption. In addition, the primer “preserves” the reinforcing layer, not allowing it to collapse under the influence of external factors. The primer is applied with a brush of the macrowell.

Before applying, the plaster is mixed with a mixer until a homogeneous mixture is obtained. The surface of the walls is covered with plaster with a trowel and a trowel, while not too thin a layer that will degrade the protective properties of the plaster, and too thick, which will hide its decorative invoice. The formation of a textured pattern can begin when the layer of plaster has dried up and does not stick to the tool.
It should be remembered that the more evenly the reinforcing layer was laid, the more textured the pattern of decorative plaster.
Painting
After drying all the applied layers, you can proceed to painting the facade. In this case, the type of putty should be considered, for example, only hydrophobic paint should be applied to the mineral putty. Avoid paint, which may include substances that destroy the structure of the foam, such as benzene, acetone, ether resins, drying oil, kerosene, toluene. Silicate or mineral based paints are best suited for this.
To give the necessary shade, the colors in the paint are added one hour before the start of painting, which is done both manually, with a soft foam roller, and using a spray gun. Despite the fact that you can use plaster, which already contains color and do without self-painting, this the finishing stage of the facade insulation allows you to create a thermos effect, in which the heat in the house is maintained even in the most severe conditions.

Video
The video perfectly demonstrates the facade insulation with polystyrene foam technology work.
-
 Technology of insulation of facades of mineral wool
-
 The better to insulate the facade of the building
-
 How to make warm glazing without changing the facade
-
 What kind of insulation do you spend money on?
-
 Frequent mistakes when warming a house, places where cold seeps
-
 Is insulation at home effective outside
-
 What are the disadvantages of PVC floor tiles
-
 How to assemble a thermal insulation pie for a boardwalk
-
 Why do they regret after insulating the walls from the inside
-
 How to insulate a loggia and not break the law
-
 Is it worth it to insulate the basement
-
 The main mistakes in home insulation
New publications are published daily on our channel in Yandex. Zen
Go to Yandex. Zen