Many modern toilets are equipped with push-drain. This mechanism is very convenient and practical, so he is very popular among domestic consumers. However, under heavy use, even he sometimes fails, then it begins to work is not quite correct. Most often, this results in leakage because the valve can no longer hold the water in the tank. In addition to everything starts to get stuck and jam the button.
In today's article, we'll see why can break down the drain button. We also look at how it is possible to repair or replace (when she was not suitable for the repair).
The causes of the fault button cistern toilet
The content of the article
- The causes of the fault button cistern toilet
-
How to fix a button toilet tank
- If she sticks
- If it fails
- Replacing the toilet tank button
- instead outcome
There are several reasons why the button is out of order. However, the main only two:
- items worn and simply fallen into disrepair;
- lost settings valves - due to this mechanism starts around failures.
Let's Let us examine in more detail each of the issues. Most often, the drain mechanism is made of plastic. On the expensive models, it is more durable, so the term of service of such a mechanism is not limited to 2-3 years.

On the low-end models toilet mechanism can fail after a year of intensive use. Unfortunately, in many cases, eliminate the damage does not work, because the mechanism simply can not be repaired, which means that it is necessary to replace some items. Given the low cost of this is not hit hard on the wallet.
Since the drain mechanism consists of several separate items, initially is to understand which of the elements broke down, and only then go to the store for new items.
How to fix a button toilet tank
Sometimes repairs can be done on their own, and he performed for 5-10 minutes. The procedure and the method of repair can be different and depends on the type of failure.
First note, what are the signs of breakage. If the cistern is not obtained a sufficient amount of water, ie. E. tank recruited only partially, there it goes on the repair work, but only on the adjusting system.
Customize flushing is necessary by means of a float. Proper positioning of this element must provide the necessary water level. Experts recommend that the maximum water level was lower by 1.5-2 centimeters overflow edge.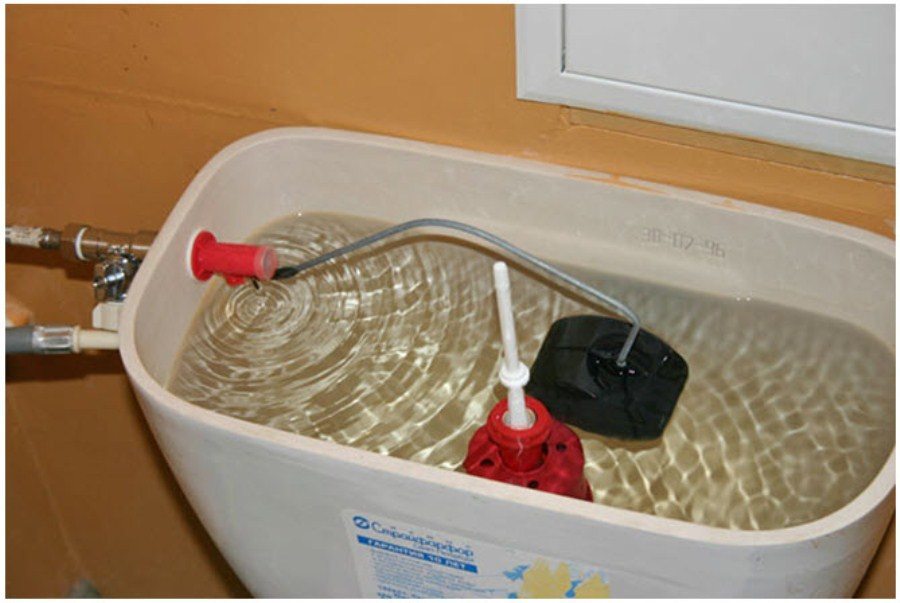
To set up the float, perform the following steps: at the lower supply valve to extract traction hooks of rack and pinions, then perform a displacement along the rail in the right direction - downward or up. The same manipulations are required to configure the valve side supply. The difference is only in the arrangement of the float.
If you want to adjust the button, then the movement of the overflow pipe, then configures the cup height. For this purpose the nut is unscrewed on the tube detaches and moves rod tube in the correct position. After that, the nut is tightened. Next, press the petals on the glass and move the guides. At the end of the thrust is snapped on the holder.
If the same problem with a button (usually when flushing takes place sticky or ceasing), then carry out repair work is possible only after a detailed examination of the mechanism and to identify the causes of failure.
When the problems started with the button, there is already regulation is not enough - you need to perform a complete repair.
If she sticks
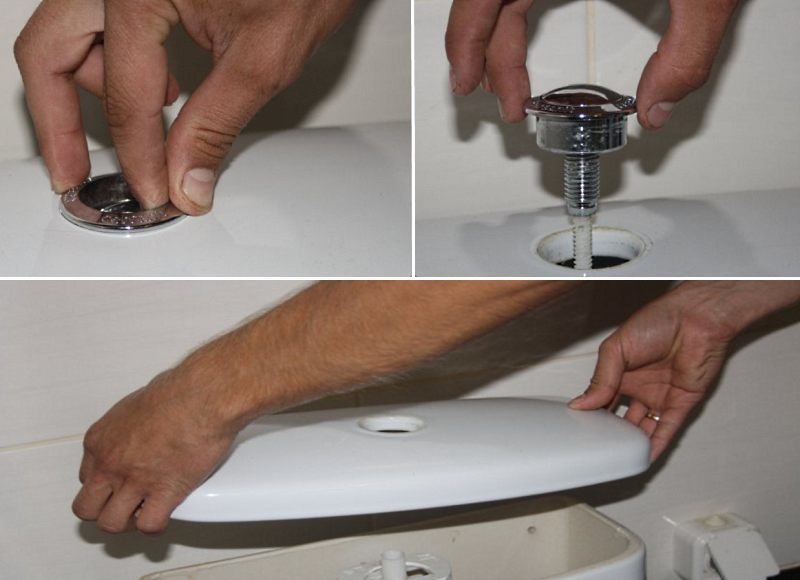
Button is jammed for various reasons. To resolve this problem, remove and completely disassemble the valve. This will require:
- to block water;
- unscrew the stopper ring;
- Eject button;
- remove the tank lid.
Then you can start to look for problems.
Important! If a two-button installed in the tank drain system, the dismantling process will be slightly different. First you need to press the big button. Thanks to this manipulation will groove. It is necessary to insert a screwdriver or an awl, and then she goes to, then shoot more. Beneath it is scheduled to open the screw that holds the slot with the button. Having turned the screw, you easily take off the lid.

If the valve is installed recently, the sticky button can be for one simple reason - you just very much delayed it. The reason for this - barbs on plastic surface elements, due to which the button and a stopper. If this is the case, you only need to make a sweep of the area with the help of nazhdachki.
Another reason for sticking - is the offset of the push lever. Thanks to him, thrust moves, so if it is displaced or skewed, the entire drain mechanism will just stopper. To restore drainage work, we need only to be adjusted and adjust the mechanism.
Another reason - in the nest buttons accumulated various deposits in the form of debris, dust and flying. To solve the problem can only be cleared, this operating unit.
If the button sticks due to wear one of the items, it must be replaced. In most cases, the call can be handled without the wizard, as the repair is performed for 10-15 minutes. If we call the plumber, then for his services will have to pay a tidy sum.
If it fails
If the button fails, the repair of the damage will look a little different. One of the main reasons for failure - discharge mechanism configured incorrectly. To setup the following manipulations must be performed:
- cut off the water and drain all of its residues from a tank;
- Eject button and remove the cover;
- completely remove the drain valves;
- perform the adjustment of the maximum water level;
- configure mechanism - it is important to bear in mind that the button is pressed should not be in contact with the pipe overflow;
- configure the float.
Furthermore misconfiguration, cause falling through push-button mechanism may be a malfunction of the return spring. If key assembly and the molded piece, there already have to replace the entire mechanism. If it is a collapsible, then produce enough replacement of a defective spring.
Replacing the toilet tank button
If the button is down, there is no need to replace the entire drainage system, you just change the button. Note that a new item should be the same model as the old one. Replaced on the following schedule:
- remove the faulty part by unplugging it from the cover;
- check the setting of all devices;
- install the new part;
- Check the flush valve operation.
Important! If the tank of the old model, it does not always turn out to find the parts you need. Often have to change the whole valve.
instead outcome
Despite the fact that there are so many models of toilets, they all have roughly the same drain system, and those differences that can be observed in these systems will not create serious problems when carrying out repair work on the keypad site.
Subscribe to our Social Networks


