The modern realities of our life are such that many of us have to save on everything we can. If the hands grow from where they should be, then the comfort of the hearth can be fully equipped without resorting to outside help. Many situations can be easily resolved without calling in electricians, plumbers or locksmiths. This will not only lower costs, but also increase your credibility with the household. If it becomes necessary to attach a new cistern to the toilet, then this will not be a big disaster. You just need to competently approach this.
Preparing for installation
The content of the article
-
Preparing for installation
- Getting rid of the old tank
- Preparing the place and materials
-
Features of the internal mechanism of different types of tanks
- Option one: compact toilet fittings
- Option two: the internal device of the hinged type cistern
- Option three: the internal structure of the built-in cistern
-
The procedure for attaching the tank to the toilet with your own hands
- New tank installation technology
You need to start work with the preparation of the workplace and the object of attention itself - and in our case it is a drain tank and all its elements.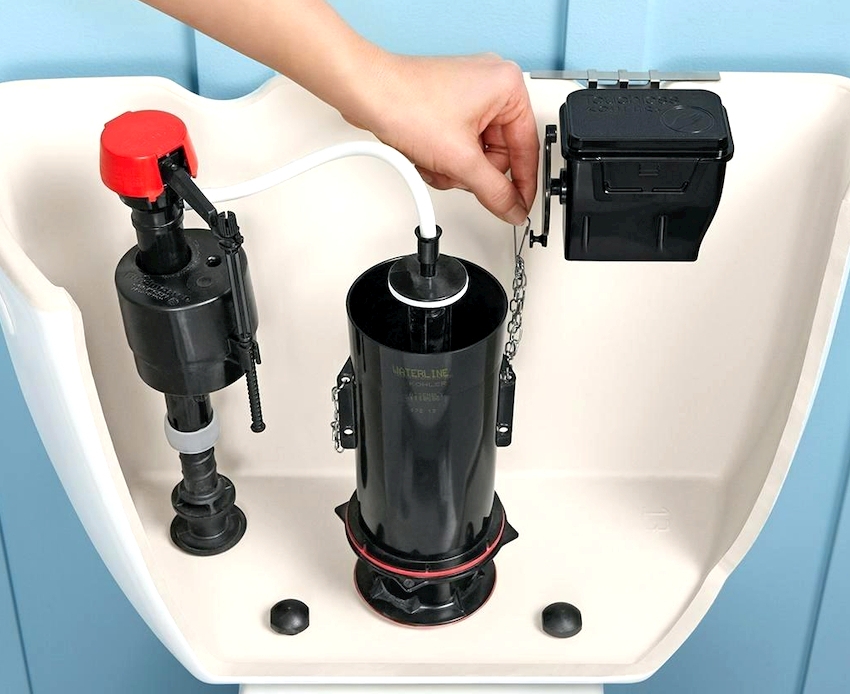
Our work will be reduced to several stages, they do not have to be observed without exception, you need to be based on the type of device you are dealing with.
Getting rid of the old tank
It is difficult to install new equipment until you get rid of the old one. If an old toilet has been living in your closet since the times of the Soviet Union, then it is better to immediately call a friend for help. It is not easy to cope with this "cast-iron monster" alone. Moreover, it is necessary to knock down rust from rusted bolts.
The dismantling itself comes down to a simple scheme:
- Pre-shut off the water supply.
- We drain all the water from the tank.
- We disconnect all pipes from the tank. This is where you need a partner.
- We unscrew the fastening bolts. This must be done carefully and carefully so that the "cast-iron monster" does not fall to the floor. Then you have to rearrange the tiles.
- We remove all unnecessary from the room. At the same time, we sweep away everything that has been sprayed.
Now you can start preparing.
Preparing the place and materials
Before starting to install a new tank, it will be useful to check the condition of all remaining plumbing, as well as communications.
Particular attention should be paid to:
- To the bowl of the toilet. Even if only one tank is changed, it is always necessary to check the condition of this important and main element. Check if it is level correctly set. If there are distortions, it would be better to correct them. The fact is that any roll can lead to incorrect operation of the drain mechanism in the tank. Check the tightness of the connections.
- Communications. We clarify how the water supply pipe is located. We look at what state it is in and overlap. We measure the length of the flexible hose for connecting the tank to the water pipe. If necessary, we prepare a ball valve, as well as additional layering.
- Drain cistern. We check it for defects, the presence of a complete set and its condition. All fasteners must be of adequate and sufficient length, as well as the flexible hose. We check the work of the internal fittings.
Well, now it's time to prepare the tool. You will need the following:
- Stock up on flat horn and end cylindrical. You will need the wrenches to tighten the bolts.
- You can't do without a tape measure, level, pencil, electric drill and hammer.
- An adjustable wrench will also come in handy.
- To ensure the tightness of the joints, you will need a sealant and a sealant, and you will also need a lubricant to protect the metal parts of the joints from moisture.
Attention! Before starting the installation, make sure once again that you have turned off the water.
Features of the internal mechanism of different types of tanks
If you have to install the drain tank yourself, then you can not do without the installation of internal fittings. This is the same unit that is responsible for collecting and discharging water from the tank.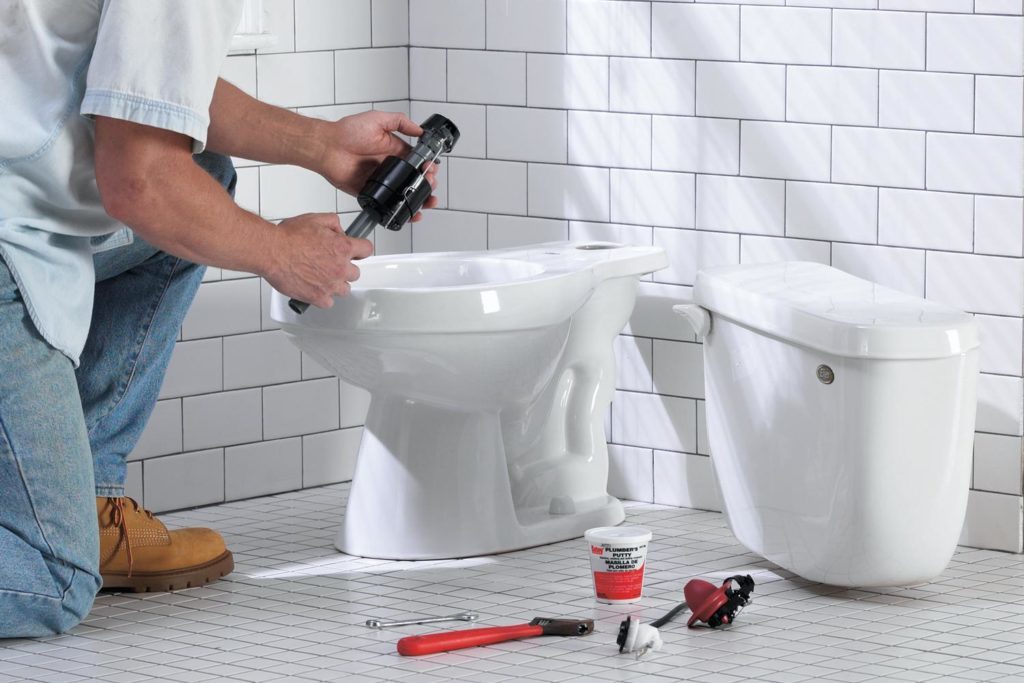
The good news is that the design of all modern products is clear and, in fact, does not raise questions. Well, if there is a hitch, you can always read the instructions.
Option one: compact toilet fittings
The inside of the tank consists of two main elements - the inlet and outlet valves. A water supply is supplied to the inlet valve, it is equipped with a float, its task is to control the collection of water.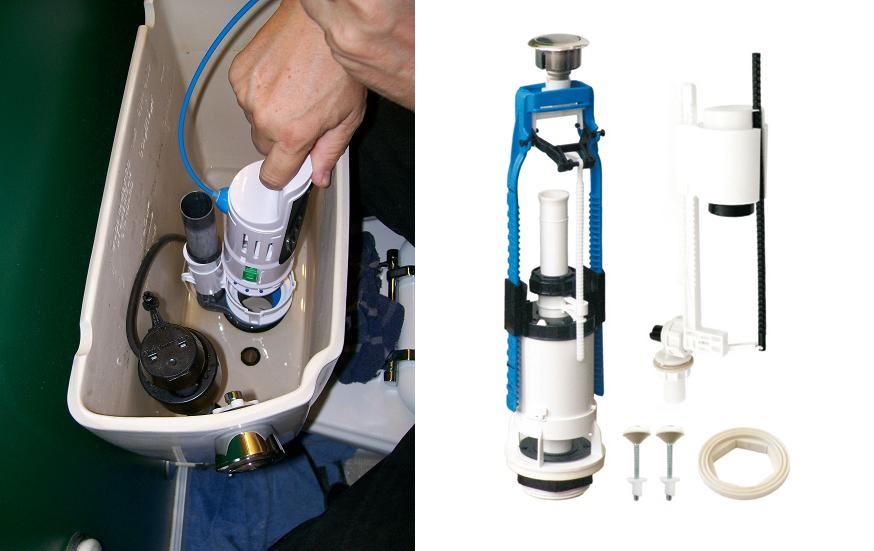
Installing this item involves several steps:
- Do not rush to start installation - first, put a water filter in front of the external entrance to the tank. It may have already been installed initially.
- According to the instructions, we fix the fittings on the lower wall of the tank. Check to see if you forgot to put on the gasket from the inside. We fix it from the outside with a nut that is included in the delivery set.
- The outer outlet is threaded. To it, as soon as the tank is installed, we supply a hose supplying water.
Both the inlet valve and the drain siphon come in two variations. They can be one level or two. If the first type is installed and the drain button is pressed in it, then all the water is poured out of the tank. In the second case, it is possible to control the discharge of water. It can be drained all or partly.
There are three main elements in the device: the connecting bowl, the main mechanism, the drain button.
We mount in the same way with the intake structure:
- In its lower part, the element has the shape of a bowl, it is she who is placed inside the opening of the drain tank. It is also necessary to install a rubber gasket and secure with a nut.
- When the tank is attached to the lower element, the piston must be attached. It simply screws in until it snaps into place.
- At the last stage, when the lid is already installed, you should install the button to drain the water.
If you plan to purchase just such a model, carefully check the package contents. Pay attention to the presence or absence of nuts and gaskets, their quality. If suddenly any elements supplied in the kit are not very good, and often they are not of the highest level, then they can be replaced.
The supplied rubber gaskets can always be exchanged for silicone ones, which are much better. Bolts are also best used with those that are not afraid of corrosion.
But all these changes should be done before the system is installed.
Option two: the internal device of the hinged type cistern
The main difference between this model and the first version is the need to install an intake valve on the side wall. In this case, a lever-type drain structure is used. This feature forced the developers to change the look of the float, as well as the release valve.
However, despite all these differences, installation is not much more difficult than the first option. The main thing is to strictly follow the instructions from the instructions.
Option three: the internal structure of the built-in cistern
The indisputable advantage of this toilet model is that there is no need to install fittings in the flush tank. From the very beginning, all the mechanisms are assembled and installed. The only thing that is required is to connect a double button to drain the water.
The procedure for attaching the tank to the toilet with your own hands
When all the preparatory work is left behind, and the inside is completely assembled, you can start installing the tank. Toilet cisterns have different designs and are mounted in different ways. But since the most common model is a compact toilet, we will consider it as an example. Installation consists of a series of sequential steps.
For this work, you need very few tools, and you don't even need a partner.
- We place the internal fittings in the tank and fix them.
- We put the sealant on the shelf. If the fixing bolts are properly tightened, the water drain hole will be sealed with a gasket. But it is better to use a silicone sealant.
- We put the tank so that the gasket is directly under the drain. The holes for fasteners in the toilet and cistern must be strictly opposite each other.
- We put washers in the form of cones on the bolts, as well as rubber gaskets. The tapered part of the gaskets should point downward. Having passed them through two holes, we put on the second set of washers and gaskets and tighten the nuts.
Hand strength is clearly not enough to tighten the nuts properly. You can't do without keys here. A socket wrench is put on the head of the bolt, and so that the bolt does not rotate from below, we hold the nut with an open-end wrench.
It is not necessary to apply excessive force when tightening the bolts. The more pressure on the gasket, the shorter its life will be. And the ceramic of the tank may well crack from the pressure of the bolts.
Now you need to align the tank horizontally and vertically. We check its position in terms of level and, if necessary, tighten or, conversely, loosen the fastening bolts.
As soon as all the work is left behind, we hide the bolts under the plastic nozzles. If there are none, then we apply a lubricant to them that protects against corrosion. We check if we have installed all the fittings inside, set it up. Now the tank can be closed with a lid, and a button can be installed on it to reset the water.
The supply pipe and the inlet valve can now be connected. A flexible hose will help us here, most importantly, do not forget to check if there are gaskets in it. To strengthen the sealing, we use tow or a sealing tape.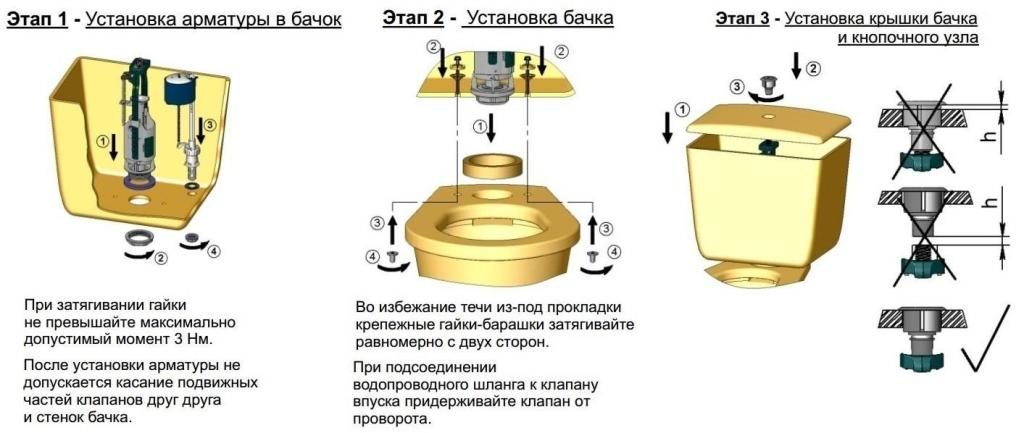
It is not recommended to use a sealant for this case. After all, there is no guarantee that there will be no need to replace the hose.
We check how tight the drainage mechanism is and whether it works correctly. To do this, you need to supply water to the tank.
If, after checking, no leaks were detected at the place of the gasket or at the joints, then the task was successfully completed and a test drain can be made. After that, we additionally check for possible water leaks. Now everything is finally ready and you can use the toilet.
New tank installation technology
First of all, it is necessary to assemble and install all internal fittings.
Attention! When all the internal elements are finally installed, you need to make sure that their moving parts do not touch each other.
Now you need to secure the tank. Once it is secured, you can replace the cover and the release button, which connects to the outlet valve.
In fact, there is nothing difficult. But! If in your life you have never had to deal with such tasks, it will be useful to contact a specialist. This will save both time and nerves. When the master is working, watch him. And then next time you can do it on your own.
Subscribe to our Social Networks


