The toilet is an indispensable attribute of any modern toilet. Its most complex and important part is the tank. Read more about the structure of this element, its functioning, varieties and troubleshooting methods.
Description of a cistern with a "cutaway" button
The content of the article
-
Description of a cistern with a "cutaway" button
- Main elements
- The principle of the drain system
- Types of cisterns for the toilet
-
The nuances of eliminating breakdowns
- The liquid fills the container above or below the required level
- Water is continuously drawn in and immediately flows into the toilet bowl
- The tank fills up with a loud noise
- The tank is leaking
- Water constantly seeps down the toilet
- No water set
- How to replace the "insides" of the tank?
The system consists of two interconnected processes: drainage and water supply. Let's take a closer look at the mechanism of work.
Main elements
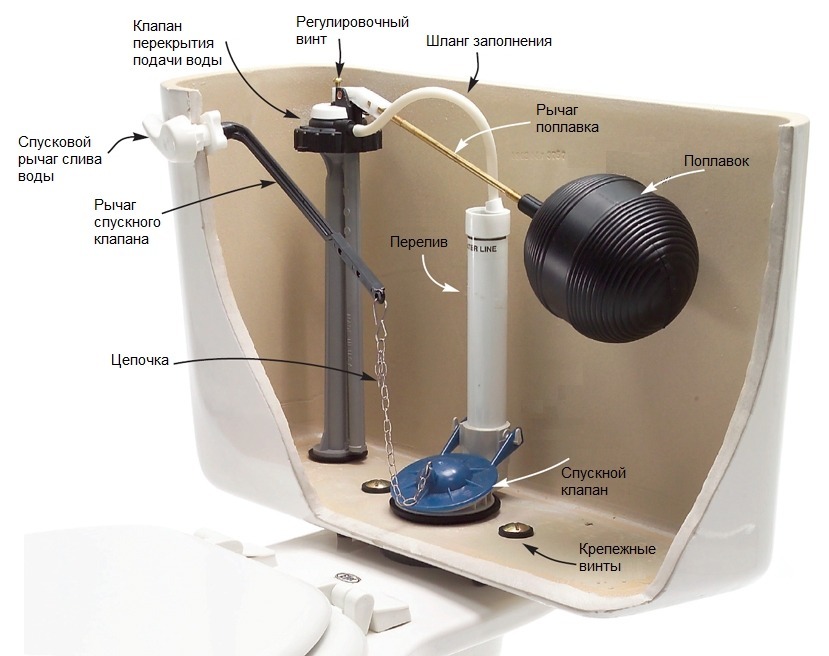
Technically, the tank is a tank with 2 (or 3) fluid supply and drain holes and contains three main mechanisms:
- inlet valve;
- beacon, on which the water level depends;
- system of levers.
The liquid is supplied through a flexible water supply hose. The feed can pass through an opening located:
- from the side (left or right), the float is attached to the edge of the horizontal rod connected to the ball valve;
- from below, the float element is paired with a vertical lever built into the eyeliner.

Scheme of work: As the water level in the storage tank drops, the float is lowered at the same time (air keeps it on the surface). In the lower position, it activates the water seal and rises higher while the tank is filling, then blocks further flow of liquid.
The float component can be of two types:
- piston - equipped with a sealing gasket, when filling the tank, it presses on the valve and blocks the flow of water;
- membrane - this is a modern version, it is a silicone or latex membrane that works almost silently, reliable in operation.
Another important element is shut-off valves that regulate the drain into the toilet. We will talk about its device further.
Important! The pressure force can be adjusted to reduce the consumption of fluid, but its minimum volume will poorly clean dirt.
Sectional diagram:

The principle of the drain system
This regulator has two tasks:
- blocks accidental flushing into the toilet (blocks the opening until the button is activated);
- protects the reservoir from overflow (by means of the overflow tube), mates with the lever and controls the fluid pressure when draining.
Technically, the scheme can be presented in the form of a lever, pneumatic chamber or rod (handle), their activation leads to the release of the liquid.

Products are widespread and popular with one or two keys. Pressing the one-piece button drains the water completely, and in the double one there is a mode of both full release and half of the volume. In some models, one button combines both modes (the depth of depression determines the amount of flushed fluid). This saves water resources if there is no need to completely empty the container.
Types of cisterns for the toilet
Products differ depending on the material:
- ceramics: characterized by reliability and affordable price;
- metal: it is characterized by durability, but has an unattractive appearance;
- plastic: stands out for its minimum weight and ease of installation.
By location and installation method:
- above the toilet: the components are connected by a drain pipe, a powerful pressure is created here (the greater the distance, the stronger it is), a chain is used to drain;
- attached to the appliance (compact toilet): the most common option;
- built into the wall of the room (concealed installation): the release button is mounted outside the wall.
On a note! The shape and appearance of the products are varied, but they are usually made in a volume of 4 or 6 liters, the drain openings have standardized parameters.
The nuances of eliminating breakdowns
If a malfunction occurs with the supply or drainage of fluid, this indicates the need to repair the tank. Consider situations that may arise.
The liquid fills the container above or below the required level
We adjust the float so that the volume corresponds to the specified parameters. If the manipulation does not work, perhaps the problem lies in the levers, their failure will require replacing the system.
On a note! It is recommended to replace a worn-out intake valve with a new one; repairing it will not cost much.
Water is continuously drawn in and immediately flows into the toilet bowl
The problem is the buoy. Possible sources:
-
 The filling valve is damaged. This is due to wear on the cuff in the piston displacer or diaphragm. These parts will need to be replaced.
 - The lever is in the wrong position, bent - we return it to the horizontal position, about 20 mm below the water supply opening.
- The float does not function.
Possible displacer malfunctions, their elimination:
- The part can crack over time, fill with liquid and sink. We fix the defect by installing a new element.
- The axis of the adjusting lever is out of order. Replace with a piece of thick wire (nail).
- The problem is in the stubborn cap. A similar part can be made from a dense base.
Important! Do not rush to completely change the mechanism, carefully check the operability of each element. In many cases, a small repair will be sufficient.
The tank fills up with a loud noise
We solve the issue by adjusting the size of the filling opening, or by installing a plastic (rubber) tube in the container so that water flows through it. We need a branch pipe within 35 cm, we connect one end of it to the inlet. When the tank is empty, we lower the second edge to the very bottom. The noise effects will be significantly reduced. However, this method only works with top-lined products.
The tank is leaking
The obvious reason is rusted or rotted screwsfastening the container to the toilet shelf. We purchase new fasteners and dismantle the tank:
- shut off the water using the valve;
- we expect the product to dry out;
- remove the nut securing the intake valve, disconnect it;
- unscrew the old fasteners joining the tank with the shelf;
- separate the tank from the rubber cuff;
- we take out the bolts and replace both, regardless of their condition;
- we clean the contact surfaces between the container and the toilet;
- we perform the actions in the reverse order: put the cuff in place, place the product on top.
Important! Tighten the new screws carefully to avoid damaging the plumbing.
Upon completion of the work, we start the water, observe its set, check for leaks. Within a few days, it is necessary from time to time to check the reliability of the fasteners.
Reference! Bolts can be metal (such as brass) or plastic materials. The second option is preferable, because it does not corrode, and with strong twisting it will not damage the plumbing coating.
If old parts cannot be removed, a multi-purpose grease can be used. In exceptional cases, use a grinder for dismantling.
Water constantly seeps down the toilet
It means wear of the diaphragm of the drain fittings, located in its lower part and is responsible for the strength of the connection. We replace the gasket:
-
 we empty the tank;
 - disconnect the drain device from the lever, unscrew the nut that secures it;
- we remove the worn out rubber, put a new part;
- collect in the reverse order.
Important! A leak may appear if the overflow adjustment is out of order. In its working condition, there should be a distance of 2 cm between the liquid level and the cut of the drain tube. We eliminate the malfunction by re-setting the desired filling limit.
No water set
The problem can be caused by one of three reasons:
- We check the supply hose. To do this, close the valve, unscrew the pipe from the tank. We place its free edge over a tank or other container, turn on the water. If moisture does not come in, the connector must be replaced.
- An option would be to clean the joints between the hose and the tank and the water pipe, a screwdriver or other object. In some cases, these areas can become clogged with sand and other inclusions.
- The third source of trouble is the coarse filter, which is covered with dirt. To check it, we use platypuses to remove the element from the disconnected liner and clean it under a strong water jet. Stubborn dirt is softened with vinegar or citric acid (put in a solution for a couple of hours), then they must be removed with a brush with stiff bristles.
How to replace the "insides" of the tank?
If a complete replacement of the "filling" is required, consider the dismantling procedure:
-
 we shut off the water;
 - carefully unscrew the key;
- separate the lid;
- unscrew the supply hose;
- dismantle the drain system from the top, which must be turned 90º;
- unscrew the fasteners between the cistern and the toilet;
- remove 2 nuts on the outer surface of the tank, fixing the valve and drain, take out the equipment;
- we put a new structure, we carry out the assembly in the reverse order.
The sanitary cistern performs functions that ensure the normal operation of the toilet. Knowing the device and the principle of operation of its main parts, the owner will be able to independently carry out prophylaxis and simple repairs of the product. Even if a complete replacement of the tank mechanisms is required, all this can be done on your own, without calling the master.


