The warm floor system creates an atmosphere of comfort and special comfort. In some rooms, such a complex can become the main heating option, which makes it possible to refuse traditional radiators.
However, before deciding on its arrangement, it is necessary to calculate the system, take into account the upcoming operating conditions and a number of parameters. An important factor is the type of flooring. The material affects the efficiency of heating and installation technology heating line.
Many people prefer to build a water-heated floor under the linoleum - such a coating is notable for its affordability and good performance characteristics. We propose to deal with the principle of the system, its components, to choose the best connection option and pipe laying scheme.
In addition, we will show you how to calculate the warm floor and pick up pipes, as well as describe the step-by-step technology for installing a heating circuit under linoleum. Recommendations of experts will help to design and equip a reliable and efficient heating system.
The content of the article:
- Nuances of exploitation of linoleum with ECP
- The general principle of the system
-
Is it possible to “hook” the system to the central highway?
- Stationary heat point
- Vertical layout
- Variants of pipe laying patterns
- Calculation of warm floor
- Requirements for premises and pipe selection
-
Possible system installation options
- Floor heating without screed
- Wooden technology mounting technology
- Concrete screed water floor
- Valuable recommendations from experts
- Conclusions and useful video on the topic
Nuances of exploitation of linoleum with ECP
Water floors are so “caught on” in cottage townships and private house buildingthat their systems began to be installed in newly constructed suburban settlements, where special heat exchangers were already pre-installed and installed to connect this design.
The main and significant advantage of this heating system is economical consumption of heat energy, excluding the impact of such harmful factors as electromagnetic and electric fields.
The following points are considered to be fundamentally important deficiencies in the ECP installed in homes:
- dependence on gas or other boiler equipment;
- the complexity of the installation work;
- an increase in the height of the floors, which may in some cases be unacceptable;
- risk of water leakage in pipes in case of non-compliance with installation technology.
It is possible to cope with the listed minuses if you carry out each stage of installation of a heat-insulated floor most qualitatively.
Owners of private suburban real estate are not very willing to use linoleum, as the outer surface of a heated floor due to erroneous suspicions about its household security. Linoleum, in contrast to other coatings, is a rather demanding material for intense heating.

Linoleum is one of the most economical types of flooring, which can be successfully and safely laid on the warm water floor, equipped in your cottage
If you comply with all the prescribed standards for regulating the temperature of underfloor heating, linoleum in the house is not will warp, swell under the action of excessive heat, and, accordingly, emit harmful substances.

Manufacturers of linoleum mark floor materials with stylized signs that indicate the possibility of the safe use of some models along with a floor heating system.
By applying high-quality, certified linoleum to water flooring, while maintaining normal heating mode, you will enjoy the comfort of a heated floor. This is the case when linoleum can be no worse than ceramic tiles or laminate flooring.

Covering the floor with linoleum, you need to take care of the progressive, smooth heating of the entire tubular system. The power of the heated floor should not be higher than 150 W per 1m2. This indicator will be enough for the floor temperature to reach an optimum value of 26-28 ° C. You can walk barefoot on linoleum without experiencing any discomfort.
Thanks to modern technologies in the production of flooring, you can safely use linoleum as a finishing, finishing material for laying it on water-mounted by you or construction team floor.
The general principle of the system
The basis of the system of such a room heating system is two-pipe heating circuitfunctioning on the principle of forced circulation of water or other coolant. Instruments will be supplied with pipe wiring and manifolds.

A schematic depiction of a typical project of a private house, which shows the involved appliances, components and wiring of a warm water floor (+)
The following important components are laid into the general scheme:
- boiler group - provides uninterrupted circulation through the collectors of hot water;
- return and supply lines for powering groups "collector + mixing unit", Distribution manifolds;
- heating fittings;
- supply pipeline.
The heart of the heating group is the boiler. Its other equally important components are the security group, the expansion or compensation tank and the pump.
Briefly describe the principle of the system, it will look like this:
- Heated water comes from the boiler. It falls on a two or 3-way thermostatic valve. As soon as the temperature exceeds the critical value, access to water from the return pipeline is opened and the temperature is equalized.
- The thermostatic valve is controlled by a thermostat. The thermostat mixed flow enters after passing through the circulation pump.
- When the water warms up to the set temperature, the mixing from the return line stops, when changing to a larger direction, it opens again. Thus, the temperature of the water circulating in the system is regulated.
- Directs the coolant to the contours of the manifold or distribution comb. For this node is fixed not only the distribution function, but also the task of collecting and sending coolant to the return pipeline.
By and large, water heating floor - this is the same radiator, but located horizontally and protected from operating loads. If there is no control unit, then the system will work only under the condition that the water temperature in the system does not exceed 50 ° C.

In the photo - the distribution node of the water system "warm" floor. In its composition there is a circulation pump collector group mixing unit (+)
The system itself is not perfect: it has inertia, warms the room for a relatively long time - from 4 to 6 hours. Difficulties also arise at the design stage, when water floors are the only source of heat.
The installation is expensive and reduces the height of the rooms due to the fact that the floor rises. Pipe system is not easy to repair.
Is it possible to “hook” the system to the central highway?
This issue is of concern to many. If the answer is unequivocal - it is better not to. For a heated floor in apartments, electrical systems are usually used due to the frequent occurrence of problems when arranging a water heating option. But in general, it is possible to power the water heated floor from the central highway.
Alexey Dedyulin
Specialist in the design and installation of HVAC and heating equipment
It is possible to connect the water floor to the central heating, but only after obtaining permission. This is due to the fact that the water system creates a problem associated with the temperature difference. In the central line, the coolant is heated to 70-90 ° C, and such a coating, like linoleum, withstands a maximum of 50 ° C. This is a nuisance of local importance, but there is also the threat of the appearance in the general heating system of a house of zones with uneven distribution of heat carrier. This is a very serious problem.
- Alexey Dedyulin Specialist in the design and installation of HVAC and heating equipment
So, without harm to the functioning of central heating, it is possible to install a heated floor in a single apartment according to several correct schemes.
Stationary heat point
The key element of a stationary substation is circulation pump. Bends of pipes welded to the riser central heating station. In this case, the water will have a stable temperature due to the operation of the pre-installed thermostatic valve.
If this option is chosen, it is imperative to protect the circulating pump by installing a pressure or flow regulating relay.

Connecting the water floor to the central heating, you need to take into account the fact that you have to equip the heat point. It will mix water from the heating system from the water mains.

The heat point is a complex composed by the calculation of equipment. In his own house he is often placed in a separate room.
When it is installed and the invoice thermostat, it will turn off the pump every time the temperature reaches the permissible minimum - about 20 ° C. Even better, the system is controlled by a regulator that adjusts the temperature according to the temperature in the room.
Vertical layout
If the heating system is designed so that it has a single way out, the heated floor is connected according to the principle of radiators. By choosing this solution, you can ensure that the heat is 2 times higher than with ordinary centralized heating.
In the presence of 4 risers in the apartment from the central system take water from two, and from the remaining liquid flows in transit.
The components of this scheme are the following elements:
- risers;
- balancing valve;
- 3-way valve;
- valve actuator.
Old radiators are dismantled, and instead they install a "warm floor" system. It will not affect the hydraulic mode of the system, since Balancing valve settings will remain unchanged.
The contour of the floor is connected in parallel. It is important to take pipes with the same length so as not to carry out adjustment of the heat exchangers in the next circuit.

Most often the contour of a water heated floor is used as an addition to the main heating network. In it connect the secondary ring to the primary ring, which includes the boiler and the collector (+)
Variants of pipe laying patterns
So, you have decided on the method of connection and now is the time to think about design. There are several layouts of ECP. They must be chosen deliberately - performance, reliability, cost of the system, and how heat is distributed throughout the room depends on it.
Schemes are as follows:
- "Snake". It happens single or double. In the first case, the pipes run along the wall and round off at the end of the trajectory, changing direction and covering the entire area. In the second, the installation scheme is the same, but a pair of pipes are laid parallel to each other at a distance of 3 cm. With this technology, floor heating is reduced in stages.
- "Snail". In terms of the scheme looks like a spiral, closing at the end point. Spiral diagram, the installation of which begins from the depths of the room to its center.
- Combined method. Several methods are used in one area, but the most effective one prevails.
Since the water temperature gradually decreases while moving through pipes, it depends on the choice of one of them how evenly the heat will be distributed in the room. The starting point for laying pipes are walls. Continue on towards the exit or towards the center.

The main advantage of the water system is maximum efficiency and independence from power supply sources. The disadvantages are the theoretical threat of leaks and the likelihood of pipe damage.
Regardless of the chosen scheme, there are several general rules according to which pipes are distributed. The first of them is to start the installation from the outer wall. The following requirement concerns the step size - not less than 10 and not more than 30 cm. Be sure to perform the calculation of hydraulic resistance.

The unsatisfactory work of the central heating forces us to look for new solutions. The most optimal of them is a water-heated floor, characterized by high heat emission (+)
The greater the number of turns the system has, the greater the hydraulic resistance value. The same thing happens with increasing pipe length. If the installation is performed in a coupler, the joining of pipes to perform using couplings is impossible.
The following circumstances affect the choice of laying pattern:
Image Gallery
A photo of

The spiral scheme is chosen if the angles of rotation of the pipe of the water floor heating system cannot exceed 90º. This is the easiest, easiest option.

Pear loops are formed when it is possible to turn the pipe 180º. It should be remembered that the step in this place will have to be increased and it is possible that the capacity of the pipe will suffer.

Laying loops "snake" can be implemented only if the radius of the flexible pipes and the step of laying allow the pipe to bend 180º

Combinations of two or more spirals, spirals and snakes and other similar schemes are used in the arrangement large areas of space or when there is a need to increase heat transfer in a particular zone, for example, at the entrance to house

Spiral layout of a heated floor

Pear-shaped loop in the floor heating device

Laying the heating pipe snake

The combined principle of laying water floor heating
Experienced installers do not recommend laying pipes in areas of the house where there will be plumbing or furniture.
Calculation of warm floor
The required amount of pipe is calculated by the formula:
L = k × S / H,
Where:
- L - the length of the water floor;
- S - area covered by the contour;
- k - multiplying factor, it is usually taken in the range from 1 to 1.1;
- H - laying step.
To the figure, which is obtained as a result, add 4 m, 2 of which will go to the connection of a straight pipe, and 2 others - to the connection to the return manifold.
Knowing the pitch of the loop, the flow of pipes can be taken from the table:

The table summarizes the most frequently requested data when calculating the footage of pipes for a floor heating device with your own hands. If specialists do this, they will provide you with a ready result (+).
For effective system operation, the maximum possible contour length is of great importance. If it is exceeded, the contour may cease to function as a result of the occurrence of statistical equilibrium in the pipe.
Professionals recommend choosing a length of not more than 70-80 m for a 1.6 cm pipe. On either side of the pipe, the floor heats up on both sides of approximately 100 mm. For a pipe section of 2.0 cm, the maximum length is 100-110 m.
If, as a result of the calculation, a length exceeding the maximum allowed length is obtained, the room is divided into 2 or more zones and several similar circuits are mounted. In the latter case, the installation of a manifold cabinet will be required.
To perform the calculation of the pump for floor heating use the formula:
Q = 0.86P / (t1 - t2),
Where:
- P - is the power of a separate circuit in kW;
- t1 and t2 - temperature at the inlet and return flow, respectively;
- 0,86 - correction factor for water.
By calculating each circuit, the results are summarized and the required performance is obtained.
Additional information on the calculation of pipes for underfloor heating is given in this article.

For the device of water floor heating systems for large-area and complex-shaped structures, they are divided into several sectors connected in parallel to the collector
The head is calculated by the formula:
H = (R * L + K) / 1000,
Where:
- R - hydraulic resistance;
- L - the length of the contour of the greatest length;
- H - head,
- K- power factor.
When choosing a boiler, you should be guided by the range of temperature adjustment - it should start at 30 ° C. To distribute heat to the contours, a collector is installed, selected by the number of contours. The number of pins on it should ensure the connection of all circuits.

The key to successful operation of the system is a professionally executed calculation. You can make it with the help of special programs and manually (+)
The budget type manifold has shut-off valves, but there are no regulators to adjust the system. In the equipment belonging to the average price segment, there are regulators with the help of which adjust the flow of water in any circuit. The most effective and expensive collectors are automated.
Here, on each valve there is a servo drive, mixing units with a two- or 3-way zone valve. In such systems, it is possible to adjust the temperature of the water supplied and mix fluids with different temperatures.
Collector cabinet of the correct size must be selected in accordance with the dimensions of the collector group.
Below it should be free space necessary for the bending of pipes. It is installed at a certain distance from the surface of the heated floor. It can be installed in the wall, but not in the carrier.
Image Gallery
A photo of

The calculation of the pitch between adjacent pipes in the floor heating system is calculated taking into account the thermometer readings in a particular room. Moreover, within the same room, it is possible to allocate zones with more frequent installation, for example, near a loggia or window, and more rarely, for example, in corridors.

On sections of the floor with a reduced spacing of the hinges of the heating system pipe is recommended to insulate. Especially insulation require pipe supply at the outlet of the collector

The maximum step of the pipe layout of the heating floor system is 35 cm, which is necessary so that the foot without shoes does not feel cold.

When moving along a loop-shaped contour, the pressure of the coolant naturally decreases. Therefore, the length of one ring is regulated: it should not be more than 100 m, so that the pressure does not fall by more than 0.2 atm

Layout step of the hinge floor system

Thermal insulation of pipes in the area of reducing the step of the layout

Maximum distance between heating pipes

Limit length of the water circuit
Requirements for premises and pipe selection
Water floors can be laid already in the finished premises.
They must meet the following basic requirements:
- Given the relatively large thickness of the warm floor (8-20 cm), the design height of the ceilings of such rooms should allow property owners to mount the selected heating system.
- The height of the doorways - not less than 210 cm.
- Total heat loss in the premises should not exceed 100 W / m2. If they are in fact higher, then you should first think about a better insulation of the building, so as not to heat the street in vain.
- The surface of the base is smooth and clean, the unevenness is no more than 5 mm. Sudden drops can negatively affect the smooth flow of the coolant in the pipes, theoretically, can affect the airing of the circuits, increase the hydraulic resistance.
- The premises should be finished plastering and finishing work, in the window openings inserted windows.
The choice of pipes is the most important task at the stage of preparation for installation of a warm water floor. Their characteristics determine how effectively the floor will give off heat.
As a rule, acquire one of three types of pipes:
- Copper. An expensive option, but the most durable and trouble-free in operation. An alternative to the copper circuit - stainless steel pipes.
- Metal plastic. Affordable, quality pipes that are able to keep their shape, easy to install. Usually choose pipes with a cross section of 1.6 cm. The metric area is calculated in advance with great accuracy, otherwise the pipe sections will have to be connected, and this is highly undesirable.
- Polyethylene. With them it is possible to more easily install the floor pipe, cross-linked polyethylene pipes they are not afraid of freezing, easily repaired. Their disadvantage - at the time of exceeding the temperature of the water can straighten up and violate the integrity of the structure.
Copper pipes - this is the best option, because copper is the best conductor and coolant. Copper pipe in warm floors ensures maximum heat transfer of the water circuit. The material will be long and perfectly operated, but it is too expensive, therefore it is rarely used.
Possible system installation options
Floor heating without screed
There are several ways to install a heated floor without a screed:
- On polystyrene foam mats. Heat distribution plates are installed in them, having slots into which a tube contour is inserted. Variants of substrates for warm floor are described in detail here.
- In the gaps in the wooden floorthat are specially left between the boards.
- In the milled grooves in a wooden base where heat exchangers and pipes are placed.
Instead of heat transfer plates, you can choose a simpler option - aluminum foil.
Image Gallery
A photo of

The use of mats with lugs in a clear order allows for extremely fast decomposition of pipes according to the diagram. The pipes are also securely fixed by these guides.

If necessary, increase the heat transfer bosses ideally perform the function of guides for laying metal plates

In the case of the use of polystyrene mats in combination with reflex plates, heat loss is minimized and the heat capacity increases by several times.

When constructing a water heating system on a wooden base, instead of polystyrene mats, pieces of plywood are used with the system outline chosen in them

Laying the heating pipe on the mats with bosses

The method of increasing heat transfer heating system

Fixing the pipeline in the reflex plates

Plywood pieces instead of lugs
The technology of installation of a light warm floor is simple, but you need to withstand all the rules. Violations during installation can lead to the fact that you have to tear off the finished coating to eliminate the disadvantages.

The use of polystyrene foam mats in the device of warm water floors can significantly increase the speed and quality of installation, to protect the underlying floor from the effects of leaks
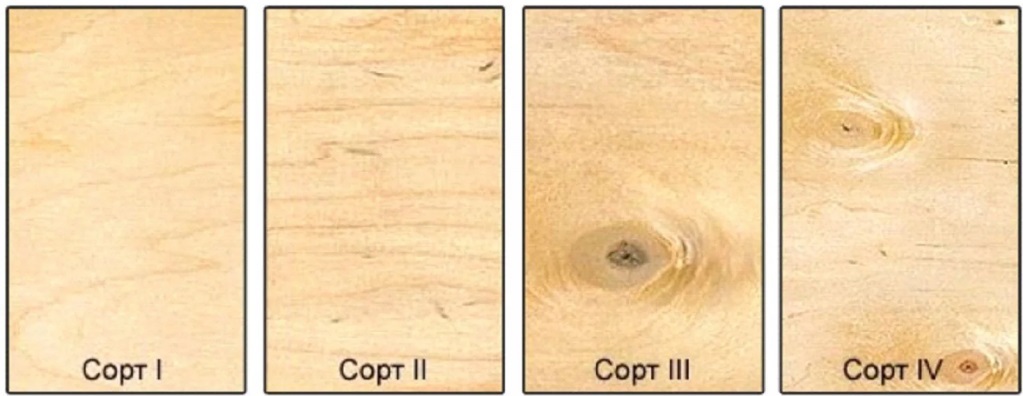
Depending on the area of the room pick up materials. For the installation of the contour will require planed boards of good quality with a thickness of 4.5 to 5 cm. In the boards, using a cutter, select the grooves for a specific pipe diameter with the required pitch.
At one of the ends choose a "quarter". Instead, you can apply purchased strips for installation with ready-made notches. In addition to the grooves in the boards, it is necessary to provide semicircular grooves at the points of reversal of the contour.

The photo shows the wooden technology of mounting the system of warm floors. It is used mainly in wooden houses. Pipes are laid in grooves in which special aluminum plates are laid.
If the warm floor is only an addition to the main heating, you can do a stowage step up to 30 cm. If this size is exceeded, there will be both warm and cold areas on the floor. When this heating system will be the main, choose a step from 10 to 15 cm. Laying with a smaller step is very difficult.
The log for log is harvested on the basis of the considerations that they will be laid in steps from 50 to 60 cm. In addition to the board and timber, plywood sheets or OSB with a thickness of 8-10 cm are needed, prepared so that they cover the entire area.
It is necessary to purchase foiled heat insulation based on foamed polystyrene with a thickness of 0.5 - 0.6 cm and insulation not foiled from polyethylene foam 1-1.5 mm thick in such quantity to cover the whole surface.
Warm floor, built on polystyrene mats with bosses, can be completed with a dry screed device, arranged in the form of flooring, or pour traditional cement-sand mortar. In the second case, the pouring work is performed in the following order:
Image Gallery
A photo of

Water floor with a relief substrate before pouring over it screed arranged in the usual way. Before pouring it is important to check whether all the loops of the pipeline lie in the same plane.

To make it easier to align the coupler, the floor must be divided into segments and arrange on their edge beacons from the solution

The ridge of concrete ridges should be at the same height. For this purpose, the lighthouses are leveled to the full extent by construction

The space between the beacons is successively filled with a solution, which is immediately aligned by the rule.

Step 1: Preparing the system for casting the screed

Step 2: Construction of concrete beacons

Step 3: Leveling Concrete Beacons by Level

Step 4: Fill the cement-sand screed over the entire area
Wooden technology mounting technology
First of all, you need to prepare the existing wood flooring. All gaps and cracks eliminate. New, not yet painted and not saturated with linseed oil, the floor is covered with an antiseptic. Further, on the prepared basis, a foil of polyethylene foam insulation is spread out.
The strips are butt-buttered with a foil layer to the outside. With the help of a stapler coating is attached to the boards. All seams are sealed with foil tape. Perpendicular to the plank base fix lags, pre-putting them on the level.
Lay the boards on the logs. At the wall, along which the installation of cranes is planned, cut a groove for the location of the pipe that supplies the coolant and return flow. Using screws, fix the boards to the logs.
Mount the nozzles with cranes - direct and reverse, then install between them a bypass, equipped with a valve. Such a solution will make it possible, if necessary, to disconnect a separate loop, leaving the system operational, and also to perform loop balancing.
Before laying the pipe all the grooves are free from dust and sawdust with a vacuum cleaner and prepare strips 25 cm wide of foil.
The foil strips are laid out on top of the recesses to place the pipes in the direction from one to the other wall. The pipes are laid on the foil and embedded in the slots. The foil will heat up and reflect heat, directing it toward the room. The pipe is connected to the fitting of the supply pipe.
Folding the ends of the foil protruding beyond the groove, bending them so that they lie on the previous board, then fix it with a stapler. The pipe is fixed to the floor along the entire contour using metal or plastic plates, placing them at a distance of 60 to 70 cm from each other.
Special attention should be paid to those places where the pipe makes a turn.

Laying pipes can be performed on polystyrene plates, but only if there is a ready-made installation scheme. After laying the pipes, the system is checked for operability, and then the works are completed.
The entry and exit points will be above the floor, so it must have an aesthetic appearance. Deepen it into the wall can not be, but you can build a beautiful box with a door, giving the opportunity to freely use the adjustment valves.
After performing these operations, the contour of the warm floor is checked for tightness, for which water is run into it, and an excess pressure is created that exceeds the working one and a half times.
If leaks are not observed, proceed to the next stage of installation: the entire surface is covered with thermal insulation, blocking the wall material to a height of 10 to 15 cm. This will prevent the coolant from rapidly losing temperature.
Further stack plywood. The ends of the sheets should not fall on the pipe, because when fixing the material with screws, they can be damaged.
Having completed the installation of plywood sheets, the entire surface is looped. The seams are sealed with a sealant or epoxy mixed with sawdust. Next, cut off the ends of the foil protruding beyond the plywood, and smooth out the seal, if it protrudes above the floor level. Spread the linoleum, trimmed so that the edges of the canvas covered the walls of a centimeter by 3.5.
When linoleum otlozhitsya and unpack throughout the day, and sometimes more, cut off the excess, attaching a metal ruler. Between the linoleum and the wall leave a gap of 0.8 to 1 cm. After trimming, it is desirable to leave the coating in this position for another 24 hours. and then secure it with glue, tape or other means.
Concrete screed water floor
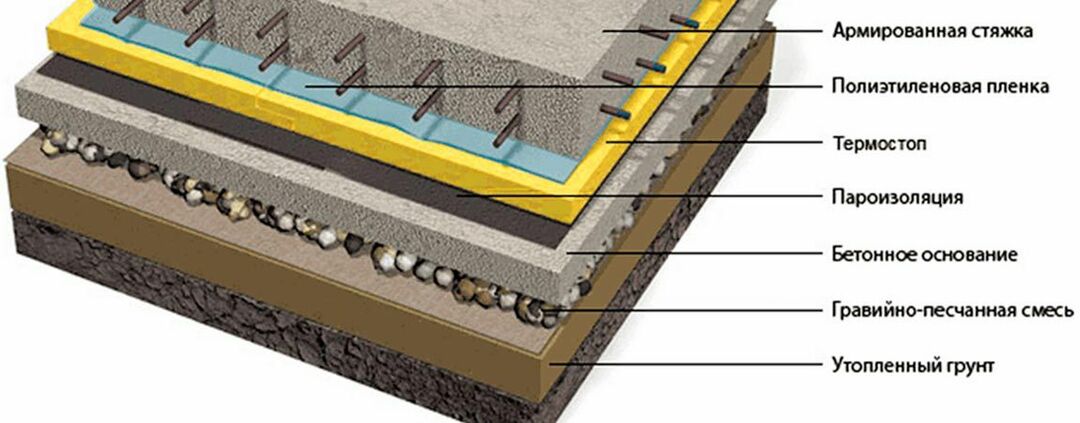
Pie obtained by wet technology or by laying in a screed includes several layers. The first - insulation, then the grid or tape - the so-called fixation system, then the pipeline and the actual screed. Finishes all flooring.

Option of a warm water floor with a concrete tie. Screed thickness max. 70 mm. Total thickness about 11 cm (+)
In apartment buildings, where there is a danger of flooding of the downstream premises, a waterproofing layer is also placed under the insulation.
Before starting the installation work, choose a place for the collector box. It is placed, not quite aesthetically looking valves, pipes, drainage bends. The range of cabinets is very large, so you can make a choice on the dimensions and other important parameters.
The installation process itself consists of the following steps:
- Clear, level the surface. Check for level horizontality. A maximum difference of 10 mm is allowed; if more, leveling is carried out.
- Laying waterproofing film.
- Along the perimeter of the room is laid and fixed edge insulation in the form of a damper tape.
- Lay out the insulation layer from 10 to 50 mm.
- Put on top of a vapor barrier layer.
- Carry out reinforcement mesh with cells from 150 to 200 mm. At this stage there is one interesting nuance: the reinforcing layer is most often spread out before pipe installation, but experts recommend doing this afterwards so that the load on the pipeline is distributed evenly.
- Begin to install the floor, for which:
- connect the pipe to the outlet of the supply manifold;
- fix the pipes to the reinforcement mesh with a pitch of about 100 cm using special clips, ties or slats, and after the completion of the installation, connect the pipe to the outlet on the comb.
- Experience performance by turning on the floor for several hours. A well-performed installation is evidenced by a decrease in pressure of approximately 003 MPa / h. at approximately the same water temperature.
- Fill the screed, given that it must rise above the reinforcing layer or pipes by 20-30 mm.
- Lay a layer of sound insulation and coating, but only after 30 days, when the screed is guaranteed to dry in natural conditions.
In the process of installing a water floor heating system, the standard steps are performed:
Image Gallery
A photo of

For the device of a warm floor of water type it is necessary to stock up on materials and devices: pipes for contour laying, thermal insulation, fixing systems and elements, collector unit for control by heating

The polystyrene foam plates are laid on the leveled and carefully dried base. Laying is done with the seam run

Along the perimeter of the constructed thermal insulating substrate have a damper tape. It is placed in the gap between the plate insulation and the wall

A waterproofing substrate is laid over the thermal insulation layer. In the example, it is foiled with reflex properties.

Then a reinforcing mesh is constructed on the waterproofing substrate, which will protect the concrete screed from gaps and cracks.

To the reinforcement mesh fix the pipeline of the floor heating system, laying it according to the scheme

Before mounting to the wall, the collector assembly is being prepared: the plugs are removed only from the supply and return pipes involved in the system

Before pouring the constructed system, it is necessary to conduct a pressure test to identify possible defects and correct errors.

Stage 1: Preparation of materials for the device of a heat-insulated floor

Stage 2: Laying the thermal insulation system

Stage 3: Installation of a damper tape on the floor perimeter

Stage 4: Laying foil waterproofing

Step 5: Install the reinforcement mesh over the waterproofing

Stage 6: Construction of a water heat-insulated floor on the reinforcing mesh

Stage 7: Preparing the collector for installation

Step 8: Pressurize the system before pouring the screed
Now everything is the same, only in more detail.
Stage 1: base waterproofing
The initial actions are in the formation of a waterproofing layer, which is placed under the insulation. You can put 2 waterproofing layer (on both sides of the insulation). The second option is preferable.
Layed in 2 layers, the film will not allow the cement milk from the screed to penetrate between the seams of the insulation, and will hold back the moisture coming from the bottom.
Waterproofing material can serve any of the materials offered by the market. The most affordable and popular is the usual plastic film.

Foamed polyethylene can serve as a good waterproofing agent. It helps to reduce heat loss, contributes to evenly distribute heat. Cellular markings that are applied to the multifoil will help simplify the process of layout of the heating tubes.
The film covers the base of the floor. At the joints fragments put inoverlap about 15-20 cm, for better sealing taped tape. In that case, if the film will be fixed to the bottom of the insulation, the pipes on the heated floor can be mounted directly on the heat-insulating sheets.
Waterproofing, laid on top of insulation, will require laying the mounting grid, which will be attached to the floor heating pipes. If you will use EPPS as a heater, the laying of the waterproofing layer can be excluded from installation.
Stage 2: laying the damper tape
Damper tape is an indispensable element in preparing the base of the floor for a concrete screed. Linear expansion of concrete when it is heated to + 40 ° C is 0.5 mm per 1 m2. The tape laid around the perimeter of the room will become an obstacle to the negative impact of such a factor and will prevent possible cracks in the body of the screed.

Self-adhesive damping tape is a strip up to 15 cm in height and 6-8 mm thick, with a layer of glue applied along the middle part of the canvas. It should be placed around the perimeter of the room, above the top edge of the screed.
In the budget version, you can apply strips of foam rubber or of improvised insulation materials with a thickness of up to 2 cm. Such strips need to stick on double-sided tape or fasten with screws, screws. Subsequently, the excess damping tape should be carefully cut with a knife.
If the room has a sufficiently large floor area or a non-standard shape, then it should be divided into rectangular or square zones. This is convenient for distributing the deformation gaps between them and laying the expansion joints. Improper gaps will cause the screed to break.
Here it is required to lay a damper tape around the perimeter of the seams, in place of which the reinforcing mesh will be divided. At its base, the deformation gap should be 10 mm thick, and its upper part should be treated with a sealant.
If the pipes are laid on the tie in the expansion joints, they must be placed in the corrugation, 50 cm in each direction. This is a regulation of the construction rules of joint venture 41-102-98
Stage 3: laying insulation material
Further operation is the laying of insulation. The construction market is saturated with a huge variety of options.
The most demanded and inexpensive option is a popular sheet expanded polystyrene 10 cm thick. It has low thermal conductivity and high strength, is not afraid of moisture, which is absolutely not absorbs. On the side surfaces of the material there are special grooves.
A more expensive option is a functional profile mats.

Thermal insulation of a warm water floor: profile mats made of resilient and durable polystyrene are an excellent choice for reliable fixation of pipes
These materials are intended to prevent the passage of heat from the pipes down to the ground, and send it up to the room of the house.

The thickness of the insulation should be at least 100 mm, if warm water floors will form on the ground, then 2 layers of 50 mm material should be laid
In that case, if you plan to place a warm floor on a water base above the basement of the house, then the insulation should be laid in a thickness of at least 50 mm.
Insulation is laid on the floor in such a way that the joints between the sheets are carefully shifted together. In the installation of a warm water floor insulation refers to the mandatory element of the preparatory base for the final screed.
It is extremely important to provide a reliable fastening of the plates. EPPS to the rough base, otherwise when pouring concrete screed they will float. The ideal choice of fastening is dish-shaped dowels, with the help of which the heat insulator plates should be fixed in the joints and in the center.
Stage 4: reinforcement and fastening of pipes for screed
The first layer of reinforcing mesh is placed on sheets of insulation. The grid in this case is used as a basis for fastening water circuits and for consistent heat distribution over the entire surface of the future underfloor heating. The pieces of the net are tied with wire, then the pipes are attached to the net with the help of nylon buckles.

The process of reinforcing the base should be at least 2 times: the first layer is placed on top of the insulation, and the second on top of the pipes. You can use a metal reinforcement mesh made of rods with a diameter of up to 5 mm and any convenient pitch.
Metal mesh for reinforcement can be replaced by plastic. It reinforces the screed well, saving it from dangerous cracking. Laying such material is quite simple. Plastic mesh is sold in rolls, its price is not high, with it damage to pipes is absolutely impossible.
After the reinforcement mesh is laid, the question of pipe protection will arise. When you move on a metal grid, you can damage the pipes and the grid itself, so it is recommended to walk only on pre-laid boards or pieces of plywood.
In construction practice, there is a clever solution, applying which when installing a water floor, you will not allow potential damage to the pipes at the time of pouring the concrete screed.
It is necessary to adhere to the following sequence of works:
- Prepare a cement mortar, at the rate of 1 part of cement M400 + 3 parts of sand.
- In the process of laying reinforcement form nashlepki from the solution, they must partially protrude beyond the edges of the grid, about 2 cm.
- "Lyapki"They are laid at intervals of 30-50 cm, this will then allow them to lay boards, other improvised material, and safely move throughout the entire casting area.
An additional advantage of this solution is the fixation of the grid. While workers are walking along the floor, it bends, this can lead to damage to the welds.
Stage 5: laying the contours of a warm water floor
As we wrote above, in the arsenal of modern methods of installation of a water floor contains 2 popular schemes pipe layingwhich are used in practice:
- "Snake". More simple wiring diagram. The disadvantage of it is that at the beginning and end of the floor there will be a temperature difference from 5 to 10 ° C. The water, passing from the supply manifold to the opposite, begins to cool.
- "Spiral" or "snail". The scheme is rather complicated to implement, but with it the t ̊ of the entire floor will be the same, since the flow and return flow will be held together. In 90% of cases, installation specialists use this method of laying pipes.
There are combined pipe laying methods. In particular, the extreme zones can be laid "snake", and the central part of the "snail".

The combined method helps to evenly divide the room into contours, optimally distribute the remnants of pipeline fittings and ensure the correct thermal conditions.
Each of the above-described pipe-laying methods allows the use of a variable pitch. This is such a method, when at the edges the pitch will be 100-150 mm, and in the center of the room - 200-300 mm. That is, in one room you can make a more intense heating of the edges of the room.
Stage 6: screed arrangement
To fill the screed choose a concrete solution brand M-300 and more.
The composition of the solution M-300:
- cement, M-400;
- sand;
- crushed stone fraction 5 * 20.
The working proportion of the solution is as follows: C / P / Sch (kg) = 1 / 1.9 / 3.7.
Above the pipes, the screed should rise by 3–4 cm so that the thermal energy of the warm water floor spreads evenly over the entire floor area.
Fill the screed must be done after installation work on the installation of all circuits and conducting mandatory hydraulic tests. If the thickness of the screed is more than 15 cm, then an additional recalculation of the thermal regime of the water floor will be needed.

Increasing the thickness of the screed will require an increase in heating time to the optimum temperature after switching on the system. The lower the thermal conductivity of the screed, the higher the need to raise the water temperature in the collectors
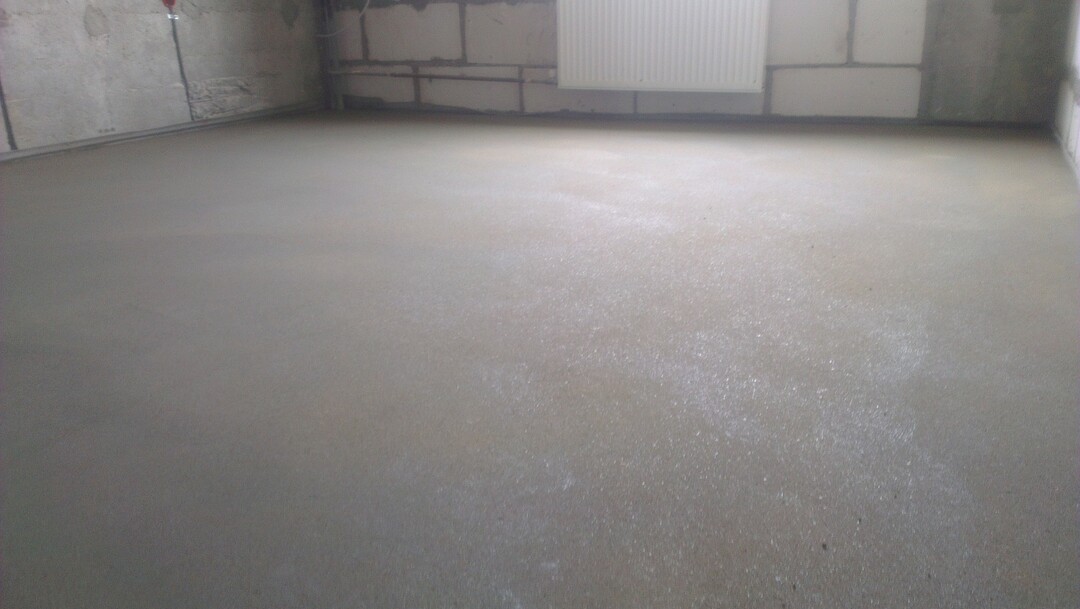
If you have done all the operations correctly, then a well-mixed concrete solution for the screed will not release water and delaminate. At an air temperature of + 20 ° C, the screed will begin to “clutch” after 4 hours.
After three days after pouring, the screed will pick up only half of its strength, finally it will harden only after 28 days. Heating of a warm water floor up to this point can not be included. Linoleum should be laid after full readiness.
Valuable recommendations from experts
When connecting a heated floor to the central heating some points are very important. Experienced craftsmen are advised to pay attention to them. Any scheme of connection to the central heating system provides for fastening to the end entrance of the comb using fittings. The tie must be made as thin as possible and must be reinforced.
After a trial run, the system is fully heated for 2 days. When passing through the walls, use corrugated pipes. The distance from the pipe to the top of the screed is at least 30 mm. You should never use coolant coming from the DH system directly, the house hydraulics may suffer from this.

The system must be tested for density and strength. If leakage does not occur with overpressure, the system will function perfectly.
If the heated floor is connected to an electric boiler, the batteries can be connected to the floor heating system directly, and each circuit can be integrated into one unit through a collector.
Since in the central heating system the pressure reaches 16 atm. This point should be taken into account when selecting structural elements - they are mainly designed for 1-2.5 units.
It is necessary to choose the scheme taking into account the area of the apartment. If it is more than 30 m², it is better to connect to different collectors.
Specificity of arranging a warm water floor for various reasons is described in the articles:
- How to make a warm floor under the linoleum on a concrete floor: detailed instructions
- Warm floor under the linoleum on a wooden floor: step by step assembly instructions
Conclusions and useful video on the topic
After watching this video, you will learn the basic principles of installing a water "warm" floor and you can do everything yourself:
Professional pipe recommendations:
The nuances of installation using a collector circuit:
To independently create a heated floor with water heating, you need to arm yourself with patience and high-quality building materials, as well as certified equipment. Set up the balancing valves, installation of the boiler and pump to experienced professionals.
The main advantage of the "warm" floor is the efficiency of this system. In addition to reducing the amount in the bills for heating, there will always be a comfortable atmosphere in the house. The process itself is not very difficult, and any home craftsman will be able to master it.
Is there anything to supplement, or have any questions on the arrangement of water heated floor under linoleum? Please leave comments on the publication. The form for communication is in the lower block.