Well drilling completed, what's next? It is necessary to organize a water supply system that allows you to wash dishes, take a shower, water plants and connect household appliances. Connecting the pumping station to the well will help solve the problem. However, for a positive result, you should know exactly how to do it.
We will tell you about how, on the basis of surface pumping equipment, it is better to arrange an automated water supply for a country house or your favorite dacha. The article presented by us describes in detail the technological rules and principles of assembling the circuit. Taking into account our advice, you can easily arrange the system with your own hands.
The content of the article:
- Features of the device of the pumping station
- Installation location: convenient and safe
- Connection order: step by step instructions
- A few valuable tips
- Conclusions and useful video on the topic
Features of the device of the pumping station
Autonomous water supply based on the pumping station includes a set of devices that provide automatic water supply to the house. To organize a comfortable autonomous water supply, it is necessary to choose a suitable pumping unit, connect it correctly and configure it.
If the installation is done correctly and the requirements for operation are observed, it will last a very long time. The house will always have clean water under pressure, allowing the use of modern appliances: from a conventional shower and washing machine to a dishwasher and a jacuzzi.
The pumping station consists of three main elements:
- a pump that supplies water;
- hydroaccumulator, where water is stored under pressure;
- control block.
The pump pumps water into hydraulic accumulator (GA), which is a tank with an internal insert of an elastic material, which is often called a membrane or pear because of its shape.
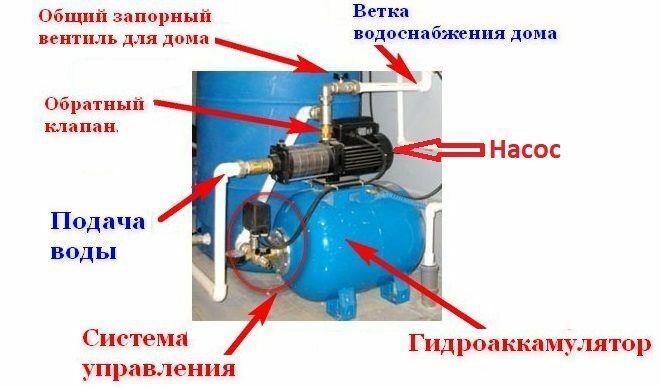
The task of the pumping station is to ensure a constant supply of water to the house at a sufficiently high level of pressure in the water supply system.
The more water in the accumulator, the stronger the membrane resists, the higher the pressure inside the tank. When the liquid flows from the HA to the water supply, the pressure decreases. The pressure switch detects these changes and then turns the pump on or off.
It works like this:
- Water fills the tank.
- The pressure rises to the upper set limit.
- Pressure switch turns off the pump, the flow of water stops.
- When water is turned on, it begins to decrease from the HA.
- There is a decrease in pressure to the lower limit.
- The pressure switch turns on the pump, the tank is filled with water.
If you remove the relay and the accumulator from the circuit, the pump will need to be turned on and off every time the water is opened and closed, i.e. Often. As a result, even a very good pump will break down quickly.
Usage hydraulic accumulator provides owners with additional bonuses. Water is supplied to the system under a certain constant pressure.
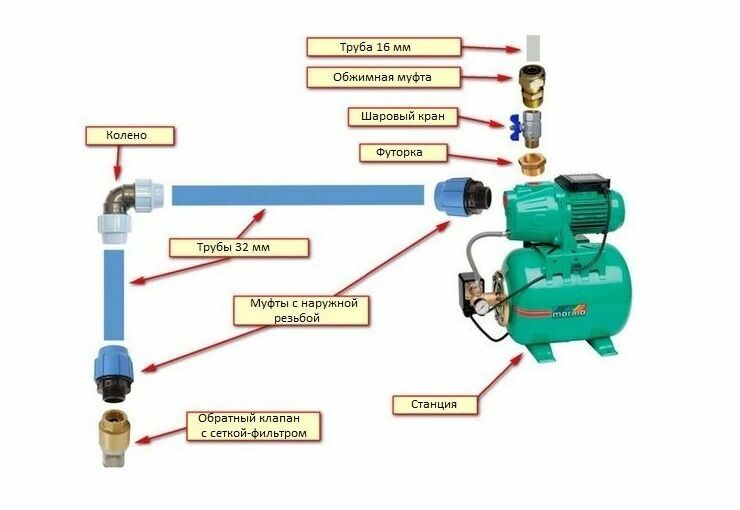
All components and materials necessary for connection should be prepared in advance. They must match the size of the nozzles of the existing equipment, adapters may be needed for successful installation.
Good pressure is needed not only to comfortably take a shower, but also for the operation of an automatic washing machine or dishwasher, hydromassage and other benefits of civilization.
In addition, some (about 20 liters), but the necessary supply of water is stored in the tank if the equipment stops working. Sometimes this volume is enough to stretch until the problem is fixed.
Installation location: convenient and safe
When choosing a place, it is necessary to take into account the technical characteristics of the device and the distance from the installation site to the water level. If it is large enough, the station is placed in a household room or in the basement.
It must be ensured that the following conditions are met:
- it was quite dry and warm;
- it was possible to install soundproofing;
- free access to devices for regular maintenance is provided.
High humidity, as well as freezing of water inside the device, lead to breakdowns.
If the equipment is delivered in the house, you will have to take care of sound insulation. The status and settings of the main nodes must be periodically monitored. Instruments should be placed so that they can easily take readings, adjust relays, etc.
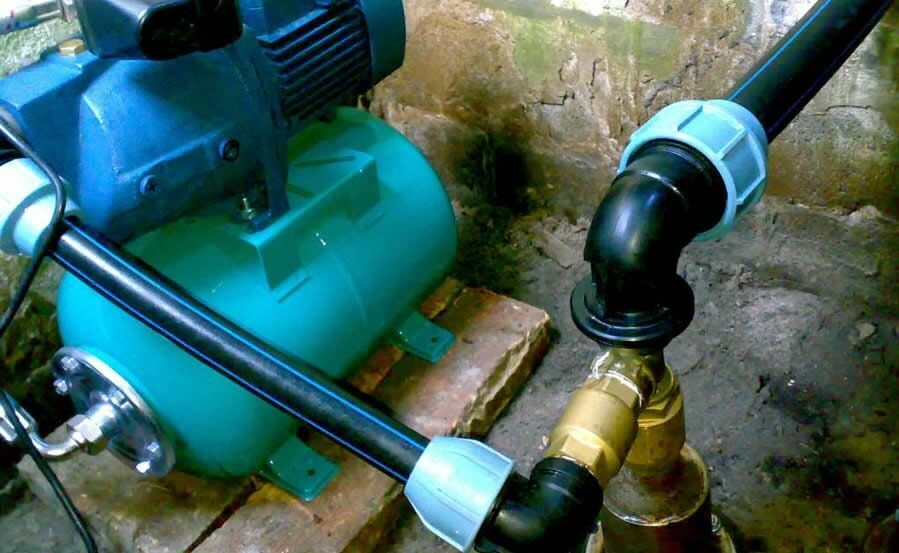
The pipes with which the pumping equipment is connected must be solid, so you need to buy communications with a good margin of length
When installing a pumping station at the mouth of a deep well, a caisson is used so that the devices are as close as possible to the water source. Caisson - this is a container that is quite spacious, in which holes and nodes are provided for easy installation of pumping equipment.
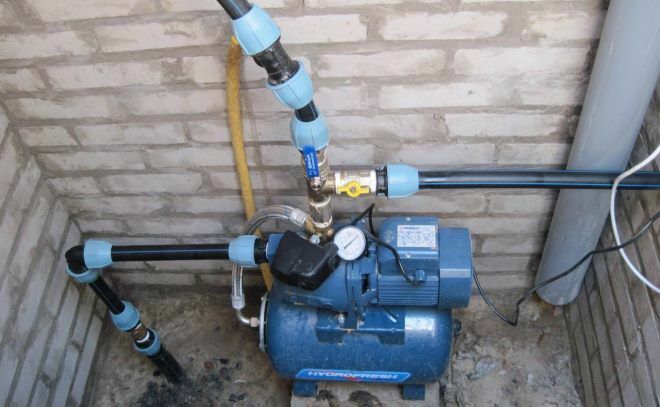
The station is placed in a house or in a caisson, for example, from concrete rings. The equipment must be protected from moisture and freezing, and the residents of the house - from the noise of a running pump
Finished products of this type are sold in specialized stores, you can choose the option that is suitable in size and configuration. They are made of plastic, metal, polymer sand compositions. For self-arrangement of the caisson, the pit is deepened and expanded, the walls are lined with bricks, and a solid cover is mounted on top.
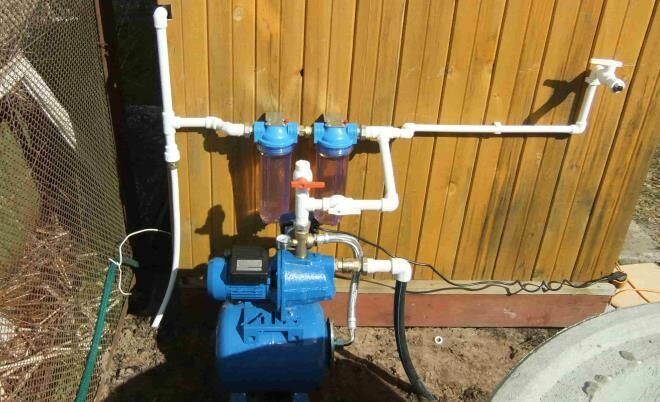
If the equipment will be used only in summer, for example, for watering, you can even put it outside the house. But for the winter, the station will have to be properly mothballed.
Often, instead of the brickwork of the caisson grids, concrete rings are used, between which the joints are sealed, and then waterproofing work is performed. In the resulting small room, pumping equipment is installed.
The installation depth must protect buried equipment from freezing even in the most severe cold. In the southern regions, one and a half to two meters is enough; in the north, a deepening of four meters may be needed.
Connection order: step by step instructions
Pumping stations are suitable for equipment with relatively deep water intakes. In case of exceeding the depth of the groundwater table to the maximum value specified by the manufacturer of the equipment, remote ejectors.
To install, perform the following steps:
- Lay a trench connecting the well and housing.
- Put pipes in it.
- Install plumbing (if not available).
- Install the unit in the selected location.
- The supply pipe is equipped with a filter and a check valve.
- Connect the line to the receiving pipe.
- Connect the unit to the water supply.
- Connect the equipment to the power supply.
- Fill the hydraulic tank with water.
- Perform a trial run of the station.
- Check joints.
- Set up the pressure switch.
External pipeline pipes water supply systems must be laid below the level at which the soil freezes through. It is recommended to make a slight slope from the house to the well so that the water returns to the pump if it stops working. This will protect the device from overheating and damage due to dry running, i.e. work in the absence of water.
The same protective function is performed check valve, which does not allow the liquid to leave the pipe and go into the well. When connecting a surface pump equipped with an ejector, it is required to connect another one to the suction pipe, which is connected to the ejector.
This assembly directs part of the incoming liquid to the base of the pipe through which the liquid enters, which greatly increases the productivity of the equipment. If used submersible pump, work is done differently. It is attached to the suction pipe and suspended on a strong stainless steel cable.
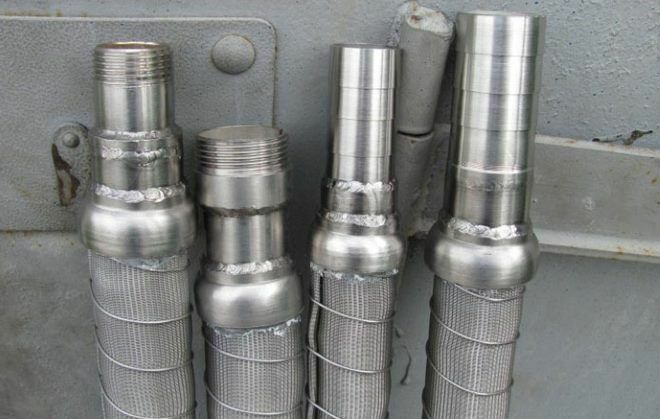
The lower end of the supply pipe should be equipped with a strainer so that sand and other particles do not pollute the water and damage the equipment.
Submersible pumps are conveniently attached to the finished head. Such a device is mounted on the upper part of the casing. It is believed that sealing the well with the help of a head allows to slightly increase its debit. To prevent the cable and cable from getting tangled, they are fixed to the pipe with plastic ties.
If the filter is already in the pump, they are limited to installing a check valve. The edge of the supply line of the surface pump must be located at a height of more than a meter. This minimum distance is half a meter for a submersible pump.
Connections of the unit with pipes must be made using American taps, valves are used, to cover any area and detach it for repair without damaging the rest of the elements systems.
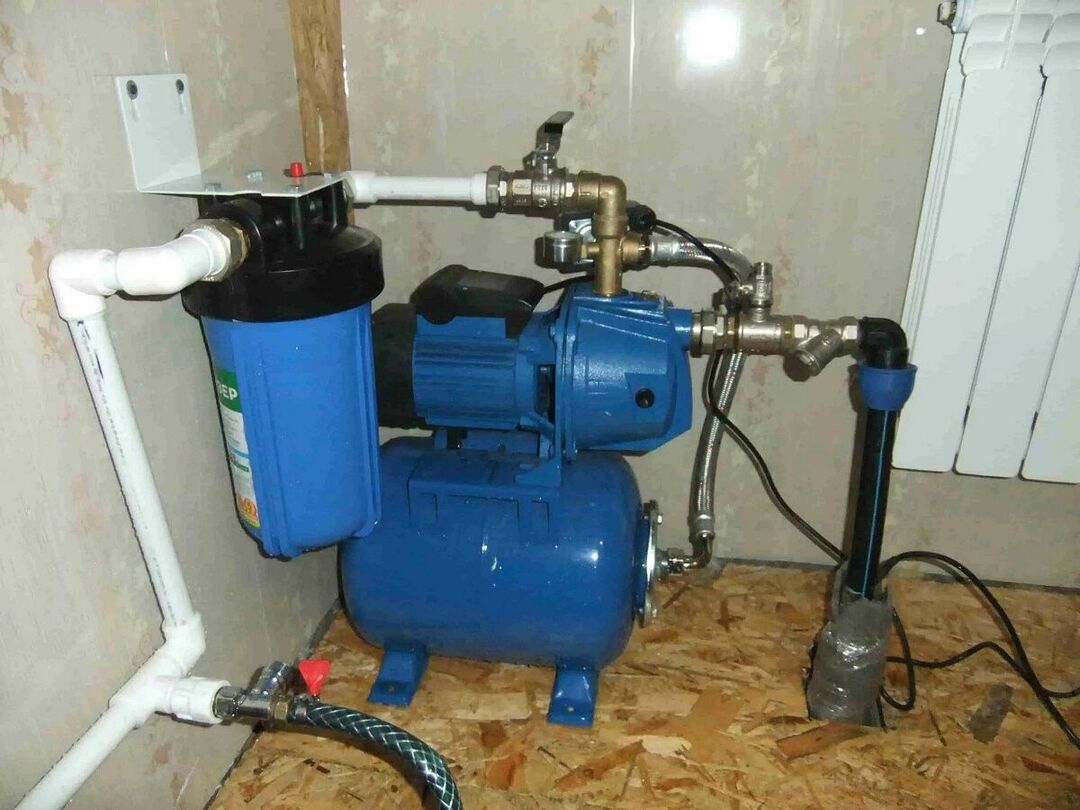
Before the station, it is recommended to install an additional coarse filter, and after it, a filter is installed that will ensure the purity of drinking water by removing unwanted impurities
Installed in working out borehole filter wears out over time, sand begins to seep through it. It is recommended to install an additional coarse filter at the pump inlet.
Power supply is provided by connecting a separate line to the equipment, equipped with an automatic shutdown device, care must be taken to ground it. Before starting, the device is filled with water through the opening provided for this.
In this case, the pressure in the hydraulic tank should be:
- about 1.5 bar for a container of less than 30 l;
- about 1.8 bar for 30-50 l;
- 2 bar or slightly less for a 50-100 l tank.
Then the water inlet hole is closed and the device is connected to the mains. You need to open the valve to let the air out. In a few minutes, water will flow from here. Otherwise, turn off the device and add a little more liquid.
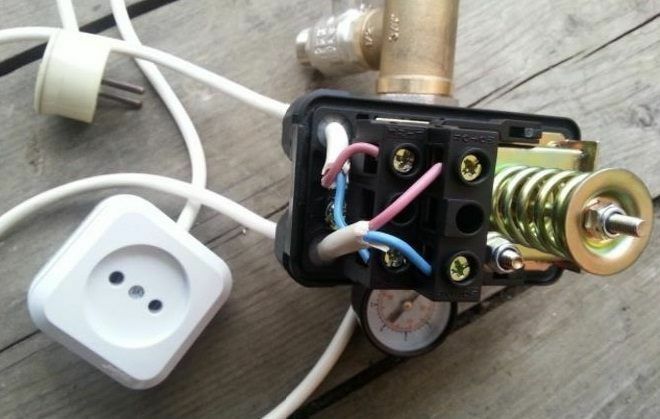
To adjust the pressure switch, it is necessary to remove the case from it in order to gain access to the screws with which the device is adjusted
Repeat switching on so that the device starts to work normally. Now you need configure the relay. To do this, the GA will have to be emptied and then refilled. The indicators are set by rotating the corresponding screws.
A few valuable tips
Threaded connections must be tightened with a wrench, not by hand, to ensure the necessary tightness. For connecting fittings, protective devices and the pumping station it is better to use pipes with a slightly larger diameter than the calculated one in order to compensate for the load increased due to bends in the main.
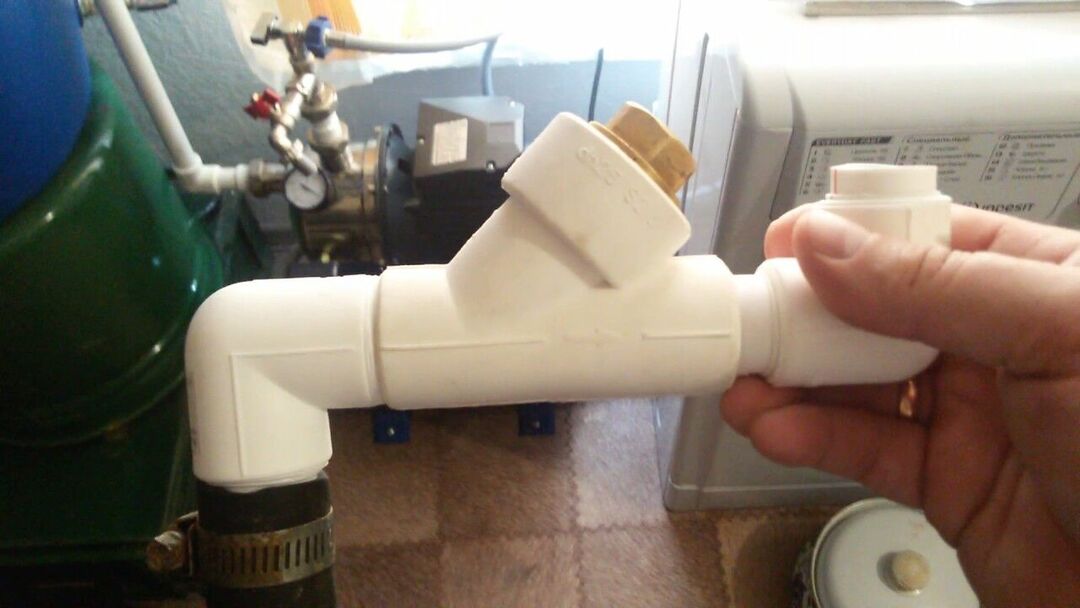
The recirculation line will protect the pump and will increase the water pressure in the system. A tee is required to install the return line.
To protect the pump from idling, a recirculation line can be installed. To do this, tees are placed on the supply and suction pipes and the free pipes are connected by a return line.
A valve should be placed on it, which allows you to control the intensity of the reverse flow. Such an addition will improve the pressure, but will somewhat reduce the performance of the device.
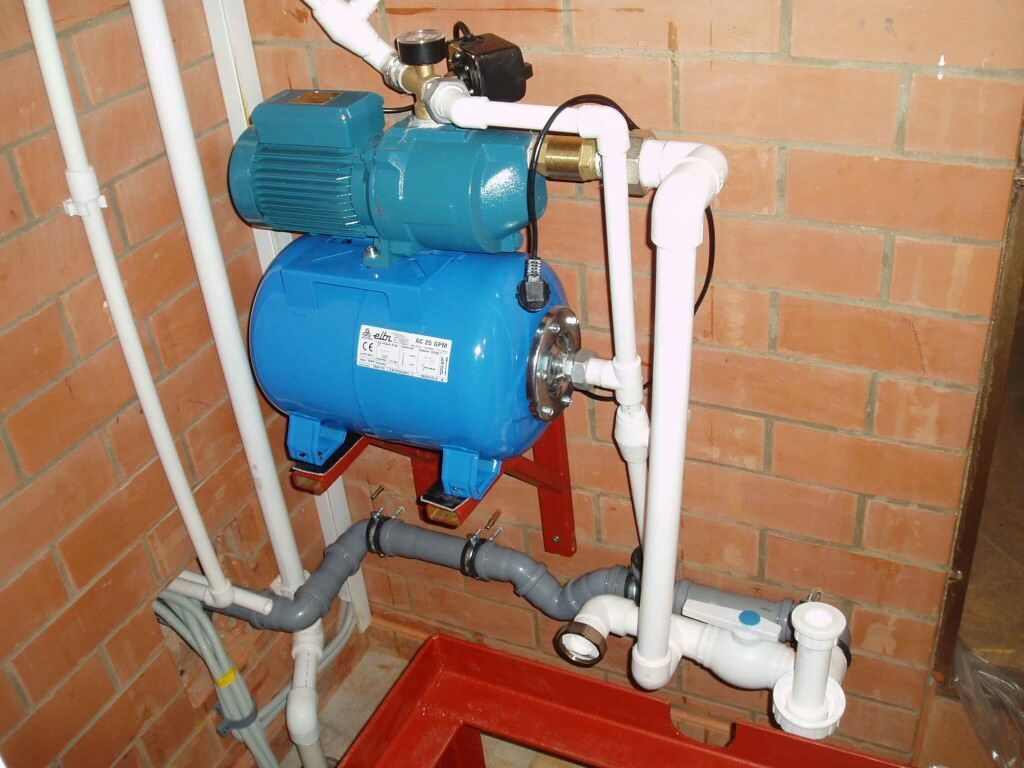
A bracket can be used as a base for the pumping station, but it must be level on shock absorbing pads so that vibration is minimal
The pumping station is placed on a perfectly flat base, equipped with shock-absorbing pads. This will reduce the vibration impact and also reduce the amount of noise.
Approximately every three months it is necessary to check:
- condition of joints for leaks.
- the condition of the filters for timely cleaning.
- relay settings for their correction;
- the condition of the hydraulic tank to determine the location of leaks.
If the pressure level in the HA does not meet the required level, it is easy to pump it up using a compressor or pump. On large containers, a nipple connection is provided for this. If liquid flows from the hole, then the internal membrane is torn and needs to be replaced.
Conclusions and useful video on the topic
Video #1 Performing piping of pumping equipment:
Video #2 Detailed overview of the installation in the caisson:
Video #3 Connecting the unit to the well-needle:
Having understood the device and principles of operation of surface pumping equipment, the installation can be handled without problems. It is necessary to choose high-quality equipment, follow the rules of its operation, and perform maintenance in a timely manner. Compliance with these conditions will ensure the correct operation of the unit and uninterrupted water supply.
Please write comments in the block form located under the text of the article. Tell us about how you installed and connected pumping equipment for automatic pumping of water. Share with site visitors useful technological subtleties.


