Inspection of the room before replacing the bathtub always brings surprises. In most cases, a tiled base was either done wrong from the start or sagged over time. In general, it needs to be changed or repaired, but how to level the floor in the bathroom so as not to do unnecessary work, and the leveling result is preserved for a long time?
The content of the article:
- What is the coverage requirement
-
Step-by-step instruction
- We prepare the surface
- Plate preparation
- The bottom layer of waterproofing
- Choosing a solution
- Installing beacons
- Fill the screed
-
Leveling under tiles
- We make waterproofing
- Required materials
What is the coverage requirement
The worst solution is not to align, leave everything as it is. It is clearly not necessary to count on the fact that height differences can be compensated by linings or adjusting the screw legs. The floor needs to be leveled for many reasons. At least in order to be able to install a new bathtub without any problems, and water and all liquids that fall on the floor do not flow under it and do not collect puddles there.
It's not just a matter of knocking down the old coating and laying the new one. The floor under the bathroom, as well as throughout the room, must meet certain requirements:
- The surface must be flat and strictly horizontal. These two conditions will help when setting the drain slope on new sewer pipes and a bathtub. In addition, without a flat subfloor, it is impossible to lay a normal floor covering.
- High quality waterproofing. The floor, especially in the bathroom, should not leak to the neighbors on the floor below. In addition, a poorly drying, perpetually wet floor creates additional conditions for the development of fungus under the tiles and on the walls.
- The presence of insulation under the screed over the entire surface.
A cold bathroom floor means that the water will evaporate much harder. The seams will remain raw.
Step-by-step instruction
It is clear that before leveling the surface, it will be necessary to dismantle the old bathtub and remove all objects standing on the floor, or those that may interfere with work. The plan for leveling the base under the bath consists of four consecutive operations:
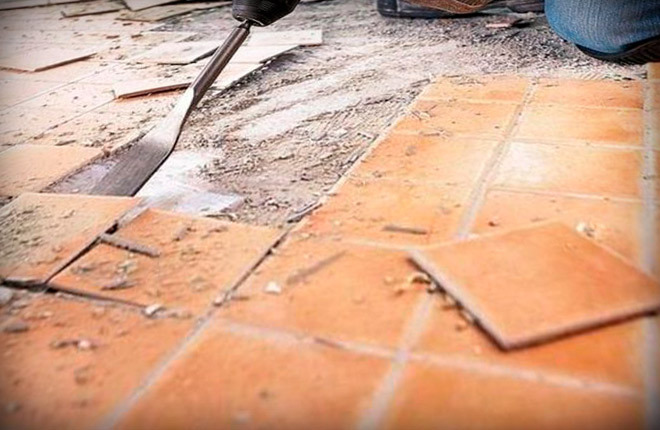
- We cut off the excess, clean up the old masonry adhesive, remove pieces of tiles, cement-sand screed and waterproofing. If the floor under the bathroom was not insulated, and the rest of the surface is covered with thermal insulation, then everything will need to be removed to the rough base of the slab.
- We strengthen the surface of the concrete or screed, overwrite all the cracks, they will definitely be in the area under the bathroom due to the constant waterlogging of the concrete.
- We apply the first layer of waterproofing.
- We install a heater.
- We make a leveling screed on the insulating layer.
- Floor waterproofing.
At the end, the floor covering is laid. It can be a tile or self-leveling floor. Linoleum or laminate in a damp room is not the place. Under the linoleum panel it will always be damp, and, therefore, a fungus may appear. There is no point in laying lamellas directly on the screed under the bathroom, the coating will become unusable after a year of service.
We prepare the surface
First of all, we remove the plumbing in the room, remove the bathtub, remove sewer pipes, drains, everything that can interfere with properly leveling the floor. Residues of tile adhesive can be cleaned off with a trowel. It is not worth chopping with a chisel, you can make a hole, which will then be difficult to level.
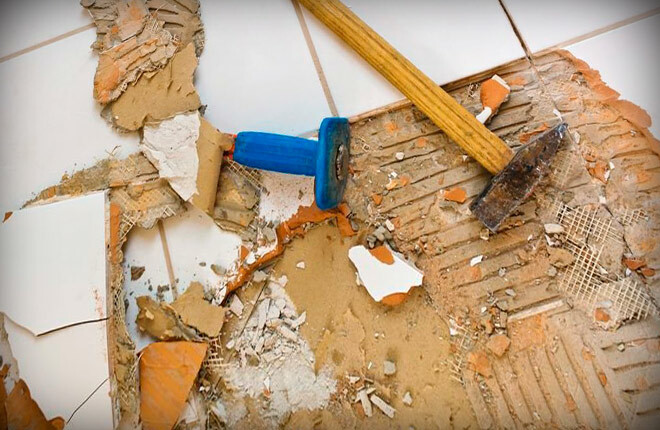
First, we knock down the pieces along the walls with a puncher, carefully and without fanaticism. If there is a layer of insulation under the tile, then it will also need to be cut and removed. Most likely, ordinary expanded clay was used as thermal insulation for the floor in the bathroom, and for waterproofing usually builders lay glass roofing material or, even worse, pieces of roofing paper glued resin at the joints.
All this needs to be cut to a concrete slab. Why is that? Firstly, the old floor insulation, especially the area that was under the bathroom, has clearly already lost half of its heat-insulating qualities. Therefore, if you level the floor in the bathroom, then why not restore the insulation?
Secondly, it is very important to get a margin for the thickness of the future screed. If the height from the concrete slab to the level of the door sill is at least 150 mm, then it will not be difficult to insulate and level the floor. But if the height difference is only 30-50 mm, then problems may arise. In order to make a solid cement-sand screed, level the floor for laying tiles, and even lay waterproofing and insulation on the entire bathroom floor, a margin of 50 mm is clearly not enough.
After stripping, removing debris and remnants of the screed with old thermal insulation, a clean, dry surface of the floor slab should remain.
Plate preparation
The first step is to repair the floor slab. Along the perimeter of the room along the walls, in the area under the bathroom, wherever water leaked, cracks and stains from rusted fittings could appear on the concrete. All cracks must be treated with a deep penetration primer and rubbed with a repair mixture.
Before leveling the floor, you need to "pat up" the floor slab. Pay special attention to the joints along the lower edge of the walls. The rest of the material is removed with a trowel and cleaned with emery.
The bottom layer of waterproofing
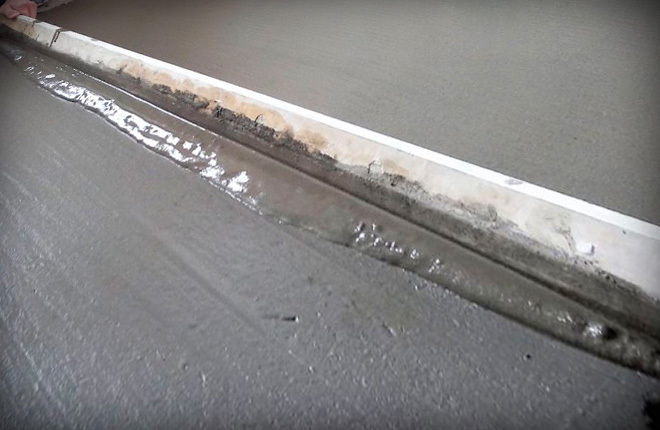
It is recommended to lay two layers of rubber or butyl-styrene waterproofing over the concrete slab. Apply with a difference of 4 hours, be sure to put a sheet of fiberboard under your feet so that the shoes do not tear the still soft layer of rubber. You also need to glue the bottom edge of the walls, so that you end up with an impromptu bathtub 10 cm high.
Builders often criticize the use of a bottom layer of waterproofing. It is believed that such a scheme is applied only on the floor in the bathroom of private houses, and protection against water on the floor slab is relevant for an apartment, especially since there is no need to level the floor.
In fact, additional waterproofing is needed to protect the insulation and screed from water. If a flood occurs at a neighbor through a wall or a floor above, water will go through the joints in the floor slabs. So, expanded clay can get wet. Then it will be necessary to change everything and level the floor from scratch.
Choosing a solution
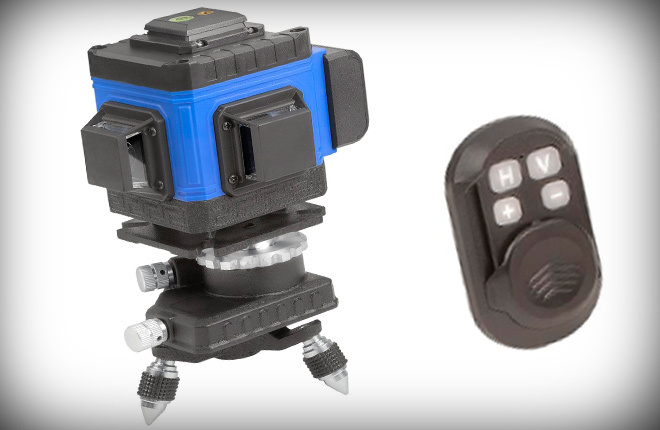
After the rough waterproofing layer has dried, you need to install a laser level on the floor and make a map of the surface elevation changes for yourself. We simply measure the distance from the floor to the beam with a ruler. You need to go from the center to each wall and diagonally to the corners. This map will come in handy when you need to finally level the floor in the bathroom.
The next step is to pour the screed and lay the insulation. Depending on the chosen scheme, thermal insulation of the floor in the bathroom, two types of insulation are used:
- Penoplex or EPS 25 mm thick;
- Expanded clay of two fractions, sand (up to 5 mm) and crushed stone (pellet size up to 15 mm).
If the height difference from the level of the threshold to the waterproofing is very large, then it is possible to lay foam sheets 50 mm thick, two layers of 25 mm each with overlapping joints. In the bathroom, it is still better to use penoplex, it is stronger and better holds the size under pressure, which is very useful when you need to lay and level the flooring.
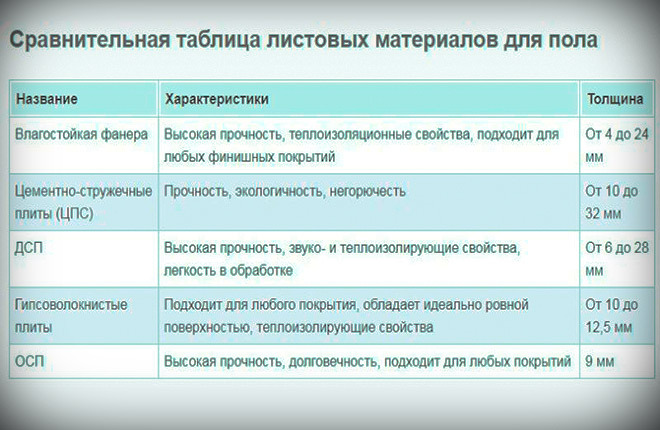
The floor itself can be leveled only with a cement-sand mixture (CPS) or a self-leveling composite polymer (self-leveling floor). DSP can be bought ready-made in packages of 10 kg and 30 kg. A mixture that can level any floor is quite possible to do it yourself. Mixing is done on ShPTs300 cement 1 part plus 2.5 parts of washed river sand, sifted and dried. After kneading, add 100 ml of PVA to a bucket of the finished solution. But if you haven’t leveled the floors before, then it’s better to buy a ready-made DSP.
Self-leveling compounds are used only for final leveling. The self-leveling floor is quite expensive, so there is no point in leveling the subfloor with it.
Wet screed
In any case, the first layer on the lower waterproofing must be done by the DSP. If the floors in the bathroom are very curved or with a large slope, then a rough screed will help pre-level the surface to an acceptable level. What cannot be leveled at this stage can be compensated for by self-leveling floors or when laying tiles.
A rough screed can be made using slab technology:
- We lay wooden corks (50x30x20 mm) on the surface in rows, one every 30 cm. On top of the corks we lay out strips of metal or better fiberglass mesh with a cell of 15 mm. Each strip must be checked for level and, if possible, aligned horizontally.
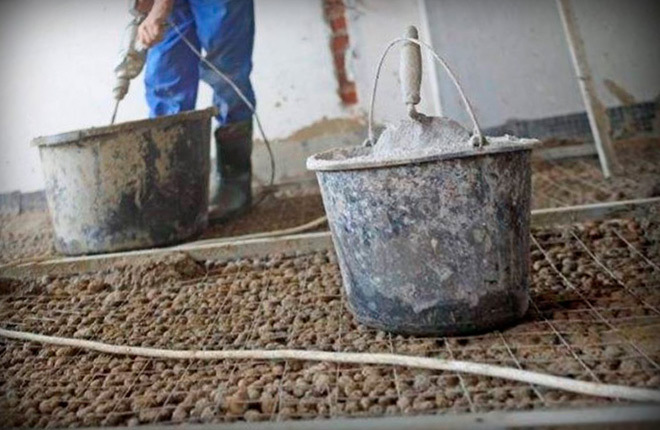
- Pour the solution, by consistency it should be more liquid than thick sour cream. We fill the entire floor so that the grid is completely hidden under the DSP layer.
- As soon as the mixture begins to set (harden), we spray a small amount of water on the surface and use a wooden mop to level the still liquid, but already viscous screed.
Alignment can be guided by two masking cords stretched over the floor on opposite walls, or by a laser level beam. As soon as the mixture thickens to the appearance of traces of the surface from the tool, the bathroom door is closed for a day. For another three days, the screed will gain strength. During this period, you can still clean up and level something on its surface.
With expanded clay
If the task was only to level the floor without insulation, then it would be possible not to make a rough screed. But for laying EPPS or for backfilling with expanded clay, preliminary leveling by pouring DSP must be done without fail. Otherwise, over time, under load, the pellets would have shifted along the slope to one of the walls and holes in the floor would have formed somewhere under the bath.
For insulation, you need to pour a layer expanded clay, first fine (sand) 10-20 mm, then expanded clay crushed stone up to 100 mm thick.
Semi-dry
Most of the solution is spent on the screed laid on top of the insulation. Accordingly, when trying to level the floor, the thickness of the solution layer increases.
For small bathroom spaces, you can use the semi-dry version, when the filling insulation is not hidden under a layer of mortar, and pre-covered with waterproof cement-bonded particle boards or waterproof drywall.
The joints between the individual sheets, as well as the line where the floor adjoins the walls of the bathroom, are sealed with sealant or a special insulating tape.
Self-levelling compounds
It is clear that laying thermal insulation with further screed using wet or semi-dry technology does not guarantee a smooth surface. The solution may shrink or the plates will lie unevenly on the insulation. In general, before laying tiles or any other floor covering, the floor must be finally leveled.
The easiest way is to use a self-leveling compound. It is a polymeric powder of self-hardening resin with a mineral filler. The composition is diluted with water or a special solvent to the state of a viscous liquid.
To level the floor for tiles, it is enough to fill it with liquid polymer so that the layer is at least 25 mm thick. If done according to the instructions, the floor is strong and hard, you can put a bath or any other plumbing.
Self-leveling floors do not have the proper resistance to detergents, soapy water spilled from the bath, so additional waterproofing and tile are required for the room. It is no longer necessary to level such a base.
Installing beacons
If you level the floor according to the traditional scheme with expanded clay insulation and a wet screed, you can’t do without beacons. These are long slats of larch or oak impregnated with linseed oil, which help to level the bathroom floor in a horizontal plane.
Lighthouses are laid on a solid base (slab), on which expanded clay is sprinkled, and fixed with holders. If you do not use a heater, then you can level and fix with a small amount of gypsum. Beacons can be placed on XPS slabs, but not on expanded clay, otherwise it will be impossible to align.

After the upper edges of all the rails are aligned in the same horizontal plane, the DSP screed can be laid.
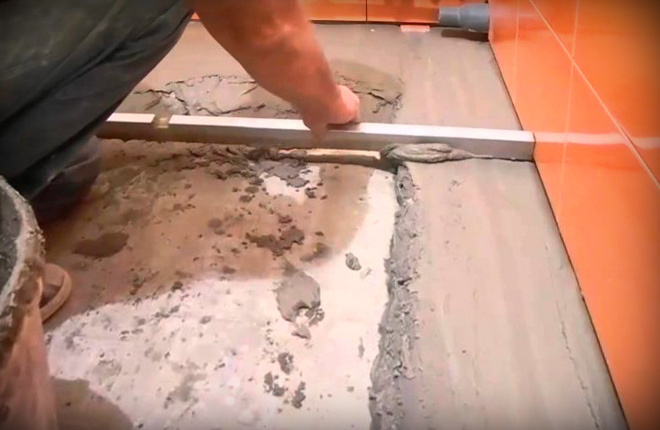
Fill the screed
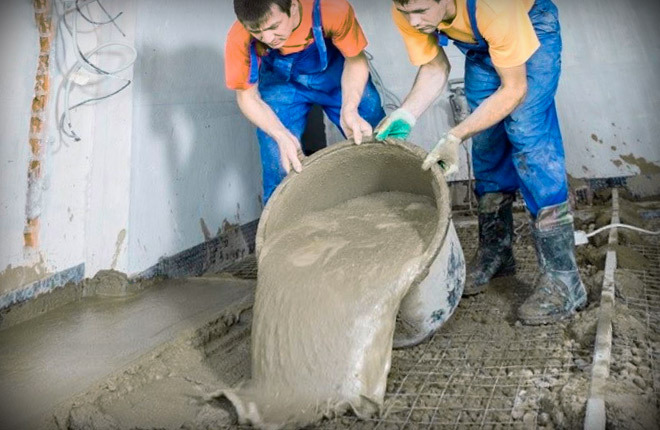
To level the bathroom floor along the beacons, you can use a liquid solution, but then there is a risk of the guides floating (extrusion of wooden slats). In addition, cement-sand mixtures with a large amount of water shrink strongly.
Therefore, for the bathroom it is better to use a solution of medium viscosity, it is kneaded in large tanks (containers) and unload into the space between the beacons, so that the mixture evenly fills the entire space under slats.
After a part of the DSP has been laid, the concrete floor must be leveled with a rule. To do this, the tool is supported on the rails of the beacons and stretched in a horizontal plane. Depending on the size of the bathroom, pour out the solution and level the floor several times. The specific number of repetitions depends on how far you can reach the rule on the lighthouses and align the screed.
Leveling under tiles
At room temperature, the screed sets in 5-6 hours in a semi-solid state. That is, the DSP material is already solid, but it can still be cut with a spatula or knife. If you lay a 12 mm plywood sheet on the screed, you can carefully walk on the still fresh DSP.
At this stage, you need to finally level the floor in the bathroom. You can use a laser level, but a building bubble level is better. With its help, we check the presence of slopes, humps and holes on the floor. It is necessary to cut off the excess mortar with a spatula, and then sand it with a plastic rule with water. In this way, you need to level the entire floor.
In addition, you need to pull out the wooden slats of the lighthouses from the screed. If the material is not wood, then they can be left in concrete.
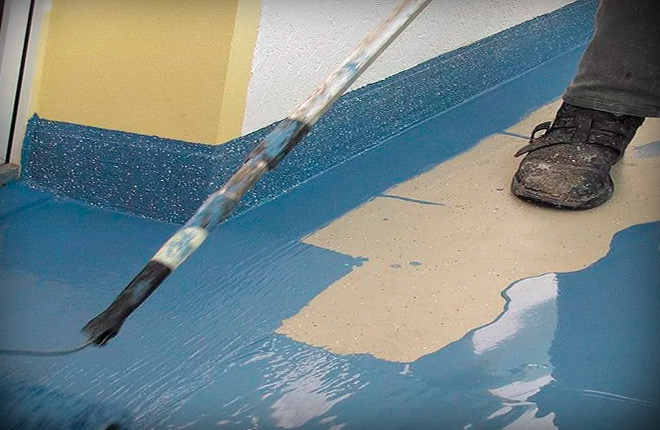
We make waterproofing
Not earlier than three days later, a layer of insulation must be applied to the floor in the bathroom. If there is time, then you need to clean up the remnants of the solution that has fallen on the walls of the bathroom, remove the dried DSP from the corners, clean and level the floor in front of the threshold. The floor must be perfectly dry and clean.
If you need to further grind the screed to remove the defect and level the surface, then after work the concrete will need to be washed and dried. Otherwise, the waterproofing may not adhere to the cement surface.
To place the bathroom, it is recommended to apply waterproofing in two layers or once, but with preliminary priming of the cement with a primer. There is not much difference, but you should not lay too thick a layer of waterproofing. It will not work to level the floor, only problems with the flooring will appear.

Waterproofing is glued to the lower part of the walls with an overlap on the floor. This is done so that water does not flow into the joint between the floor and the walls of the bathroom. The primer is applied a few hours before the main layer of insulation, it is best to use a brush with medium bristles.
The insulation itself is applied by roller or brush, depending on the viscosity of the material. Usually the floor in the bathroom is “rolled” twice: in the longitudinal and transverse directions.
Important! After laying the waterproofing, it will be impossible to level the floor by cleaning the concrete. Therefore, all finishing operations with a concrete surface must be completed before waterproofing.
Required materials
In order to level the floor, it is not necessary to use expensive imported materials. Something you can do with your own hands, for example, DSP. On sale, a bag of 50 kg will cost 230-250 rubles, if you do it yourself, you will only have to spend money on ShPTs300 cement. For one ten-liter tank of the finished mixture of cement-sand mortar, about 4 kg of cement will be required.
For self-leveling floors, you can buy a KNAUF self-leveling mixture or the same Prospector, which will cost less, although it takes longer to level them.
To insulate the floor in the bathroom, you will need at least a cube of expanded clay, it is cheap, up to 50 rubles. bag. For lighthouses, it is better to buy plastic or aluminum slats, after you level the floor, they can be left in the screed.
For waterproofing, "Penetron" or any other material similar in composition is suitable.
It is quite possible to level the floor in the bathroom even on your own, without the involvement of craftsmen and specialists. All that is required is to follow the sequence of work and not try to speed up the process. You need to level the floor in the bathroom once, but with high quality, and forget about past problems.
Tell us about your experience in how you level the floor in the bathroom or in other rooms. What problems arose and how they were solved in the course of work.


