There is a staircase to the attic in almost every country house. It is used for safe and comfortable lifting. The design can be bought in a ready-made form or make it yourself. How to make it and what is needed for this, we will tell further.
The content of the article:
-
The main parts of the structure
- Kosour
- bowstring
- Safety handrails or railings
- Flight of stairs
- Treads and risers
- Security requirements
-
The main types of structures
- Stationary
- Folding structures
- What materials and tools will be needed?
-
Step-by-step instructions for making stairs to the attic
- Easy option
- Medium difficulty option
- Stationary option
The main parts of the structure
Attic stairs consist of separate parts:
- stringers and bowstrings;
- railings for safety;
- flight of stairs;
- steps.
Kosour
This structural element of the attic stairs is a solid beam. On its surface there are cutouts on which steps are fixed. Usually the design has 2 stringers, which provides it with strength and stability. But there are models with one kosour, to the central part of which a wooden plank is attached.
bowstring
A bowstring is a load-bearing inclined beam. It differs from the kosour in that its ends are hidden, and special grooves are used to fasten the steps. There are always two bowstrings in the attic stairs. They are located on both sides of the structure.
Safety handrails or railings
Railings are called railings located on the outer sides of the stairs to the attic. To connect them, use handrails attached to the top of the railing. Together they perform a protective function, ensuring the convenience and safety of movement on the stairs. They are made of metal, wood, glass.
If the staircase to the attic has a hatch, then the railing should reach its base and at the same time not interfere with the opening of the lid. Handrails must meet certain requirements:
- height cannot be lower than the level of a person's belt;
- the width should be such that it is convenient for a person to hold on to them;
- there should be no sharp corners at the ends of the handrails;
- outwardly, they should be in harmony with the stairs and the interior of the house.
Flight of stairs
It is necessary to combine all the elements into a single design. It consists of steps that are attached to the kosour and bowstring. The ladder can be single-flight or multi-flight. A single-march structure from the floor to the attic will not have turns. Multi-march consists of several spans.
Treads and risers
The tread is a horizontal plank for the feet. Between each tread there can be vertical boards - risers. They are used to further strengthen the structure. The design with risers is called closed. If they are not, then the steps are open. These are usually folding stairs to the attic.

Security requirements
The stairs to the attic are a risk zone. To avoid injury when using it, the design must meet certain requirements:
- Handrails with handrails are essential for safely climbing or descending stairs.
- If a hatch is used to enter the attic, its dimensions should not impede free movement.
- The ladder must be capable of supporting a weight of more than 200 kg.
- If the staircase is wooden, its surface is covered with a fire-fighting compound.
- The angle of inclination of the structure should be within 60-70 degrees.
- So that the structure does not interfere with movement in the room, it must be installed next to the wall. It is desirable that it be placed in the corridor, but not in the kitchen or in the living room.
- The width of the stairs should be about 80 cm. The height of the steps depends on the height of the people who will use the structure.
- The standard dimensions of the hatch to the attic are 70 * 120 cm.
Read additional material on the topic of arrangement: Attic ventilation in a private house.
The main types of structures
The simplest ladder to the attic is a ladder. However, it is unstable and uncomfortable, especially when moving with heavy hands. This option is suitable if the attic is used to store unnecessary things, so they rarely look in there.
More often, stationary or folding ladders are used to climb to the attic. Based on where the structure will be placed, it is divided into external or internal.
Outdoor models are usually made of metal and additionally coated with special paint. It will protect against the negative effects of precipitation.
If an internal option is used, it is necessary to think over its size and shape in advance. The design should look good indoors and not interfere with its inhabitants.
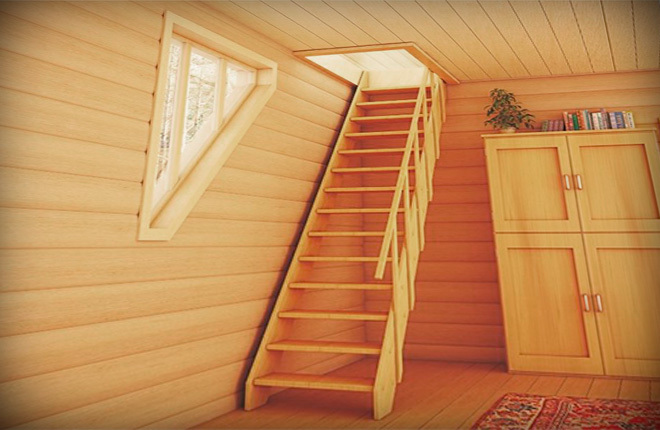
Stationary
Usually monolithic structures are made of wood. If they plan to use the stairs every day (they equip a workshop, a rest room, a bedroom in the attic), it is complemented by a door. Staircases can be allocated for stationary stairs. But even without them, you will need a lot of free space to install the product.
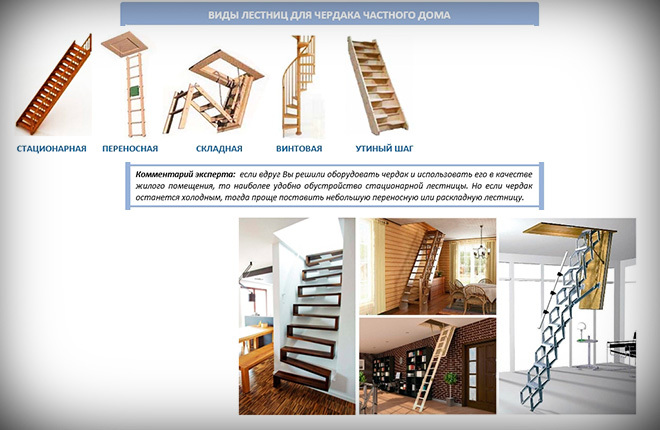
Folding structures
You can buy a folding attic ladder or make your own. Schemes and drawings can be found on the Internet. They are suitable for small spaces where space is limited or where a permanent structure cannot be made.
The advantages of folding attic stairs are lightness and small dimensions. But the strength of the product may be limited. Such designs are divided into:
- Scissor. They are attached to the hatch and laid out down in the form of an accordion. For their production, metal is used, which over time can begin to creak. To prevent this from happening, the elements must be lubricated regularly. Suitable for occasional use. Differs in insignificant loading capacity.
- Telescopic. Consist of several sections. Aluminum is often used for their production, so the product is light and durable. At the same time, telescopic options did not become popular. Due to its compact size, this ladder can be transported in the trunk of a car.
- Sliding. Used in small spaces. For their production, light metal or durable wood is used. The ladder extends from the attic hatch. Its features are light weight, compact size, strength.
- Folding. Consists of several sections. The first is firmly attached to the hatch to the attic. The second half is attached at the bottom with the help of hinges. This makes it possible to fold the product forward.
- Retractable. The product can be fully retracted behind the attic hatch.
- Screw. Suitable for spacious rooms, as they take up a lot of free space. At the same time, the design looks easy. But moving up such stairs can be inconvenient and even dangerous, especially if there are no railings.
What materials and tools will be needed?
To create a staircase with your own hands you need:
- Timber and plywood to create a hatch to the attic. The cross section of a wooden beam is about 50 * 50 mm. The thickness of the plywood sheet is 10 mm.
- Wooden board (20mm thick x 120mm long) to create the stair details. Board length may vary. It depends on the number of sections, step pitch, linear parameters of the product.
- Folding and folding mechanisms that will provide cushioning when opening the hatch.
- Loops for fastening the hatch. They can be replaced with a solid piano construction.
- Mechanisms that will keep the hatch from suddenly opening.
- Mechanisms (hinges) that will help the sections fold or unfold.
- Wood saw.
- Self-tapping screws and anchors.
- Roulette.
- Screwdrivers.
Step-by-step instructions for making stairs to the attic
Step-by-step instructions depend on the chosen design option. Based on your skills and available space, you can choose from easy, medium, or hard.
Easy option
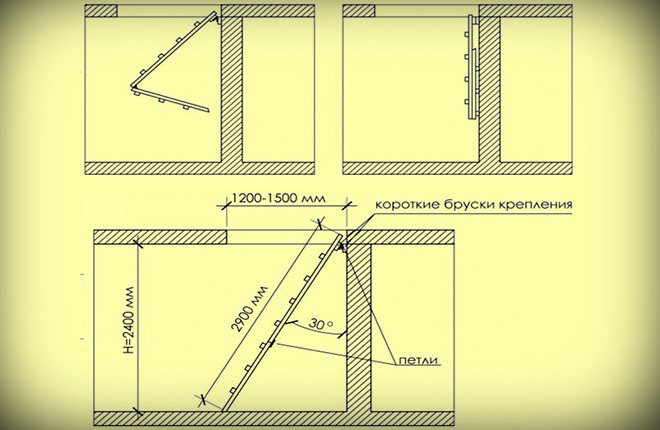
Suitable for those who do not have experience in carpentry, the room is small in size, and the hatch is located near the wall:
- Prepare a wooden ladder and use a tape measure to measure 2/3 of its length. Cut and connect the parts with card loops. The smaller part should fold against the wall.
- Attach long wooden blocks to the bottom with self-tapping screws. This will become the basis of the product. At the top, a short beam is attached to the card loops. Connect it to the beam, which is attached at the bottom of the hatch.
The disadvantage of this option is that the product will always be in sight.
Medium difficulty option
When folded, this option will not be evident. The basis for the design will be the hatch. Its size depends on the dimensions of the opening. For its manufacture, 4 beams 50 * 50 mm and a sheet of plywood 10 mm thick are used.
On each edge of the beam, cuts are made at half of its width, which are smeared with glue. A rectangular frame is assembled from the bars, using self-tapping screws to strengthen the joints.
The finished frame is attached to the hatch with hinges and upholstered with a sheet of plywood. To prevent the hatch from opening on its own, a latch is installed. If the attic is not heated in winter, the edges of the hatch are sheathed with a sealant.
You can use a ready-made ladder to the attic or make it yourself out of wood:
- The finished structure is sawn into several parts. Their length should not exceed the width of the hatch.
- Separate sections are connected with metal hinges.
- The top section is attached to the top side of the hatch.
This option is suitable for a small room, since when folded, the structure will be removed to the attic.

Stationary option
This option is the most reliable. But it will take more time and material to create it. It should be chosen if the attic is used frequently, and the house has enough free space.
The step-by-step instruction looks like this:
- Calculations of the future product are carried out with the calculation of the pitch, span length, tread. On their basis, a drawing is created.
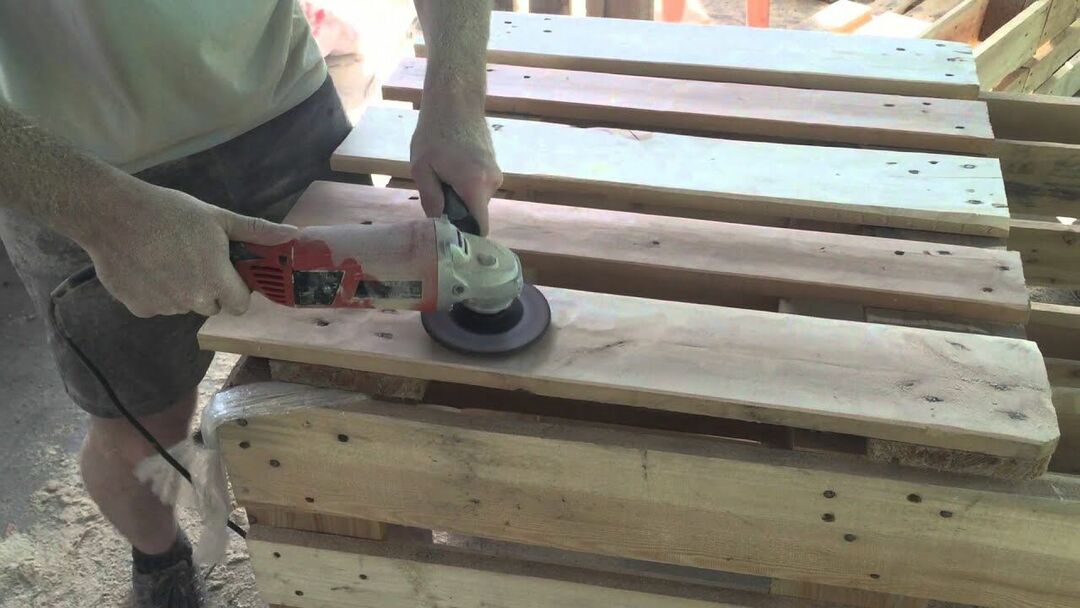
- Prepare boards 40 cm wide. The length is equal to the length of the span. To create steps, boards, durable glass or plastic are used. The wood used must be dry, otherwise the product will quickly become unusable, start to creak or dry out.
- Prepare braids. On the boards (40 cm) make markings according to the finished patterns. Make cuts on the marks.
- Kosour is being installed. They should rest against the floor of the room and the attic.
- Steps are being installed. The easiest way to do this is using self-tapping screws that are screwed into the protrusions of the stringers.
- Railings are installed for safety. They can be wooden or metal.
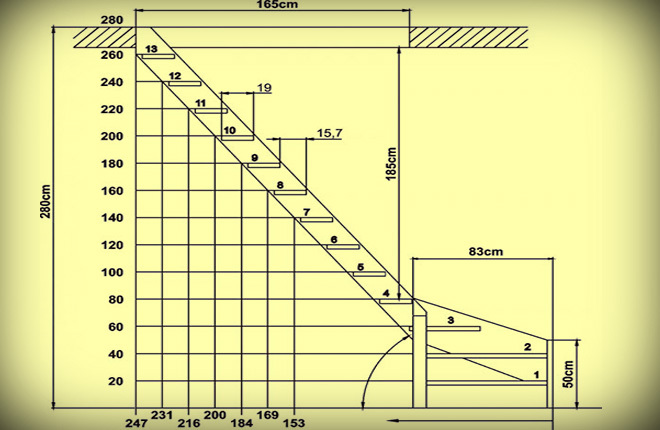
In order for the structure to be durable and safe, it is necessary to correctly carry out calculations and use high-quality material.
See how to make an attic folding ladder:
Does your house have an attic? What ladder did you choose for it? Did you make the design yourself or buy ready-made? Share your experience in the comments.