The quality of outdoor recreation directly depends on the conditions. For a small Sunday rest in the country, a lawn under a wooden canopy in front of the house is also suitable. But if you plan a permanent pastime in the open air, then it is best to make a gazebo from a profile pipe. Build once and forget about problems with rain and wet grass.
The content of the article:
-
Preparatory stage
- Ready options
- Drawings and diagrams
- Which profile pipe to choose?
-
Construction stages
- Foundation
- Bottom trim
- Installation of vertical racks and painting the frame
- Roof fabrication and roofing
- Decorative trim and moisture protection
- wall cladding
- Floor
- Results
Preparatory stage
Preparation for the construction of the gazebo is no less important than the assembly process itself. To build you will need:
- choose a place on the site in front of the house;
- make a foundation in advance, the structure from the profile pipe will turn out to be quite heavy, without a base, the gazebo will quickly “roll”;
- choose a design, make a drawing and calculate the amount of materials needed.
Usually a metal structure is assembled directly at the installation site. The profile pipe is cut into blanks, adjusted and welded by a welding inverter.
It is only necessary to deliver to the dacha the required amount of a square profile in blanks of 6 m. But for this it is necessary that the power grid be connected in a country house. Moreover, its capabilities (power) should be enough to connect the welding machine.
Otherwise, you will have to make a gazebo from separate sections welded from a profile pipe. Or buy a ready-made design of a country gazebo made of thin-walled galvanized profile, plastic and cellular polycarbonate.
Ready options
As a prototype of a future gazebo, you can use existing structures. It is not necessary to copy the model to the smallest detail, but especially successful solutions must be used.
Since a metal profile pipe will be used to build the gazebo, it is possible to make the frame light, almost openwork. But, on the other hand, a certain experience in working with metal and designing frame structures from a profile pipe is required.
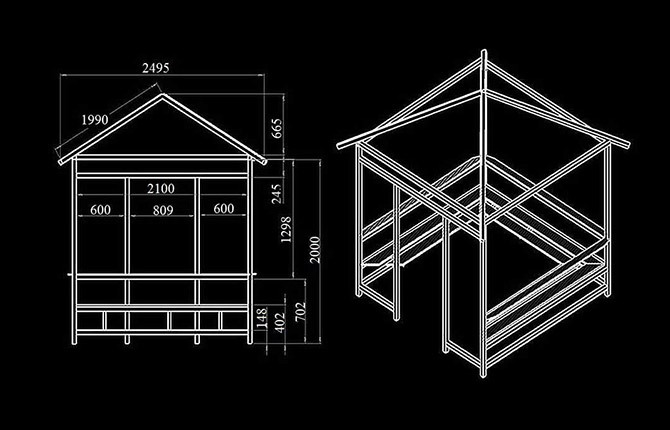
For the first experience, you can choose a model with thickened vertical racks and a hipped roof.
The gazebo is built from a square pipe 50x50 mm and 40x40 mm. A simple metal profile structure with a convenient design, two entrances, no railing (which children always like) and a well-thought-out roof scheme.
If a more spectacular appearance is required, decorative elements can be added to the design. For example, make a fence with forging elements, add top trim in the form of decorative arcs to the racks.
The gazebo will turn out to be higher and more spacious, but the cost of construction will increase by 40-50% due to additional decor and roofing made of bituminous tiles.
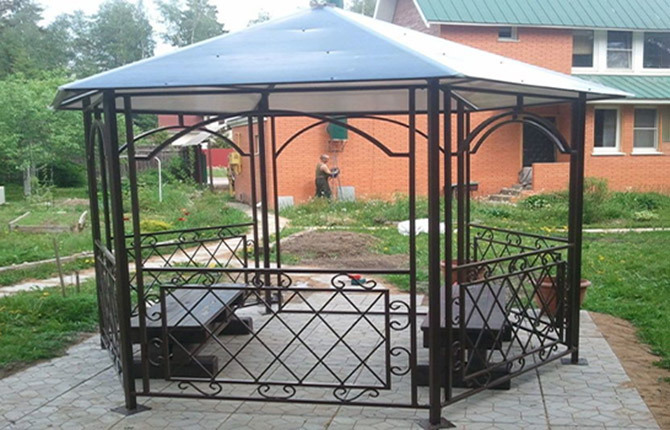
The roof does not have to be hipped. For example, gazebos for outdoor feasts with a hipped roof are very popular. The slopes are more gentle, so you can not be afraid that the wind will tear off the roofing.
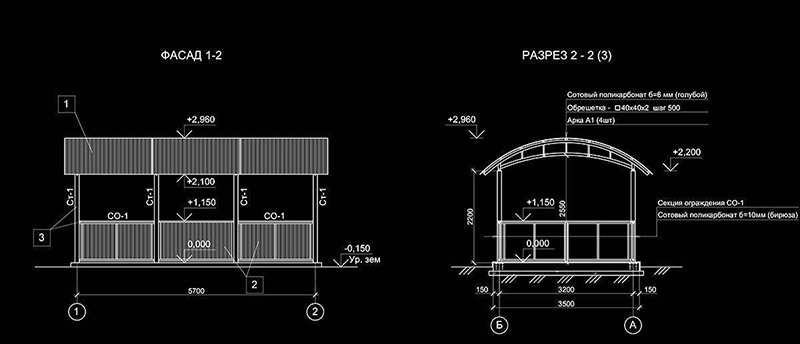
For home gazebos, the roof is often made in the form of an arch, welded from a profile pipe, bent in an arc.
The design of the gazebo from the metal profile turned out to be so successful that the scheme is used for the construction of various kinds of outbuildings and pavilions.
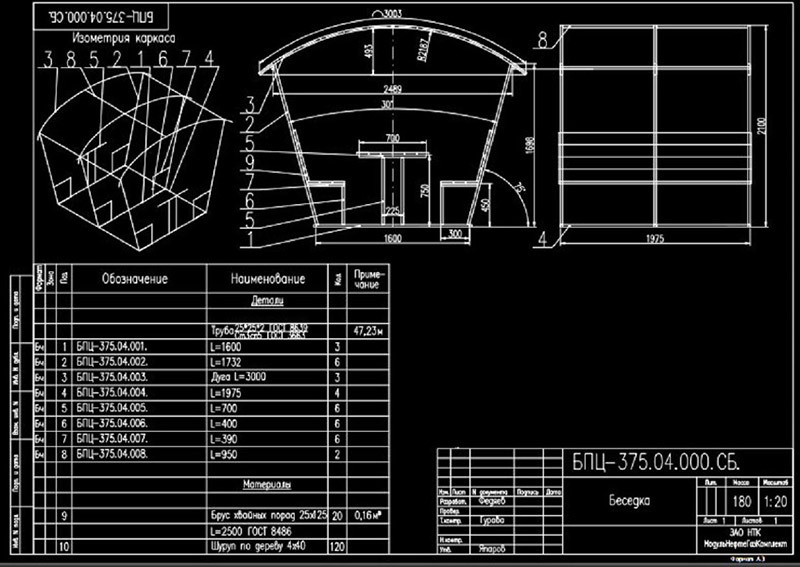
With an arched roof, small gazebos are often built from a light profile pipe 25x25x2 mm. Such structures are often installed for relaxation during a lunch break. The gazebo turned out to be quite rigid, well protected from the wind, if the cladding is done correctly, then the internal space will not be flooded during heavy rain.
Often such gazebos are placed in the yard only for the summer season. Thanks to the use of a light profile pipe, the weight is small (up to 60 kg). This allows you to transfer the frame and fix it on a concrete foundation or bury it directly in the ground, for example, next to the beds in a summer cottage.
Drawings and diagrams
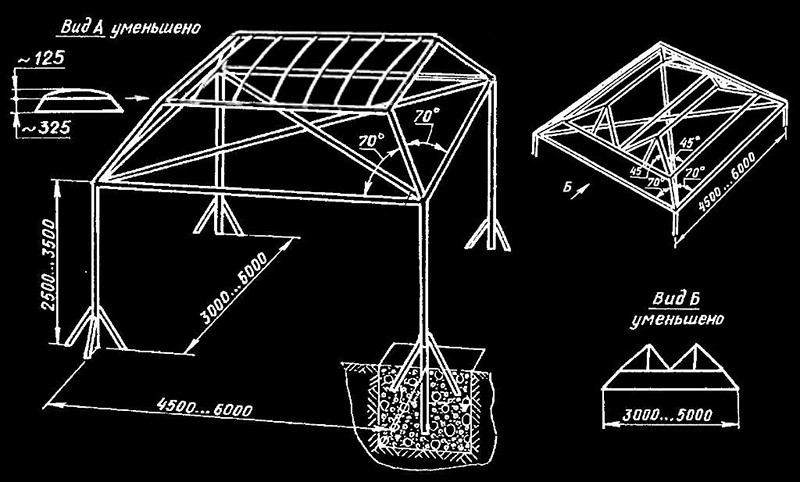
In addition to light weight, a portable gazebo has another important advantage. It is easy to make it in a garage or workshop, assemble it, adjust it to size, disassemble it, and transport it to the country house for further installation. A drawing of a building from a profiled pipe 25x25x2 mm is shown below.
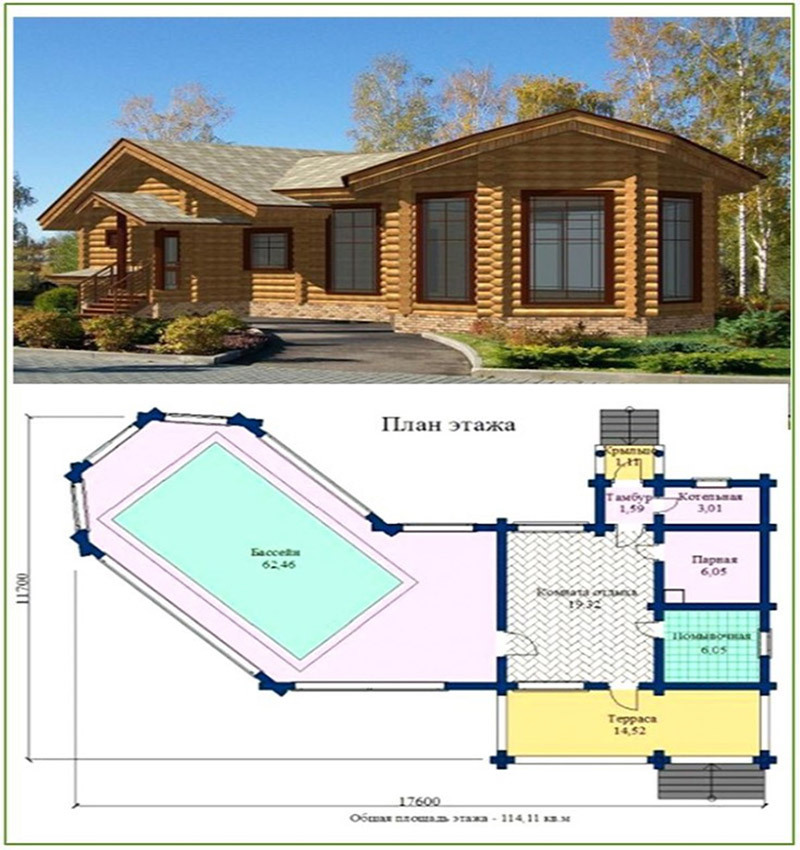
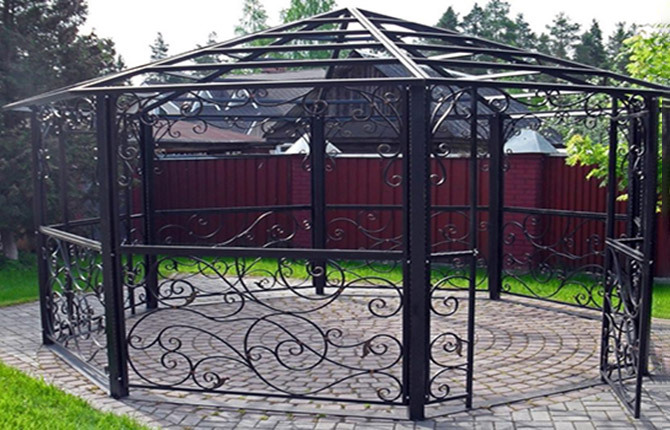
The most difficult to build is the gazebo model with an octagonal hipped roof. Such structures are usually made with a polycarbonate roof, glazed windows, and an additional decking podium.
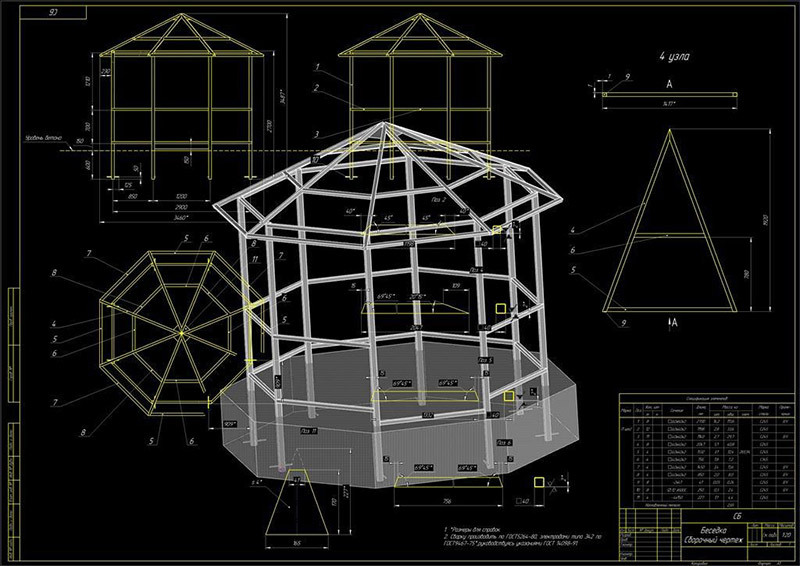
The main difficulty lies in the precise installation of vertical racks from a profiled pipe 40x40 mm. In addition, you need to correctly assemble the triangles from which the crate is assembled under the roof. In order for the segment to turn out in the form of an isosceles triangle, you will have to make a template to size, and in addition, you must correctly maintain the cutting angle of the profile pipe blank.
It is much easier to assemble an ordinary square gazebo with a hipped roof. The main thing is to correctly make the foundation for the installation of vertical racks from a profile pipe.
Pavilion-type arbors are placed mainly on a dump base or a slab is poured with concrete.
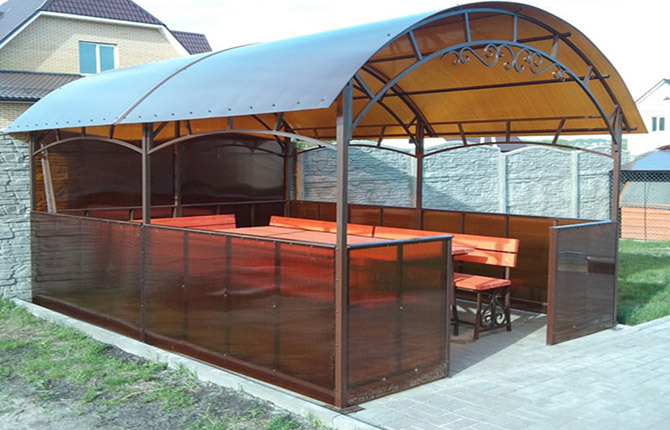
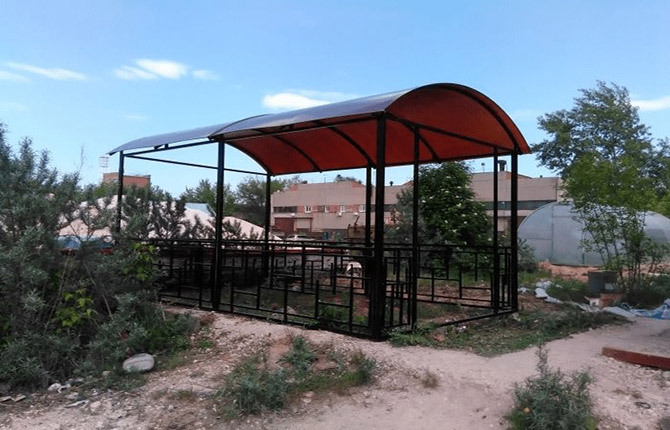
In addition to these options, the so-called free arbors for a picnic with a barbecue and barbecue are popular.
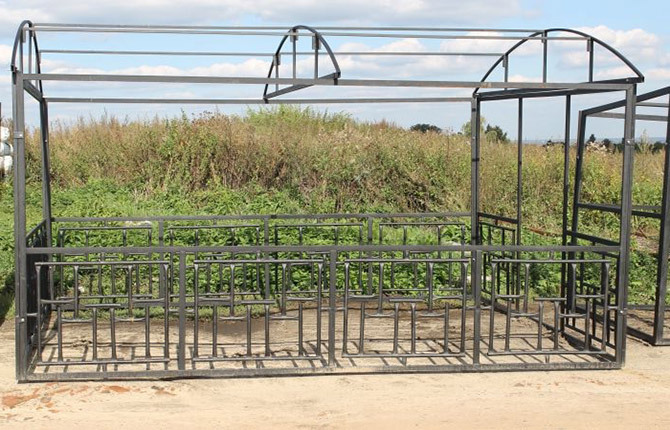
Such structures are usually taller than ordinary gazebos, so the ceiling is reinforced with diagonal braces from a profile pipe. In addition, the scheme of the roof itself is different. The upper part is made in the form of a set of arches with a soft removable roof. The coating is removed during the burning of the brazier to simplify the removal of smoke.
Such arbors do not have a foundation and a side fence. The vertical racks of the frame are installed in the pit and temporarily fixed with struts until the structure is finally aligned with the horizon. Upon completion of the assembly, the pit is covered with gravel with a small addition of sand, after which the pit is shed with a very liquid cement mortar.
Which profile pipe to choose?
You can build from a profile of any kind. The thickness of the wall depends on the area of the base and the height of the gazebo. For example, for a model with an octagonal hipped roof, it is better to use single profile pipes 50x50 mm with a wall thickness of 2.5-3 mm.
But it is better not to use too large a profile. Firstly, it is quite expensive, and secondly, profile pipes 40x40 mm, 50x50 mm are suitable only for vertical racks. All other details of the gazebo will need to be made from blanks 20x20 mm, 40x20 mm, 30x30 mm. So it is better to buy a profile of a smaller section, but in larger quantities. And vertical racks under the roof of the gazebo can be made from a professional pipe welded into a package.
Therefore, to build a small gazebo, it will be enough to buy a profile pipe of three main sizes:
- 40x20 mm;
- 30x30 mm;
- 20x20 mm.
Even scraps of material will be used. But it must be borne in mind that, without experience, welding a thin-walled profile of a small section (20-30 mm) is much more difficult than a 40-50 mm professional pipe.
Construction stages
For the first experience, it is best to choose a light version of the gazebo with an arched roof and inclined posts. The dimensions of the base are 160x200 cm, the height under the roof is 170-200 cm.
After choosing a project, you need to choose a place for installation. If it is supposed to rest in the heat, then choose the northern or northwestern part of the house. The place should be dry, with sandy soil.
If the soil is clayey, rocky or chernozem, then after arranging the foundation, it will be necessary to fill the site with dry sand with a layer of up to 20 cm. For one building you will need 2-3 m3 dry sifted sand. This is called the sanitary barrier.
Foundation
The site will need to be cleared of grass, cut off the top (up to 10 cm) layer of soil with roots, remove all this. Compact the site and cover with fine gravel. For a small gazebo, it is best to make a pile foundation.
For example, drive eight supports of asbestos-cement pipes, 110 mm in diameter, to a depth of 40 cm into the ground, so that heads 10-15 cm high remain above the surface. The blanks will need to be pre-coated with hot resin.
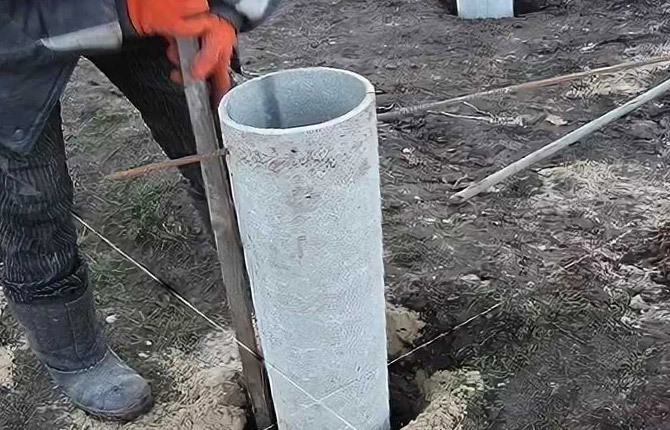
Holes for pipes are drilled in the ground with a garden drill to a depth of 45 cm. At the bottom you need to lay sand and fine gravel. After installing the blanks from the cut ACC into the pits, they will need to be leveled (sieged) so that the heads of all supports are in the same plane.
This can be done using a building level and a pair of masking cords stretched diagonally between the supports. The remaining free space between the support and the ground is covered with gravel sand (sand and fine gravel screenings).
The entire area allotted for the foundation is covered with the same mixture, it is enough to make a layer of 3-4 cm. After installing the gazebo, a sanitary layer of sand is additionally poured. There should be a ventilation gap of 5-7 cm between the lower contour and the sand. Thus, the sand will dry out, and the profile pipe from which the base is welded will not rust.
The protruding part of the asbestos-cement supports will need to be painted with oil or bituminous paint.
At the last stage, the frame will need to be fixed on pile pipe supports. Therefore, beforehand, even at the stage of pouring concrete, a piece of reinforcement with a diameter of 12 mm and a length of 15-20 cm is inserted into each asbestos-cement pile. After leveling, the gazebo can be tied with soft steel wire or "grabbed" by welding.
Important! On asbestos-cement recessed supports, you can put any heavy building assembled from a profile pipe. For structures made of aluminum profiles or wooden beams, the foundation is made columnar, with partial penetration into the ground by 10-15 cm.
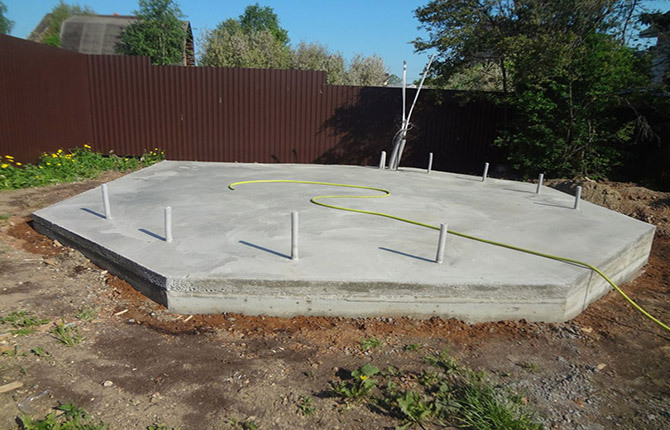
If there is heaving soil in the summer cottage, then for any type of building from a profile pipe it is best to use a slab foundation. You can determine the degree of heaving by the porch or blind area of the foundation.
If in winter (January-February) the soil rises strongly by itself and partially raises the details of the supports of the porch group, then according to the instructions it is better to make a slab foundation. It will require more physical effort, but in general the design is simpler.
Step by step manufacturing process:
- Dig a hole according to the size of the gazebo with a depth of 30-35 cm.
- Fill the bottom with sand, gravel, level and compact.
- Lay a downed beam or slab along the edges of the pit. This will be the formwork, its height should be up to 10 cm above the ground.
- The bottom is covered with a thick plastic film.
- Additionally, you can lay 6 mm reinforcement bars and even tie them together, but this is not necessary.
- Pour concrete 1/3, lay rubble stone and pour the rest of the concrete mix so as to fill the formwork to the brim.
If a gazebo is built from a profile pipe in hot weather, then the foundation must be covered with black plastic wrap and left for 3-4 days until setting. During this time, the film must be lifted several times and sprayed with water on the plate.
After 4-5 days on such a foundation, you can put a gazebo of any size and weight. This scheme is used to build sheds from a profile pipe with barbecues, brick ovens, fireplaces.
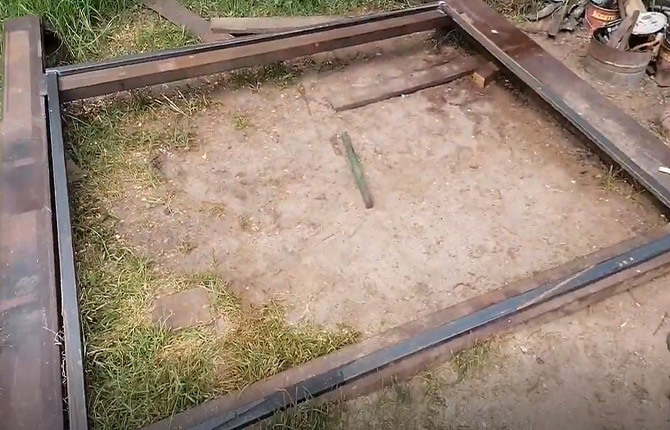
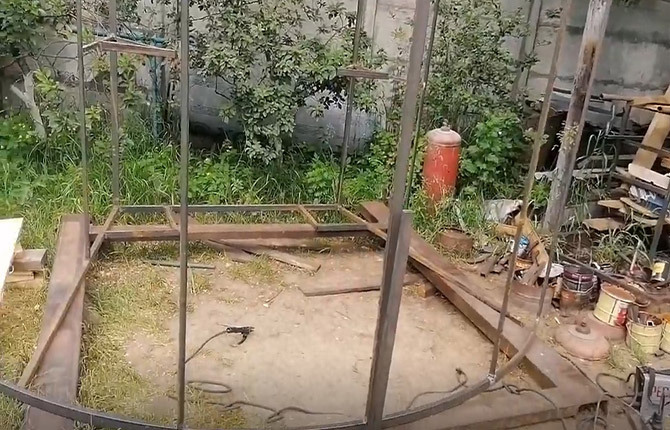
Bottom trim
The construction of the gazebo frame begins with the assembly of the lower contour-string. In this case, this is a simple rectangle made of a 20x40 mm profile pipe. With the help of a grinder, you need to cut off two blanks of 160 cm and 200 cm each.
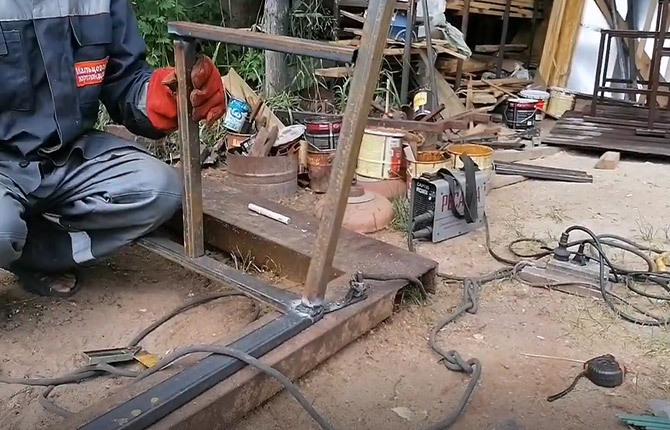
Now it is important to weld them correctly in the form of a flat frame from a profile pipe. If the work is carried out in a locksmith's workshop, then the workpieces can be laid out on the welding table (or on the concrete floor) and fixed with clamps.
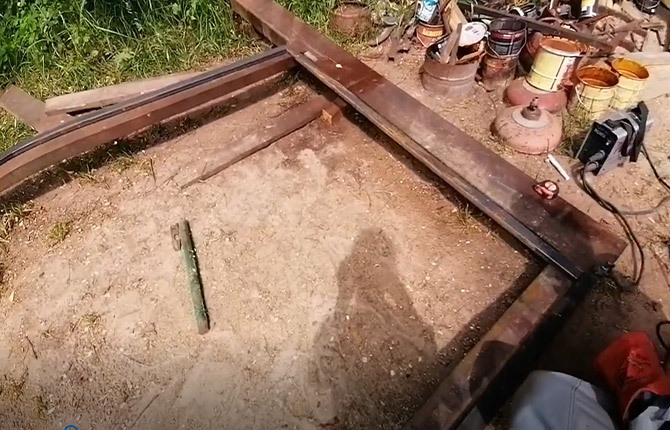
But to give as a table, you have to use improvised material. Instead of a welding table, a homemade pallet made of boards and slabs is used. The main thing is to correctly lay the lumber on the ground so that the sections of the profile pipe laid on top are located in the same plane. Pieces of the profile pipe can be tied to the boards with wire to prevent displacement during welding.
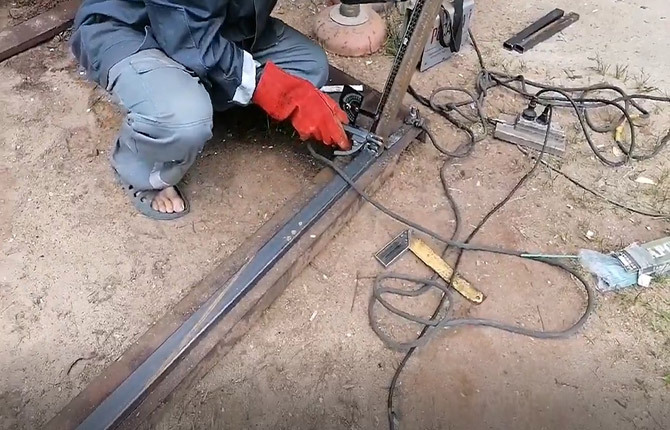
Next, you need to weld the workpieces at the corners. For work, a welding electrode "Monolith" with a diameter of 3 mm is used. The welding current must be selected experimentally so as not to burn a hole in the profile pipe.
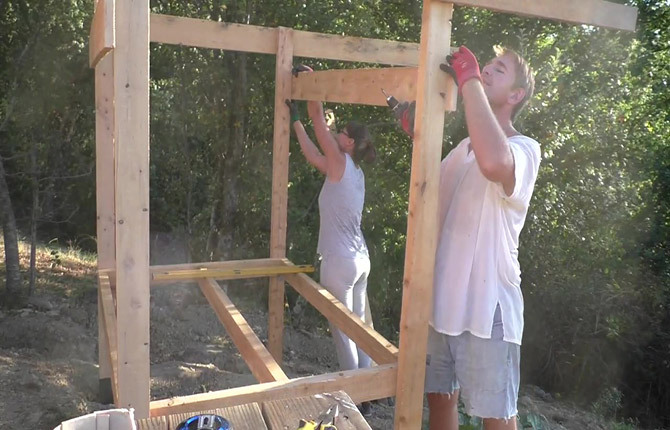
Installation of vertical racks and painting the frame
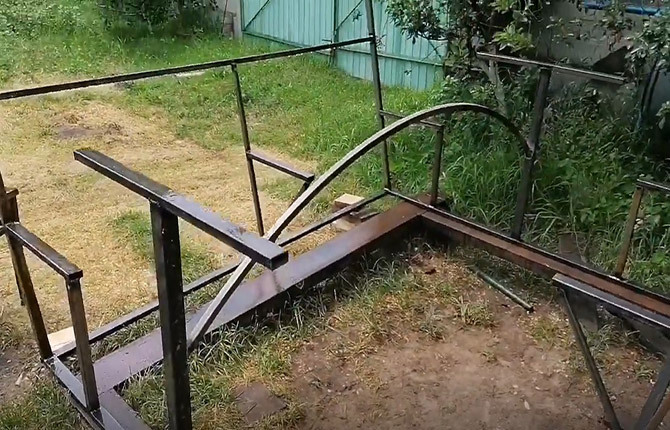
The next step is to make vertical racks on which the roof will be held. The details are not quite ordinary, as they will be set at an angle to the horizontal base of the gazebo.
Racks are cut from a profile pipe 30x30 mm, 180 cm long. One of the ends must be cut at an angle of 15O to the cutting plane. The rack is installed in the corner of the lower contour, slightly tilted outward, so that an angle of 105 is obtained between the plane of the base and the workpiece.O, and weld. First, with dots at the corners of the profile pipe, then, after final alignment, they are scalded with a continuous weld.
Important! While the racks are held on the lower trim only by welding. Until the reinforcement is installed, you need to try not to touch them so as not to break off and damage the seam.
Next, on the body of the gazebo, it is necessary to weld a metal reinforcement in the form of two horizontal jumpers. Each part is cut from a profile pipe 20x20 mm, 194 cm long.
Set aside with a tape measure on each rack 80 cm (from the bottom trim) and weld two parallel crossbars. After that, one more vertical cross member (80 cm high) must be welded in the center on each side, at a distance of 100 cm from the sidewall.
Now you need to make struts-supports for benches in the gazebo. Each part will be welded from two sections of a profile pipe - 30x30 mm and scraps 40x20 mm, all 40 cm long. The angle between the segments is approximately 90O.
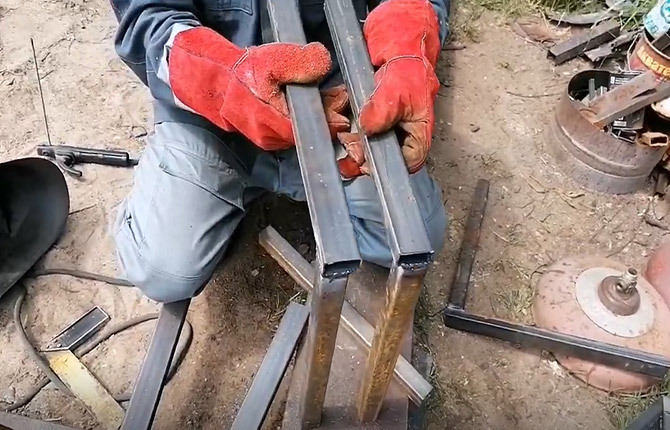
Supports are welded at the bottom of the vertical posts.
Another similar support-strut, but already with an angle of 60O, are attached on each side to an additional central cross member.
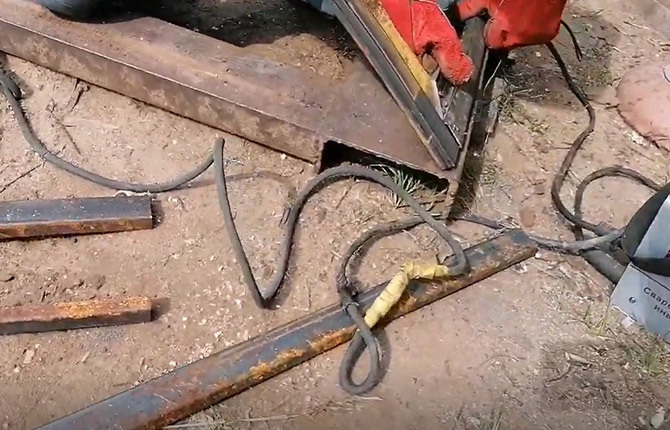
All welding seams must be cleaned of slag, the frame metal must be treated with a protectant (rust modifier). After a couple of hours, the treatment site is washed with a small amount of water and dried thoroughly. After a day, the skeleton of the gazebo will need to be primed for further painting.
The profile pipe must be cleaned from rust to white metal before painting. The surface must be degreased and primed. It is best to paint with enamels for outdoor use. The color of the paint is chosen according to the climate.
Metal painted with white enamel does not heat up so much under the sun's rays. For a humid climate, for example, if a gazebo was built from a profile pipe by the sea, you need to look for special ship grades of paint. Otherwise, the metal will rust a lot.
Roof fabrication and roofing
The most difficult stage of work is the construction of the upper part of the gazebo. The general appearance of the building depends on how successful the base for the roofing is, whether the roof will leak or not.
The roof will be made of an arched type of two shaped pipes with a section of 40x20 mm. The length of the workpiece is 290 cm. Each workpiece must be rolled on a pipe bending machine.
Often you can find recommendations to make gable or flat roofs for gazebos from a profile pipe. It is believed that making a frame for a flat roof slope is much easier than bend the arc the right size.
Perhaps the manufacture of a gable roof is actually easier, since a pipe bender is not required. But in practice, gable roofs are easily broken by strong gusts of wind, in addition, the roof ridge requires careful insulation, otherwise a leak will appear in the first rain.
If there is no experience, then blanks from a profile pipe can not be bent on their own, but contact the workshop. The result of the work is easy to check by the following parameters:
- the initial blank of the profile pipe should be 290 cm long;
- after rolling, an arch (arc) is obtained, the distance between the ends should decrease to 200 cm;
- the height of the arch, installed vertically, should be 55 cm.
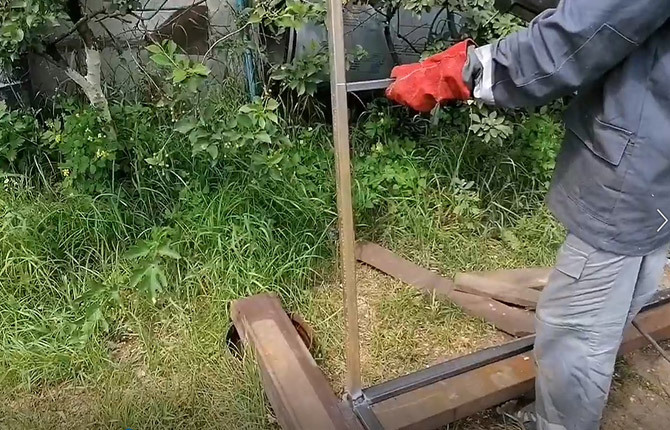
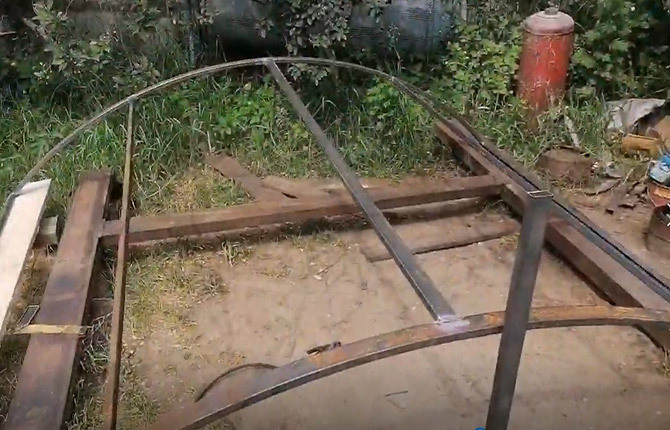
The roof frame of the gazebo is assembled separately. To do this, you need to install one of the arches vertically with your hands and fix it with the help of improvised means. For example, tie to a pipe driven into the ground. It is important that the arc is strictly in a vertical position.
Further, one horizontal crossbar is welded to each end of the arch. It is made from a profile pipe 40x20, 192 cm long.
The second arch is welded in a similar way. To prevent the arcs from falling, you will need to connect them with additional jumpers. One is fixed by welding at the upper (ridge) point. Another one, but already from a pipe 20x20 mm, is welded from left to right at a distance of 60 cm from the ridge point.
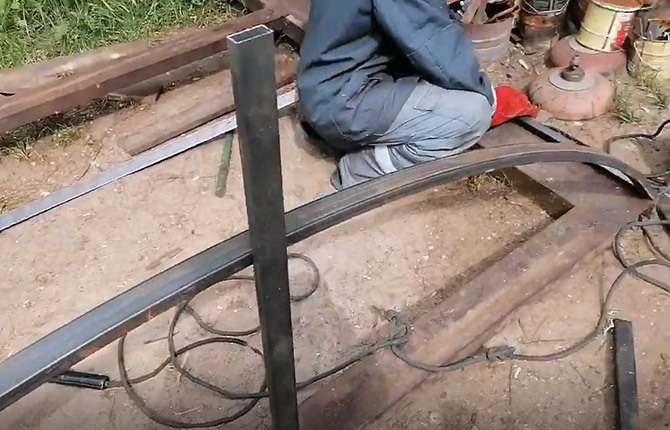
For the final assembly of the gazebo, the initial frame will need to be laid on its side. The roof base assembled from a profile pipe is moved so that the base of the arcs is in contact with the tops of the vertical racks of the gazebo.
All four main supports of the gazebo are welded to the roof frame.
Decorative trim and moisture protection
The base of the gazebo from the profile pipe is almost ready. Two benches will be added inside, and this is enough for rest. But in most cases, in addition to benches, a metal table with a wooden top is added to the “furnishing” of the gazebo. The base of the table can be made with your own hands from scraps of a profile pipe and an arc.
The tabletop for the table in the gazebo is usually made of grooved boards. The blanks are cut to size, dried and treated with several layers of drying oil or polyurethane varnish. Knock down the countertop immediately after the coating dries to a state of tack.
Wooden slats for benches are recommended to be made from linden. The wood is carefully polished and treated with oil-wax for steam rooms. This is a guarantee that vacationers in the gazebo will not have splinters and scratches on exposed parts of the body.
Interesting: How to make a swing with your own hands from metal.
wall cladding
For the roofing of the gazebo, cellular polycarbonate 8 mm thick is used. It is quite strong, but it bends easily. Putting it on the roof will not be difficult. The roof can be laid in transverse strips, but one continuous polycarbonate sheet 6 mm thick can be laid. There will be no seams, less risk of water flowing into the joints.
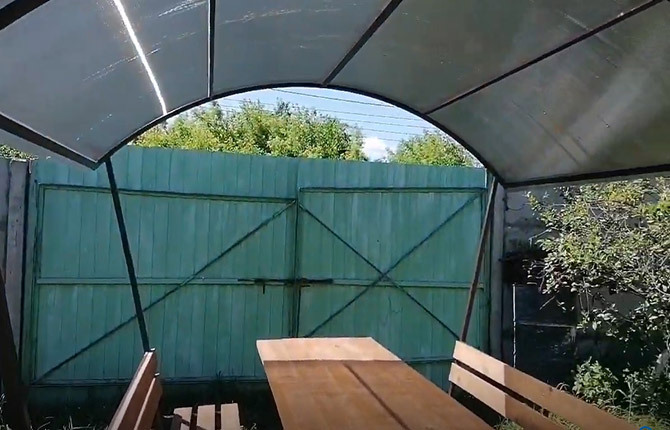
The walls can also be tightened with polycarbonate, but in this case, the ventilation of the internal space is greatly impaired. To decorate a country gazebo, nets for growing cucumbers are often used. You can pull on a regular camouflage net or make a screen from midges and mosquitoes.
Pergolas from a profile pipe are often left open or one (usually external) wall is sewn up with a thin wooden lath.
Floor
The area under the gazebo can be laid out with cement-sand tiles imitating natural stone. But, as practice shows, the tiled floor is quite cold. Therefore, the base under the tile must be insulated in advance.
It is much easier to sew up the lower trim of the frame with a 40 mm thick timber or a polished inch board. The blanks must be sanded and treated with polyurethane (yacht) varnish.
Finished floorboards are fixed with a gap of 3-5 mm. Self-tapping screws are screwed directly into the body of the profile pipe of the lower trim. This will not affect the strength of the structure. But you need to wrap the screws into the profile pipe so that the head is completely hidden in the tree. For safety, you can pour a few drops of varnish into the holes.
Useful: Arbors with their own hands made of wood.
Results
To build a simple gazebo from a profile pipe in the country, as follows from the video, it will take 2-3 days of free time and about 15 thousand rub. for the purchase of materials. Tools can be borrowed. As a result, spending just one weekend, you can get a great place for a summer vacation during your vacation.
Tell us about your projects. What design of the gazebo, in your opinion, can be considered the most successful for building with your own hands and why? Also save the article to bookmarks and share it on social networks.