The size of the chicken flock in the country is a conditional figure. Each summer resident decides for himself. Usually they plan to order an extension to the house for fifty heads of birds in the future, but for now the bottom line is, you can make a chicken coop for 5 chickens with your own hands, without waiting for a big construction.
The content of the article:
- What should be a chicken coop for 5 chickens - requirements
- Features of the summer chicken coop
-
Features of the winter chicken coop
- Choosing drawings
- Required dimensions
- What is the best way to make a chicken coop?
-
Step by step construction instructions
- Foundation work
- Construction assembly
- Floor and walls
- Arrangement of the chicken coop inside
- Ventilation
- Warming for the winter
- Heated chicken coop in winter
- Results
What should be a chicken coop for 5 chickens - requirements
The first step is to determine the minimum area for a comfortable habitat for the bird. At a rate of 3 chickens per m2 it turns out that for 5 chickens a chicken coop with an area of \u200b\u200bonly 1.5-2 m is made with their own hands2.
Basic requirements for the design of the chicken coop:
- good heat and sound insulation of the room;
- convenient layout for chickens;
- good lighting, preferably natural.
The remaining requirements are formulated in the process of linking the project to the area.
Features of the summer chicken coop
For a summer house, it is important that the room is well ventilated, and the air is not oversaturated with fumes. In any summer poultry house, even if it is a chicken coop for several chickens, overheating of the room was the main problem. Chickens are reluctant to come in the evening to spend the night if the roof is covered with metal, the windows are the size of a palm, there is no ventilation, the air inside is heated to the limit, and the room itself is quite cramped.
Therefore, a do-it-yourself summer chicken coop for 5 chickens is always built from boards, tongue-and-groove planks or ordinary stuffed shingles. The walls of such a room protect from moisture and noise, but at the same time they pass air well. In a summer house, it usually blows well from all cracks. But the main thing is that the chickens take root, gain weight well and rush, they need to feel safe.
Summer buildings are always raised above the ground on vertical supports. It is believed that the breeze blows through the underfloor of the house, thereby lowering the temperature inside the chicken coop. In reality, a chicken coop, even for five chickens, is raised above ground level only for the sake of protection from soil moisture. In addition, it is much more convenient to serve a chicken family, feed it, clean the floor, process internal surfaces.
Features of the winter chicken coop
A year-round simple poultry house can also be built from boards, slats, planks, slabs. But at the same time, do not forget to insulate the room, since the cracks in the walls of the house, which helped a lot in the summer, can turn into trouble in the winter. Chickens will freeze and get sick. Therefore, a year-round chicken coop is usually reliably insulated with mineral wool or any other thermal insulation with good vapor permeability.
Winter houses are usually built from sheet material, usually plywood or OSB. Better yet, nothing came up. The roof, walls and floor are either double box-type, if the winters are not too severe, with frosts down to -7OWITH.
If the winter is colder, then all surfaces, especially the floor, are insulated according to the scheme for residential buildings. With the possible exception of the entrance doors, they are simply stuffed with a double rail and closed from the inside with a fabric canopy. It makes no sense to insulate, otherwise the door hatch and the canvas will swell from condensate.
Reading: How to build a warm winter chicken coop in the country with your own hands
Choosing drawings
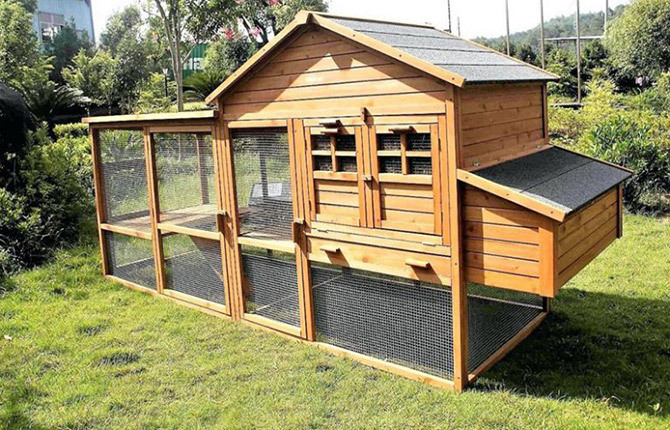
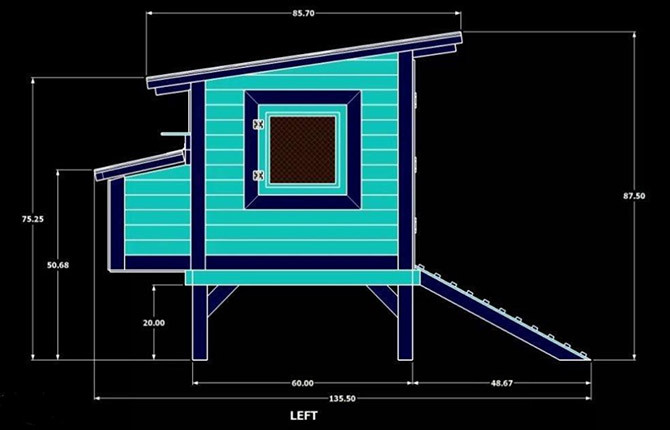
Most summer residents choose to build a winter house project for their own construction. The classic layout of a small chicken coop with decorative lining of the walls is shown below in the drawing.
In this case, the room was built from OSB with foam insulation and exterior trim with decorative clapboard. It turns out beautifully and reliably, but requires correct calculations and placement of the ventilation system.

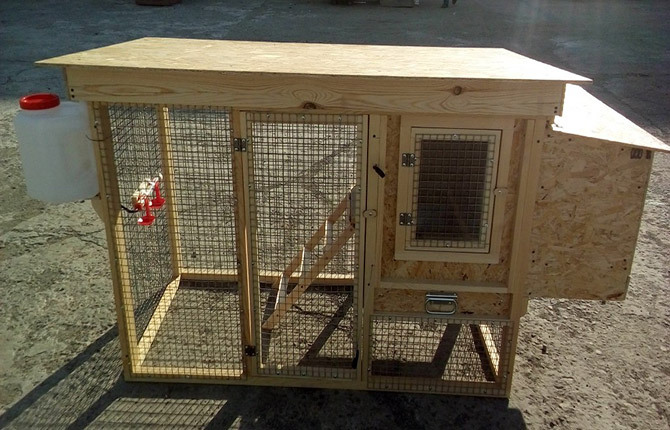
The classic version for 5-7 chickens with walking on a frame made of pine slats is shown in the drawing.
The technology and sequence of assembly of such a room is shown in more detail in the video:
This is more of a decorative poultry house, since there are few chickens, and most importantly, it can be installed in the local area, somewhere not far from the main entrance to the house.
Reading: How to build a chicken coop with your own hands
Required dimensions
In most cases, the dimensions of the poultry house are selected individually according to the preferences of the owners. If the chicken coop is planned to be installed next to the fence of the site, then the height of the building is chosen so that the windows or the grid of the aviary are covered with a fence.
If the place for a small poultry house with five chickens is chosen in the backyard, then it can be made quite high. The limit is limited only by the growth of the owners, since in winter it will be necessary to clean the snow from the roof.
The inner space is usually made 80x120 cm in size, sometimes more, based on the addition of the number of chickens. The ceiling height is 100-150 cm, it makes no sense to do less, then you will need to strongly raise the chicken coop above the ground level.
Quite small houses are usually of summer type, the walls are not insulated, and the interior is too small to safely place at least one heating device.
What is the best way to make a chicken coop?
Small-sized housing for chickens is always made on a wooden frame made of slats. Usually pine or spruce. Metal frames made of profiled pipes are rare, used only in mobile, transportable chicken coops.
The frame is sheathed with a board or OSB sheets, you can use plywood. But a plywood sheet is almost twice as expensive as OSB of the same thickness; plywood is used mainly for large full-sized poultry houses with a number of chickens from 20-30 pieces.
Often, winter chicken coops are built in a combined way, the walls and corners on the windward side are made of boards and slats, always with mineral wool insulation and vapor barrier. Part of the building on the leeward side is simply sewn up with OSB sheets. The scheme looks rather unusual, but in practice it justifies itself, in addition, you can save on material.
Step by step construction instructions
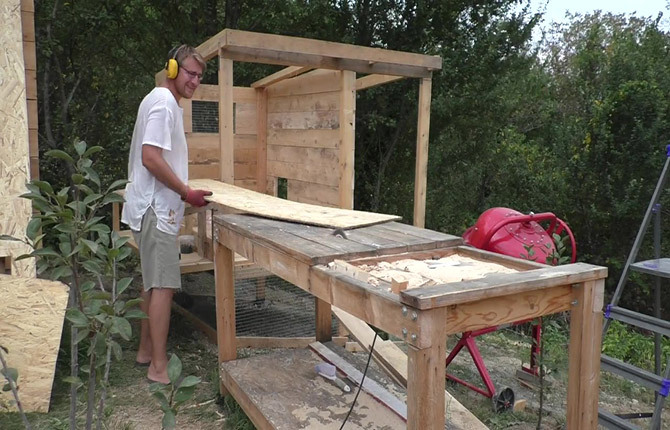
It is very important to think over and calculate all the details of construction before starting the construction of a chicken coop for 5 layers. Work out all the details according to the sketches so that when cutting the blanks, you don’t confuse and spoil the material. A small summer house for 5 chickens is easier to do with your own hands somewhere in the garage, then transport it to the dacha or suburban area. It is light, compact, weighing up to 50-60 kg.
A winter chicken coop for 5 chickens is built with their own hands directly on site. Many details, such as insulation and ventilation, have to be adjusted in size.
Foundation work
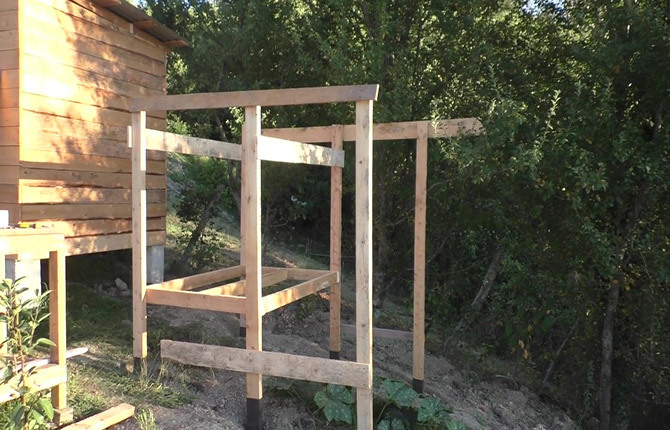
The poultry house will be installed on vertical supports made of timber 150x50 mm. The racks of the winter house will need to be embedded in the ground, so before starting work, the tree is smeared with resin, wrapped with roofing felt and fastened with stapler staples.

Next, the vertical racks must be installed in the drilled holes and fixed with struts with spacers.
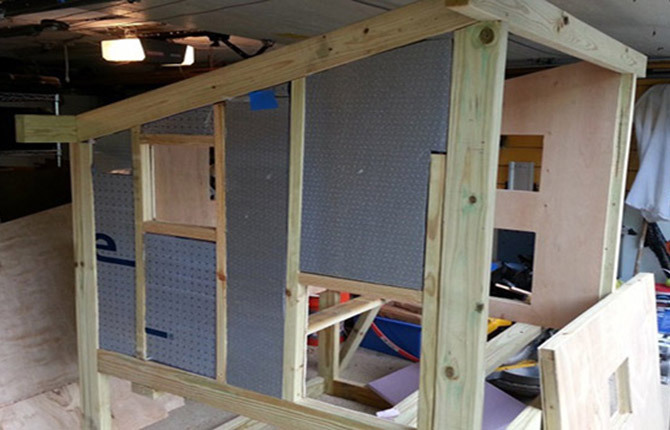
Racks need to be aligned vertically, after which they are temporarily tied along the lower level with boards. All parts of the room (except for racks) are made of timber 100x50 mm. Housing for chickens turns out to be quite high, so the foundation racks should be made reinforced.
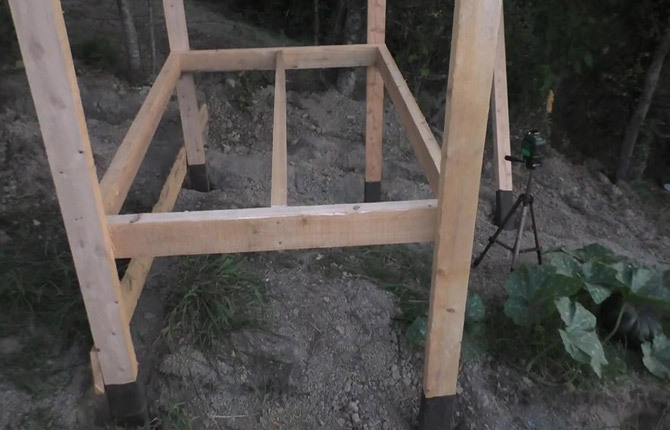
Now you need to make a frame - the floor for the building. The basement will be insulated, so the base frame is assembled from a thick board 70x30 mm
Construction assembly
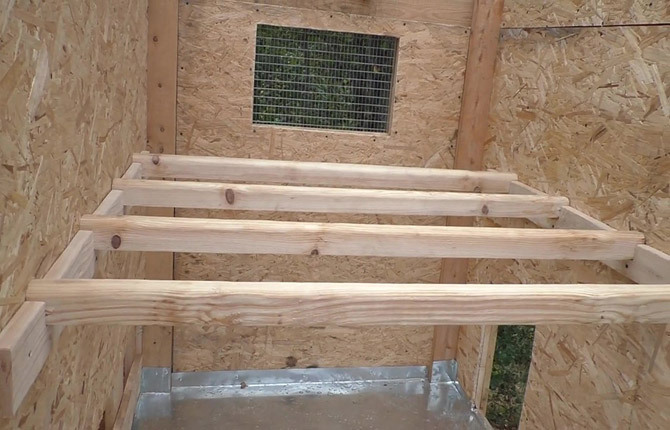
After the chicken coop floor box has been fixed to the vertical posts, you can make the top trim.
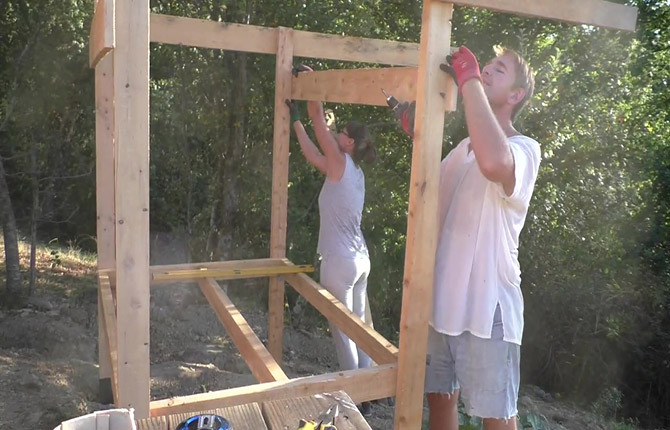
With the help of steel corners, two upper crossbars are attached.
In addition to the already installed supports, two more racks will be additionally packed, they will be used for an extension to the poultry paddock for chickens.
Only now, after the final assembly of the frame, it is possible to fill the racks with a cement-sand mortar.
Floor and walls
After the concrete has set and tightly fixed the frame of the chicken coop, you can sheathe the walls.
First of all, the back and windward (cold) part of the house are clogged with boards. Immediately cut out a window (tighten it with a net), make a hole for chickens in the walking area. The steel mesh must be stretched before stuffing with floor boards.
Since there are few chickens, the walking area is small.
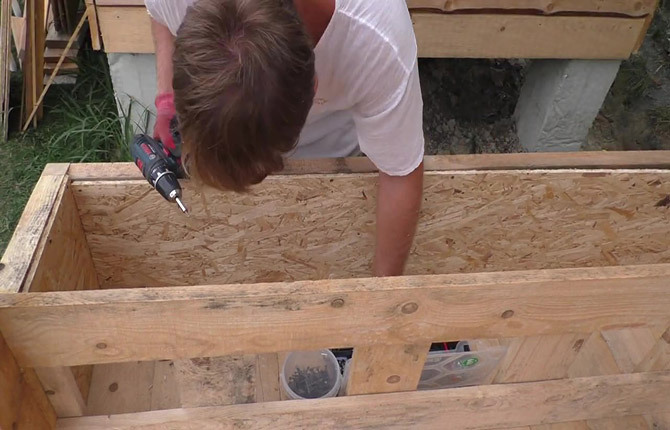
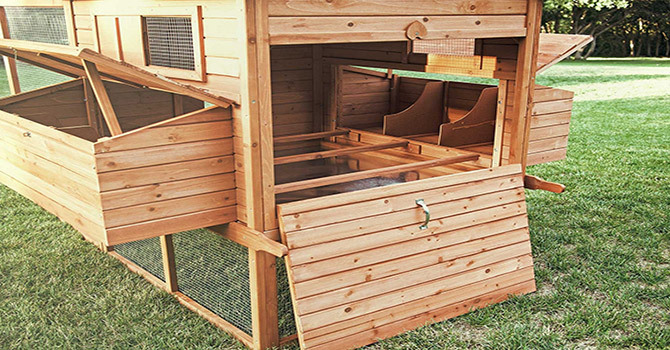
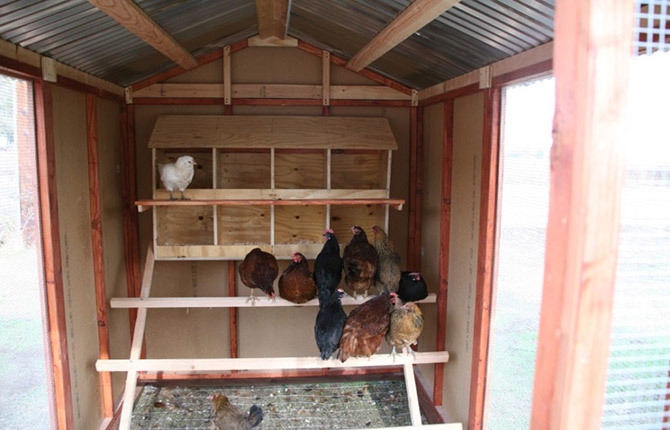
Trays or niches for laying hens are immediately assembled from pieces of OSB, they will be additionally insulated, so they are made from a solid plate.
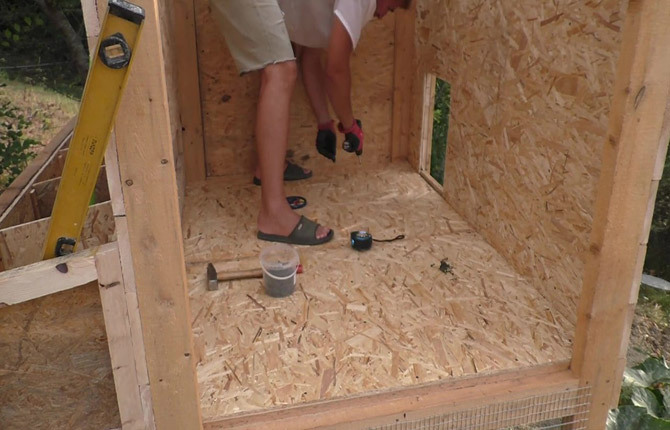
At the next stage, a small chicken coop room is additionally sheathed from the inside with OSB sheets. The interior space is reduced but still large enough to accommodate all the hens and chicks.
The roof turns out to be shed, flat, the base for the roofing of the chicken coop is sewn up with boards and OSB. A metal profile will be used as the roof of the room. The double lining should dampen the sound of the rain well so that the chickens do not react to sounds, you can lay a layer of lining material. Roof eaves and overhangs must be hemmed with OSB trimmings.
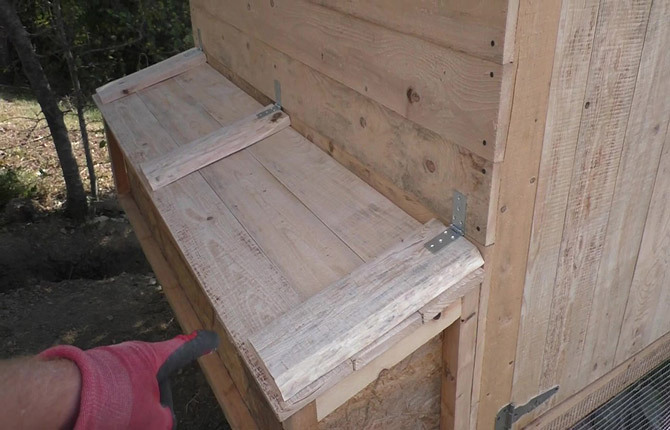
The niche for laying hens is closed with a common hinged sash.
Arrangement of the chicken coop inside
So that chicken droppings do not destroy the relatively weak OSB plate, a sheet of metal must be laid on the floor inside the chicken coop. The walls from the side of the niches are additionally sheathed with a board.
All internal arrangement of housing for chickens comes down to the installation of perch poles. Their number is obviously greater in the expectation that the number of chickens will increase over time.
Now you need to make a fence for the chicken coop. On the previously installed poles, mesh strips are pulled, it must be steel, but always with a polymer coating.
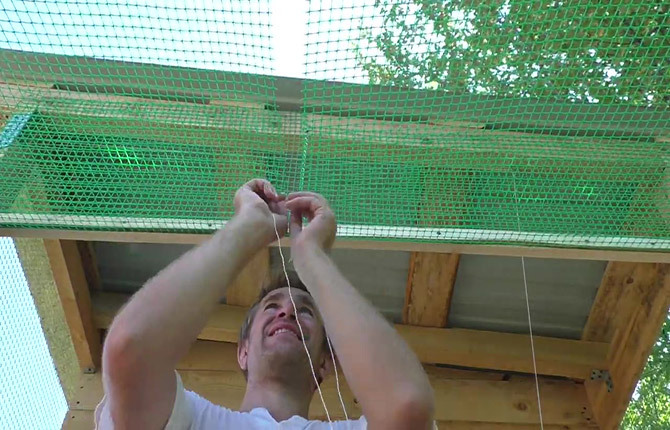
You will also need to tighten the upper part of the paddock with a net, otherwise local predators may come to the chickens.
Ventilation
Proper ventilation of the house is extremely important for small chicken coops with an area of 2-3 m.2. The smaller the internal space, the more difficult it is to organize a stable supply of fresh air without losing heat and without overcooling the chickens.
The standard scheme in the form of two ventilation windows on opposite walls of the house does not work well in this case, the volume of the room is too small.
So the best option is exhaust pipe installation. Moreover, its height should be a meter and a half above the roof. Inside, you will have to install a valve on the ventilation window, and use it to adjust the level ventilation in the chicken coop.
Warming for the winter
The chicken coop turned out with double walls. The thickness of the outer boards is 25 mm, plus another OSB of 10 mm and an air gap between the inner and outer facings. As a result, the chicken coop wall is almost 45 mm thick.
If you add a small heating system, then the thermal insulation power will be enough so that the chickens can endure the outdoor temperature without health consequences up to 2-3OWITH. When using additional heating, the limit temperature drops to minus 10-15OWITH. But this is for healthy chickens moving indoors.
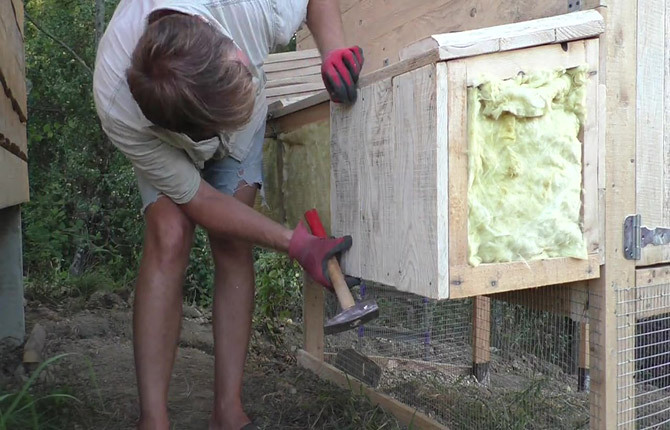
Laying hens are in a more vulnerable position, so the niche (trays) must be insulated with mineral fiber thermal insulation, followed by boarding. In laying hens, the air temperature will be 8-10°C higher in winter. In summer, the niche is protected from sunlight by the wall of the house, so it will not be hot.
Heated chicken coop in winter
Even such a small chicken coop for 5 chickens needs to be heated. Despite the double walls, the door reinforced with thermal insulation, with strong wind and frost it is cool in the chicken coop. According to sanitary standards, the temperature inside the chicken coop should not be below 10OWITH.
Two heating systems can be used for a small-sized poultry house:
- red incandescent lamps;
- homemade heater.
You can also install one UV lamp. It also warms well, plus it gives out a lot of ultraviolet radiation. But you can turn it on only for a short time, and the stream of light should be directed exclusively to the back wall of the chicken coop.
Heating with an infrared lamp
Your best bet is to buy a pair of pre-made fixtures with red bulbs, reflectors, and wiring. For a chicken coop with an area of 2-3 m2 bulbs of 100-150 watts are required. Typically, the lamps are turned on during the rainy season, when the chickens suffer greatly from high humidity inside the house.
Do-it-yourself heating
For a budget mini-chicken coop for 5 poultry, you can make a heating system with your own hands. One of the options is shown in the photo.
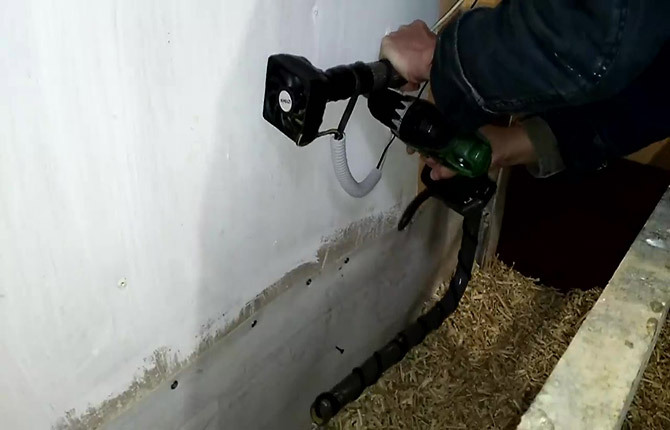
The heater is made from a piece of a two-inch water pipe made of cross-linked polyethylene, inside of which a loop or a spiral of a two-core heating cable is inserted. It is used for arranging underfloor heating. Loop power - from 50 W to 100 W, depending on the length of the cable.
A standard 12V fan is installed at the inlet of the pipe, it is used for cooling in desktop computers.
The system is connected to a relay-regulator with a temperature sensor. Everything is automated, so homemade heating can keep chickens warm throughout the winter, without human intervention.
Results
Almost any summer resident can build a poultry house for 5 chickens. The main task is to choose the right place and prepare the material for the construction of the frame. The design is simple, all the work can be done with the minimum of tools that any summer resident has in stock.
Reading: How to build an all-season chicken coop for 20 chickens with your own hands
Tell us about your experience building small chicken coops. What do you think is the main difficulty in building small poultry houses? Also share the article on social networks and add it to bookmarks.


