Most summer residents and lovers of outdoor recreation dream of building a chicken coop with their own hands on a suburban area. It is impossible to say how accessible it is for a non-professional and a beginner. Much depends on the desire and at least basic knowledge about the behavior of chickens of different breeds.
The content of the article:
- Basic requirements for chicken coops
-
Preliminary preparation for construction
- Choose a location
- Project selection and design
- Determine the required area
- Designing a walking area
- We prepare materials and tools
-
Step-by-step instructions for building a chicken coop
- How to make a plank floor in a chicken coop
- Ground floor option
- Walls
- Frame and roof insulation
- Aviary and walking area
-
Interior decoration
- Feeders and perch
- Ventilation and heating
Basic requirements for chicken coops
In theory, you can even raise chickens in a dugout, but most still prefer to build a full-fledged do-it-yourself chicken coop, moreover, warm, bright, spacious, providing high comfort level. Otherwise, chickens simply will not rush, gain weight.
Things to consider:
- The chicken coop must be properly positioned on the site. And not in the way that is convenient for the owners, but according to the habits of poultry. For chickens, the main reference point is sunlight, so the chicken coop must be set up taking into account the movement of the luminary across the sky.
- Proper feeding, ventilation, heating of the chicken coop. Chickens are sensitive to smells, especially strangers.
- Sanitation. The design of the chicken coop should provide protection for chickens from external infections. In addition, a quarantine box should be equipped in the house, in which chickens with suspicious behavior or symptoms will “hide out”.
Plus, the very design of the chicken coop should ensure the protection of chickens from birds of prey, rats, weasels, dogs, cats. The walking area next to the house must be closed from the penetration of all birds that can carry infections that are dangerous for chickens.
Preliminary preparation for construction
The first step is to determine the number of chickens in the room, calculate the required building area, and make a small draft design of the building. The best chicken coops are always frame or adobe type.
Then choose the layout and location of the "furnishing" for the chickens. At the last stage, the method of heating is determined, as well as the ventilation scheme of the chicken coop. It remains only to think out the exterior and interior decoration of the premises, the layout of the place for walking chickens next to the chicken coop.
Choose a location
Chickens are sensitive to loud noises, unfamiliar sounds and smells. This must be considered before building a chicken coop with your own hands. Therefore, the chicken house is moved away from the road, garage, car parking.
Usually a place for construction is chosen according to one of two schemes. For example, a house for chickens can be built opposite the main cottage building. Of course, the aviary for walking the birds is located on the back of the house so as not to frighten the chickens and at the same time remove the accompanying odors.
Such a scheme is usually used to place chickens in insulated winter chicken coops if the owners live in the country all year round. In winter, you often have to look at the chickens to turn on / off the lighting, heating, open / close windows, fill the drinkers, feeders, and at the same time check the condition of the birds.
How convenient is this placement:
- The chicken coop is easier and more convenient to maintain than walking through the entire area to the edge of the local area.
- The chicken house is always supervised. Usually raptors, foxes and weasels do not risk getting close to human habitation.
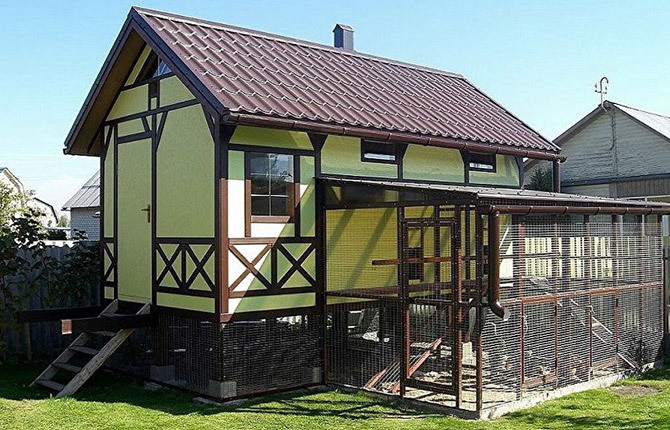
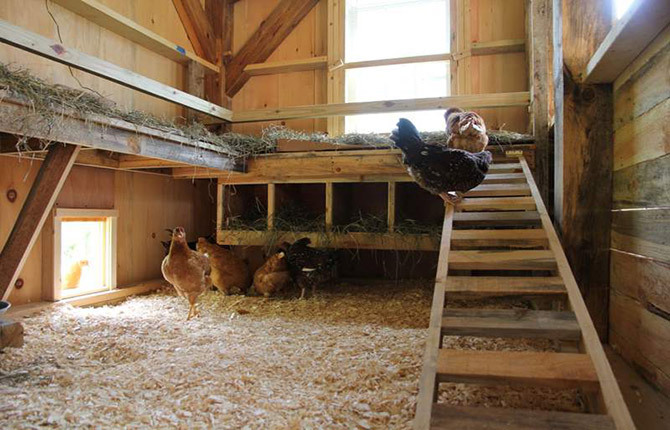
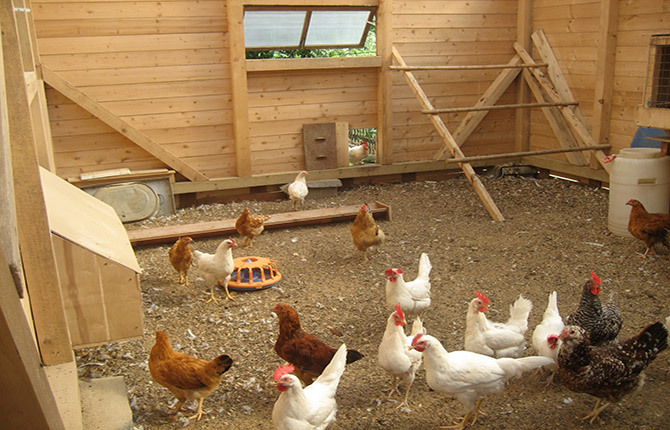
The second option is to build a chicken coop on the outskirts of the site. In this case, you can get rid of the main irritants for chickens, and at the same time from odors. In addition, it is possible to correctly install the house in relation to sunlight. Approximately as in the photo.
The house should be located so that the aviary or chicken walking area “looks” to the northeast, is well lit in the morning and before lunch. In this case, the birds have the opportunity to rest during the lunch heat in the aviary in the shade of the chicken coop.
The front door, as well as the hole for chickens, are located on the south or south-west side. This is the lee side for the coldest northern and northeastern winds.
If housing for chickens is built at a distance from home in accordance with all the rules, then security will be required for it. For example, to make a special elongated leash on a steel wire log for a yard dog.
Project selection and design
Before you make a chicken coop, you need to consider its layout, the list of materials used. Simple chicken coops for suburban areas, as a rule, are built from what is at hand.
Moreover, even if you plan to breed chickens on an ongoing basis, it is better to use small chicken coops. No more than 30-50 chickens. The division into several rooms simplifies the control of the sanitary condition of the birds. If there is an outbreak of the disease, then there is always the opportunity to isolate some chickens from others.
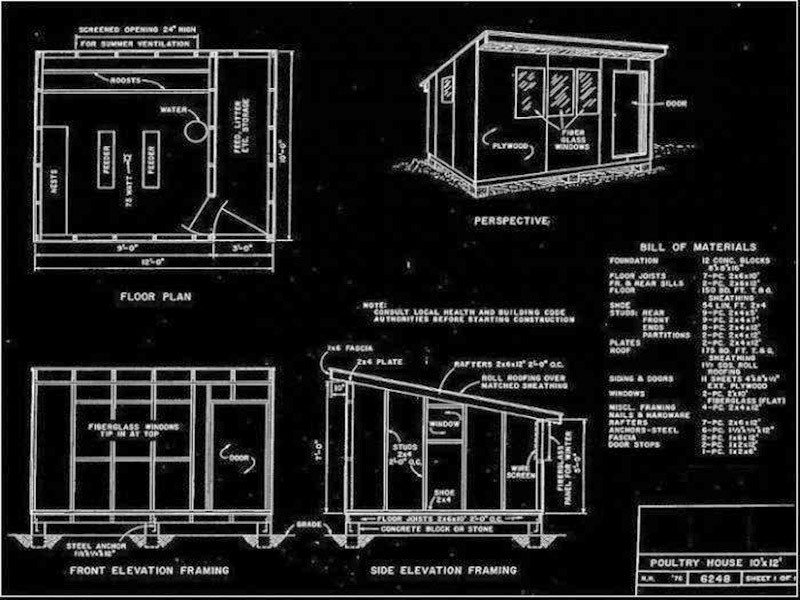
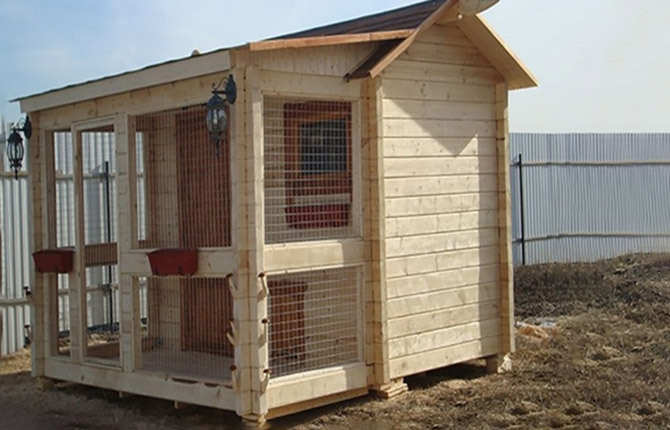
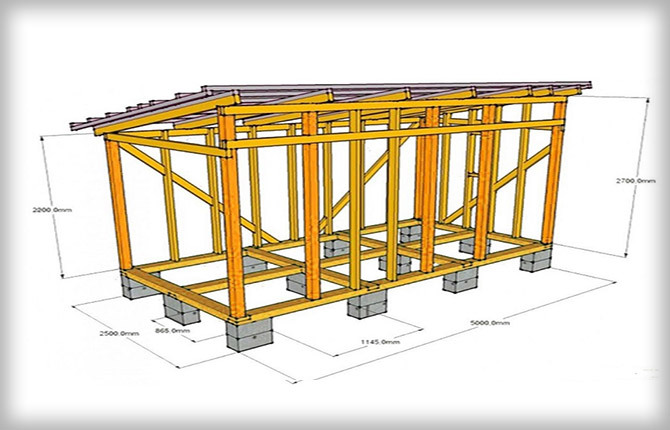
As a drawing for design, you can use one of the options for small chicken coops, authored by G. TO. Grigoriev. This is a relatively simple project, affordable to build with your own hands, budget in terms of costs, built from available materials, mainly wood.
Moreover, the use of natural materials is the main principle of the construction of chicken coops. This is a kind of guarantee that the chickens will not get sick due to the high content of phenol formaldehyde in chipboard, mineral wool, polystyrene foam insulation.
A simple chicken coop is built on a frame scheme with an earthen or plank floor and a shed roof. The walls are made of backfill or adobe. The outer surface is sewn up with a wooden clapboard or plank. The lower part, the plinth and underground, as well as the ceiling, are protected by a steel mesh to avoid foxes, weasels, and rats from attacking chickens through tunnels.
The roof on a shed roof must be made soft. For example, a filling type with a coating with further cladding with a rail and roofing with glass roofing material.
Roof structure can be simplified. For example, it is cheaper to use natural material - reeds.
The entrance is made through the vestibule. Inventory, sanitary facilities are often stored here, and a stove is installed, in addition to food. In exceptional cases, an insulator for sick chickens is made in the vestibule.
Determine the required area
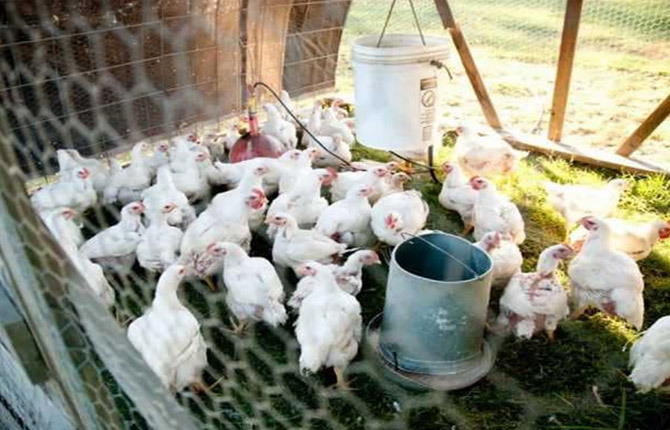
There are 2 schemes for raising chickens. The first is cellular. In the chicken coop, the bird is in cages. It is mainly used for growing and subsequent sale of grown chickens or young animals. The calculation of the area is performed from the nome of 7 chickens per meter.
The second scheme is the free keeping of chickens on the ground with a place for walking. In this case, the norm of the area for keeping chickens is no more than 3 heads per meter of area.
Separately, it is necessary to provide for quarantine - at the rate of 3 heads per m2, as well as a chicken place - 10-15 for a grown three-week-old young.
That is, for 30-40 chickens, a chicken coop of 12-15 m is required2.
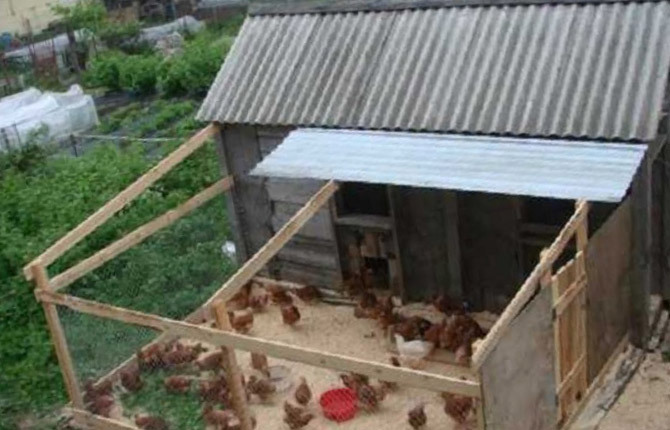
Designing a walking area
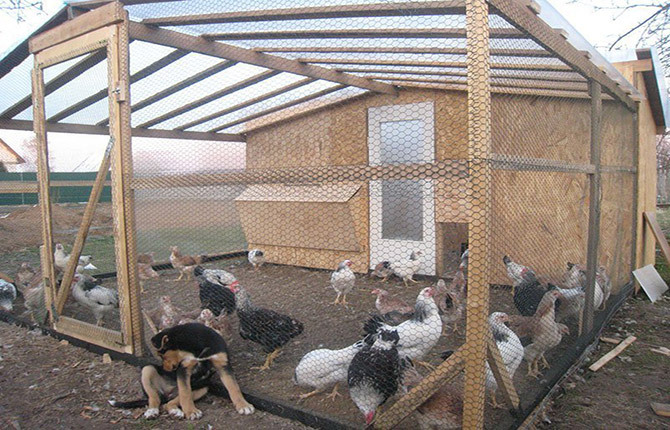
The aviary is usually used for young and very grown individuals. For adult chickens, the walking area should be large enough. Fenced with a mesh 10-15 m2 is no longer enough. In addition, it should be borne in mind that in spring, adult chickens have an increased need for pasture, so they have to be released from the chicken coop outside the aviary.
It is necessary to plan in advance a part of the dacha area for filling with sand, small pebbles with grass overseeding. That is, for growing healthy chickens, a place for summer walking should not be limited to a net near the chicken coop.
The aviary is covered with a protective net. You can use fishing or special models for growing climbing plants. The main thing is that the material is durable. The net is needed to protect chickens from birds of prey.
Part of the roof overhangs on the side of the fenced area is either made longer (outlet up to a meter), or equipped an additional canopy so that a small area adjacent to the chicken coop building is reliably protecting the chickens from the sun light and rain.
We prepare materials and tools
To build a budget chicken coop, use any materials that can be found in the backyard of the cottage. Even cuttings of slabs, slats, boards, fresh rye or flax straw will be used. You can cut reeds. In order to prepare 30-35 sheaves for the roof, you only need a sickle, rubber boots, a wheelbarrow and 4-5 hours of time.
But there are a few things you need to buy:
- Wooden beam, section 100x100 mm for supports, lower and upper trim of the frame. You will need 2 pcs. 350-400 cm each, four 250 cm each.
- Beam 70x50 mm for tying the frame and roof rafters, the approximate number is 40 m.
- Wooden tongue-and-groove plank 180x12 mm.
- Steel pipes with a diameter of 70 mm for fencing.
- Corners, soft steel wire.
- Three window frames, one 60x130 cm, the second - a window 60x35 cm, the third of the same size, but with a transom and a protective mosquito net.
To equip a perch, a shield, places for laying hens, an ash box, you can use improvised material, or buy OSB 10 mm thick. Chicken fencing is best made from welded mesh with a mesh size of 50 mm. In addition, you will need an asbestos-cement weaving pipe, crushed stone, sand, lime, grated clay, expanded clay.
Of the tools you need to have:
- Bulgarian.
- Manual circular saw (cheburashka) for cutting wood.
- Hand saw for wood.
- Joiner's measuring tool.
- Shovel, hand garden drill and rammer.
In the process of building a chicken coop, you need to purchase special equipment - infrared lamps for heating, drinkers, feeders, a sanitary tray. To connect the lighting (heating) of the chicken coop, you will need a wire in protective silicone insulation, a bag and a photo relay.
Also in the chicken coop you need to install exhaust ventilation with a valve. This is necessary in order to ventilate the chicken house in winter or during periods of extreme heat.
Step-by-step instructions for building a chicken coop
The main question that you have to face at the beginning of the construction of the chicken coop is how to make the foundation. The easiest option is to make an earthen floor for chickens. The second is a plank floor on logs and columnar supports. Although chickens love soil, both options should be considered.
How to make a plank floor in a chicken coop
In this case, it will be necessary to make a columnar foundation under the chicken coop on asbestos-cement pipes, as in the video.
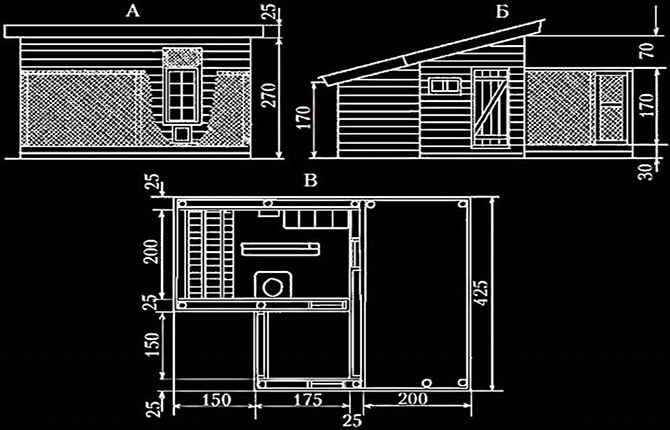
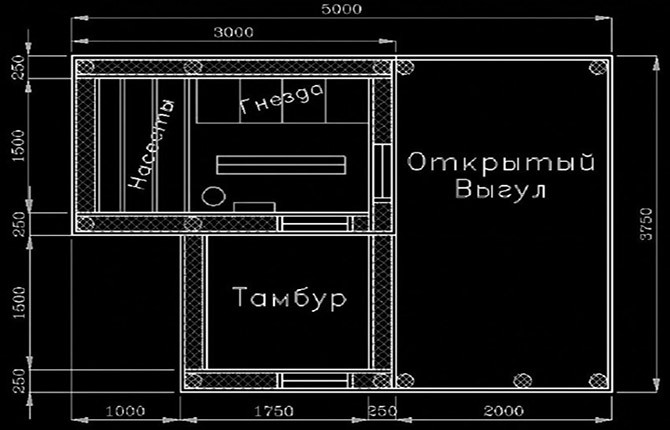
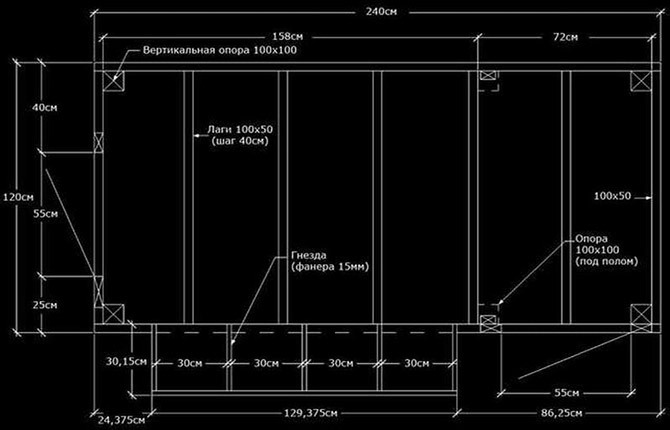
To do this, the contour of the future chicken coop is marked on the ground. In the corners of the building in the shape of the letter "G", these are 10 points, plus one central one, you need to drill holes (pits) to a depth of at least 60 cm with a manual garden drill. The project with dimensions is shown below.
Inside the pits, segments of asbestos-cement pipes are laid 70-80 cm long, 20-25 cm protrude above the ground. All pipes must be aligned to the same level. For example, hammer in several pieces of reinforcement and pull six masking cords along the contour, use them as a level.
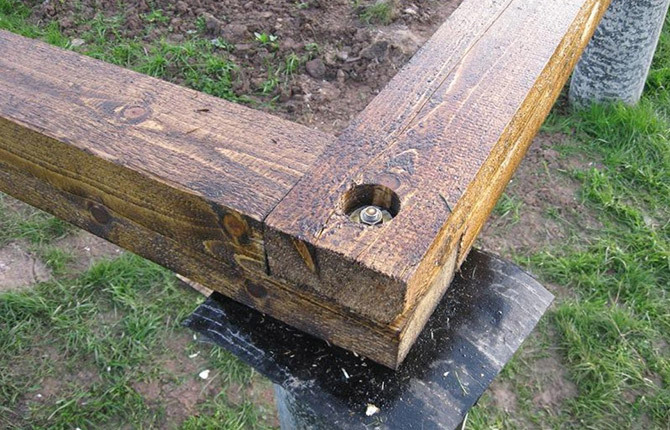
Anchors are inserted inside the pipes and filled with a cement-sand mortar. Next, you will need to assemble the strapping of the foundation from the timber. In the corners, the beam is sawn half a tree and fastened with anchors to the posts.
It remains to cut the logs for the floor, hem them from the bottom with planks so that the insulation does not fall out, and fill the underground with mineral insulation, for example, expanded clay. A plastic film is laid on top and the floorboards are stuffed.
This is a standard warm, dry floor that can be used both in a chicken coop and in non-residential utility rooms.
But there is one limitation. Wooden floorboards can't handle chicken manure. Especially if it is used for space heating. The tree quickly rots from chicken droppings, and the floor in the chicken coop has to be patched almost every year.
That is, the floor in the chicken coop can be sewn up with sheet material resistant to ammonia and nitro compounds. Or make it mud.
Ground floor option
This option is also called a clay floor. There is no step-by-step instruction, since it is made mainly using the old technology of adobe mixtures. The foundation is made in the same way as for insulated wooden floors. But the height of the supports is reduced to 5 cm. The piping of asbestos-cement pipes is made from tarred timber. At the same time, an ordinary red brick is laid out under the strapping, and a drainage ditch is dug around the chicken coop.
Inside the contour, you need to dig the soil to the depth of the shovel bayonet. A mixture of gravel and sand is poured at the bottom, a waterproofing film is laid with an overlap on the walls. The rest of the space is laid with a mixture of clay and 5% slaked lime. The mixture is tightly rammed to a stone state.
The compacted layer of clay is “raised” to the level of the lower edge of the beam (strapping). Now a metal mesh needs to be laid on the floor. It is needed to protect the chicken coop from rats and weasels. The metal must be galvanized or plastic lined. The final layer of clay is already applied on top, but now it is additionally mixed with cow dung, mixed and moistened to the state of mastic. With this mixture, the adobe floor in the chicken coop is leveled (rubbed). It's safe for chickens.
Then, when its inhabitants settle in the chicken coop, pour sand and sawdust on the floor. Approximately 1-2 times a month, the litter should be changed to fresh, plus greens and grass should be added to the chickens. Before replacing the adobe floor, wipe it with a fresh mixture of clay and lime.
Walls
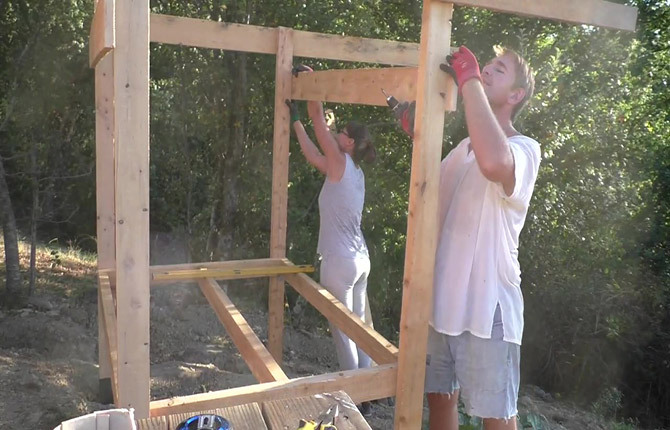
The chicken coop box is built according to the frame scheme. First, corner supports 100x100 mm, 270 mm and 250 mm high are installed. Each support must be aligned vertically with a level and fixed with struts.
Install the top harness. These are horizontal beams or boards sewn between the heads of vertical supports. In this case, the upper harness is laid strictly horizontally along the height of the rear (lowest) support-racks. We hem the heads of the beam supports from the front side (the highest ones) with an additional horizontal beam 50x70 mm for the entire length of the wall.
After the frame of the chicken coop has acquired the necessary rigidity, you need to install a door frame, a hole for chickens, window frames. They are attached directly to the vertical posts and struts-crossbars. Now you can form the walls of the chicken coop.
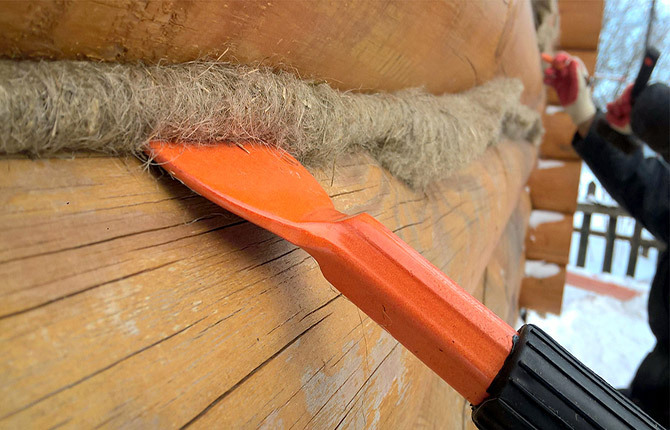
In this case, the walls of the chicken coop are backfilled. The scheme is simple - horizontal tongue-and-groove boards (planks) are sewn from bottom to top from the outside and inside.
This is how a double-sided formwork is formed, inside which expanded clay is poured. Backfilling is carried out to the level of the upper wall trim. Backfill thermal insulation is valuable in that it passes air well, that is, it "breathes", does not rot, does not collect condensate, and most importantly, the walls of the chicken coop are obtained without joints and cold bridges.
The width of the wall is 25 cm, which roughly corresponds to a wooden beam 8.5-9 cm thick. This is enough for a chicken coop if the average temperature in winter is -7-10OWITH. If in the area where the dacha and chicken coop are built, the frost reaches 20OC, then the walls can be additionally insulated with mineral wool lining.
But chicken coop owners often use a different method - they simply install additional heating inside, for example, they hang an infrared heater on the ceiling, which turns on at night during severe cold weather above the bed chickens.
For chicken coops with adobe floors, the main heat is released due to the overturning of sawdust and chicken manure. This is the safest type of low-temperature heating, in addition, pathogenic bacteria brought to the floor from the street or from walking are completely eliminated.
After assembling the walls of the chicken coop, a path to the front door is poured, and at the same time, ebbs and a blind area are formed from concrete in the ground. It is important that rainwater does not accumulate under or next to the chicken coop, but flows away from the poultry house and the chicken run area.
Many beginners try to save money on the path to the chicken coop. In fact, you can enter the building only in clean shoes. No dirt can be brought inside, otherwise the chickens will constantly become infected with infections. Therefore, it is necessary to beat off the formwork with boards and pour a small path of concrete. Until the cement-sand mixture has hardened, it is poured over the surface with fine gravel screenings with sand.
The outer walls of the chicken coop are whitewashed once a year, the inner walls - before winter and at the end of spring. You can, of course, not whitewash the tree, but in this case, the appearance of woodworms and bark beetles is almost guaranteed.
Frame and roof insulation
The roof of the chicken coop will be shed. Since the height of the front vertical supports is 20 cm higher than the rear ones, it is necessary to fill the rafters to form a slope. We must not forget to make the front overhang long (above the front wall). It will protect the chicken hole and the ventilation window with a transom from rainwater.
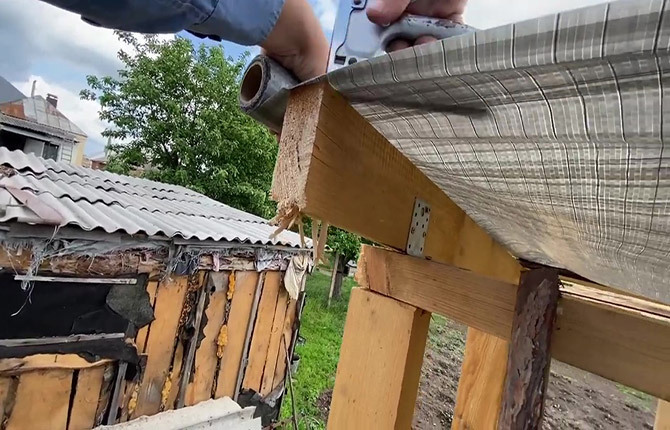
The roof of the chicken coop needs to be insulated. To do this, the log beams along the lower edge are continuous, without breaks, hemmed with a tongue-and-groove board. You can use scraps of material left after forming the walls of the chicken coop. At the same time, the space between the rafters from the front and back sides is sewn up with scraps of boards. That is, a closed space is formed in which the insulation will be laid.
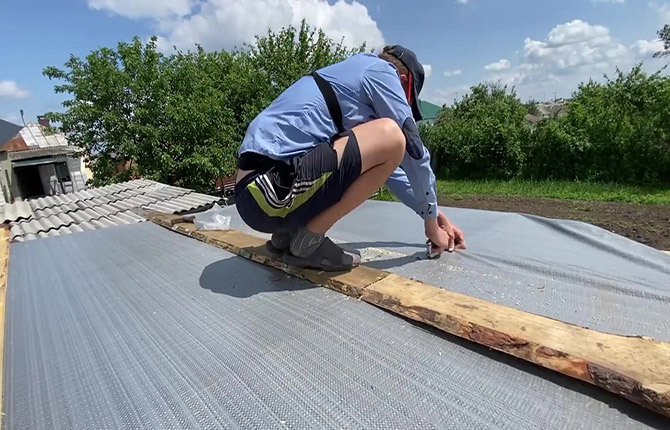
Next, a geotextile fabric is laid on the filing and fixed to the tree with staples with a conventional construction stapler. Now you can lay the heater. As thermal insulation of the roof use:
- Expanded clay.
- Reeds tied in bundles or sheaves. Reed stems can be pre-treated with a solution of iron sulfate.
- Mineral fiber boards.
The choice of material for the roof of the chicken coop does not really matter, the main requirement is good vapor transmission. The insulation is laid between the rafters and once again covered with geotextiles. After that, you can stuff the crate, stretch the vapor barrier membrane, sew on the slats of the counter-batten and lay the roofing. For example, they stuff solid slats and roll up the roof with glass roofing material on mastic.
Sometimes you can find recommendations for arranging a roof for a chicken coop from adobe mass, ground clay with chopped rye straw and a small addition of cow dung. The technology is effective, safe for chickens, but rather difficult to implement.
Aviary and walking area
The chicken pen is made after the construction of the chicken coop is completed. Construction begins with the installation of 2 pillars and a box for the front door. To fix the loot, 2 pillars with a diameter of 100 and a height of 250 cm are pre-hammered into the ground. Each pillar must enter to a depth of 50 cm, so you first need to make the pits with a garden drill. The lower part of the post is fired with a blowtorch and coated with tar or pitch. Lutka is attached to the posts with ordinary wire.
As soon as the fence is ready, the gap under the bottom strapping must be filled with a mixture of sand and gravel. This is important so that the chickens are not tempted to tear up the soil under the fence.
Inside the enclosure there should be a drinking bowl, a feeder and separately, always under a canopy, an ash box. It is a mixture of dry sand and ash in which chickens take dusty treatments that help get rid of parasites and fleas.
Interior decoration
Before the appearance of the first tenants in the chicken coop, it is necessary to sanitize the premises at least twice. First of all, the walls are treated with a solution of copper sulfate with soap. This will not protect the interior lining of the room, but it will help get rid of infections that are dangerous for chickens that “arrived” in the chicken coop along with the wood material.
After drying (at least three days in a draft), you can install a perch, feeders, nests for laying hens, drinkers, and collect a hole for chickens.
Feeders and perch
It is believed that the simpler the equipment in the chicken coop, the better. Feeders for chickens are always made of wood. You can knock down two grooved boards at an angle, plus fix the walls on both sides. The feeder will be long and narrow. That is, there will be no crowding when feeding, regardless of the age and size of the chickens.
Drinkers will have to be bought certified for a large chicken coop. You can, of course, do it yourself, but, as practice shows, small purchased models are more convenient for chickens. Water for birds in the summer can be kept in the vestibule so that the chickens do not get sick, you will need to regularly wash and treat the drinker with hydrogen peroxide.
The perch in the chicken coop is made at different levels so that the chickens themselves can determine who is in charge in the chicken coop, where and how the old-timers and youngsters spend the night. At the same time, it is not necessary for chickens to make a large perch. It is enough to place a pair of 50x70 mm timber scraps at an angle to the wall and nail three to four meter crossbars to them.
In summer, chickens often sleep in a chicken coop on a bed of clean sand, so it's cooler. Only for the winter the number of places on the perch has to be doubled.
Ventilation and heating
For large chicken coops, 3 ways to heat the room are used:
- Wood stove with coil, water tank and hose laid directly on the floor in the chicken coop. It is considered temporary and is used only in severe frosts.
- Infrared heaters or red lamps are suspended permanently on the ceiling or on a horizontal beam above the place where the chickens gather.
- UV lamps (with a black opaque bulb) are used as an additional lighting, mainly during the day, when there are no chickens in the room, and there is an opportunity to improve territory.
In chicken coops with adobe floors, heating is used with decomposing chicken droppings mixed with sawdust. In order for such a litter to begin to warm, a layer of at least 3 cm thick is needed. Therefore, natural "heating" in large chicken coops is considered auxiliary, and the main heating is provided by a stove or heaters.
For ventilation of the room, a transom is used in the window, as well as an additional window in the vestibule. There will be no big draft in the chicken coop, but the air flow through the 30x60 cm window will be enough for 30-40 individuals even on a stuffy summer evening.
For chickens make backup ventilation. It is used in the chicken coop usually in winter. Or during a period of intense heat or prolonged rains, when the natural flow of air into the room practically stops.
To ventilate the room, a 30 W electric fan with a 120-150 mm impeller is used.
You can build a real chicken coop with your own hands in the country in 1-2 weeks. Moreover, this can be done in early spring, before buying, make a compartment for chickens. At the same time, whitewash the walls and ceiling. Another week will be spent on minor improvements and the settlement of grown chickens. After about a month and a half, the grown chickens will fully get used to the new chicken coop.
Tell us about your experience in building housing for chickens - what projects, in your opinion, can be considered the most successful? Share your opinion in the comments!