Winter for poultry is a real test. Hens tend to lay poorly or not at all due to low temperatures. Building a winter chicken coop in the country with your own hands is somewhat more complicated than building a regular summer house from plywood and boards.
The content of the article:
-
What should be a winter chicken coop - basic requirements
- Basic requirements for the design of a winter chicken coop
- How to choose the right place for construction
- Calculation of the dimensions of the chicken coop and preparation of drawings
- Selecting and preparing materials and tools
-
We build a winter chicken coop - step by step instructions
- Foundation
- Foundation for a chicken coop
- Arrangement of the floor and walls
- Ceiling and roof construction
- Building a paddock
- Ventilation
- Lighting
- Heating
- Warming
- Interior decoration
What should be a winter chicken coop - basic requirements
The winter version of housing for chickens is fundamentally different from the design of the summer house. There are two ways to build a winter chicken coop:
- In the form of an outbuilding to the cottage.
- Detached house with its own heating system.
An insulated extension to the dacha building looks like a more profitable and successful solution. You can thoroughly insulate the room, especially the foundation and roof.
The poultry house can be connected to the heating system of the country house. This will increase the load on the boiler or dacha stove, but the extension can be made quite large in size. Accordingly, there will be not one and a half to two dozen chickens in it, as in an ordinary winter chicken coop, but two or three times more.
The only negative of the poultry houses attached to the dacha is the smell of decomposing bird droppings. You can't get rid of him. Therefore, winter poultry houses in the attached version are built only in visited summer cottages. The owners do not live there permanently, but often visit the summer cottage.
It is best to choose a budget option with the construction of a separate chicken coop. The size of the poultry house and the number of chickens will be smaller, but it will be a complete winter housing for poultry.
Basic requirements for the design of a winter chicken coop
Almost all freestanding poultry houses are built according to the following scheme:
- The box or body of the building is raised above the ground on additional supports - these can be piles or just a frame made of wooden beams.
- The body of the house is assembled from thick boards or timber. If the chicken coop is insulated, then it is laid outside, on top of the walls, and not inside.
- The size of windows is increasing, blinds are often installed on the frames. They are closed at night or in heavy rain.
- The winter poultry house is equipped with a closed aviary, with a canopy or roof over the bird's walking area.
In the event of heavy snowfall or a blizzard, the paddock will be covered with snow, but chickens still need to be let out for a walk. The canopy can partially protect against snow drifts.
For heating the winter chicken coop, mainly electric heaters are used. In order not to disturb the chickens, the heating on-off system is connected inside the house to a relay with a temperature sensor.
In most projects, the place for laying hens is allocated in a separate niche, so that you can open it and pick up eggs without opening the main front door. Thus, heat loss is avoided. In the same way equip a box for feeding birds.
How to choose the right place for construction
If the summer versions of the chicken coops are usually taken out to the leeward side of the site so that the breeze blows away all the smells away from the cottage, then the winter poultry houses are simply removed to the edge of the territory. It is desirable that the place in the country house for construction be closed from the wind. At least 1 or 2 sides. It can be trees or a fence around a country house. Just do not need to build a poultry house right under the tree. Any noise greatly frightens the chickens, and if snow caps regularly fall on the roof, this will only harm the birds.
In winter, the remoteness of the chicken coop from the main cottage building is more of a disadvantage than an advantage. The poultry house should be visited regularly to feed the birds and clean the premises. Therefore, if you build a winter chicken coop in the country with your own hands, then you will need to make a path, you can even under paving slabs.
You can not build poultry houses near the toilet, sewer, cesspool, other living creatures in the country. Otherwise, the chickens will get sick regularly. In addition, rodents will disturb the birds, so the place for the winter house should be removed from the sanitary zone of the dacha.
Calculation of the dimensions of the chicken coop and preparation of drawings
The dimensions of the winter house are deliberately chosen less than that of the summer one. In cold weather, birds are not as active, and a smaller room is easier to heat.
The best option would be to build a small winter chicken coop (winter house). Most often, the area of \u200b\u200bthe house does not exceed 7-10 m2. The traditional layout is 2.5x2.5 m or 3x2.5 m. At a rate of 4 adult chickens per 1 m2 up to 20 birds can live in such a warm chicken coop.
The height of the room is taken within 150-170 cm. Doing below is not recommended due to deteriorating conditions chicken coop ventilation.
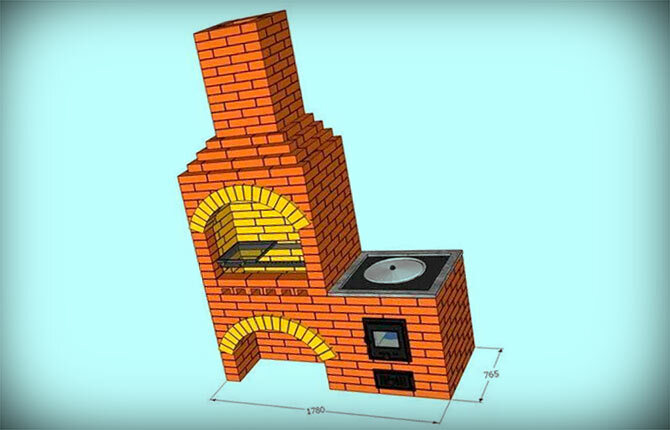
Below is a drawing diagram that can be used for calculations, as well as a prototype for building a poultry house in the country with your own hands.
The wintering room for chickens is usually made wide, but not deep. If we take into account that the house is raised on a frame or piles above the ground level, then by opening the door, you can easily reach out with your hand (broom) to the opposite wall. This makes cleaning easier. It can be done without even entering the winter house.
Particular attention should be paid to the size of doors and windows. It is better to make them glass for the entire doorway. For a winter chicken coop, windows or glazed doors are the only source of daylight in winter. It is clear that the frame will need to be made double, otherwise the heat loss through the glass will be too large.
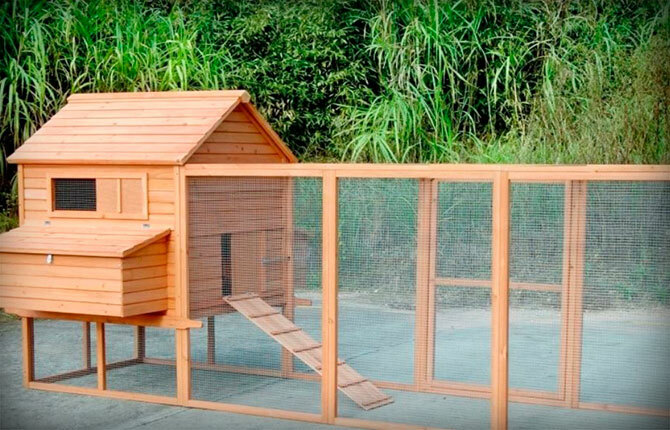
Most owners, if the size of the dacha area allows, build a winter poultry house as part of a whole complex of two buildings connected by an aviary for walking birds.
In the summer house (it is always three times larger than the winter house), chickens spend most of the year - from early spring to late autumn. In winter, birds are transferred already with the onset of cold weather. In addition, the winter house is used even in summer, for example, for raising chickens or resettling sick individuals.
For you: Hood in the chicken coop
Selecting and preparing materials and tools
Any outbuilding in the country is built according to the residual method. That is, for the construction of the poultry house, all available stocks of boards, slabs, scraps of plywood, glass and frames, door canopies left over from the overhaul of the dacha or house will be used.
An aviary for winter walking can be made from any suitable mesh or even a thick transparent plastic film left over from a purchased stock for building greenhouses. Using a film for a winter chicken coop in the country looks like a strange decision, but this is only at first glance.
A film awning and a frame from a greenhouse that is idle in the winter in the country often becomes an additional shelter for chickens. The greenhouse is simply transferred to the winter poultry house and loaded with almost ripe compost. The compost compost material generates a lot of heat, plus chickens fertilize the compost mixture well with manure. Inside the greenhouse, attached to the poultry house or more often to the aviary, it is much warmer than on the street. The difference is almost 10OC, so the chickens walk inside it most of the daylight hours, and do not sit in a cramped chicken coop.
Separately, you need to prepare materials for the roof and roofing:
- Vapor barrier membrane.
- plywood.
- Mineral wool or any other insulation with high vapor permeability.
- Bituminous tiles or ondulin.
Of all the roofing options for a winter chicken coop, only slate, shingles and ondulin are suitable.
You will also need material for the frame of the house, 100x50 mm. For the floor - grooved board 30x250 mm. For the manufacture of the frame of the paddock, an ordinary pine floorboard.
Separately, you will need to prepare a cinder block - from 20 to 40 pieces. It will make a good base for a winter chicken coop. The cinder block should be two-chamber, that is, the lightest, with large internal cavities.
Of the tools you need a circular, Bulgarian, electric jigsaw or reciprocating saw, screwdriver, shovel, garden drill, wheelbarrow, ladder. Separately, you need to buy wiring and a flexible floor heater.
We build a winter chicken coop - step by step instructions
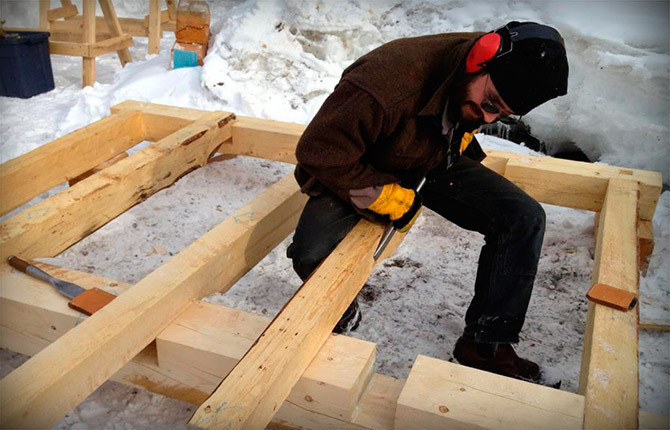
You need to build housing in the country for chickens in summer or autumn, in the absence of rain. The first step is to plan the site. Level it, remove excess soil and lay it with a shaft above the level of the site so that the water flowing down the slope does not fall under the foundation of the poultry house. Sometimes in the country it is necessary to make drainage gutters to avoid flooding the chicken walking area.
Foundation
The frame of the winter chicken coop will be installed on vertical piles made of timber, with a section of 100x100 mm. It is best to use larch or oak. If the cottage is tight with an oak beam, then the piles can be made of pine, after soaking the lower part of the support with a hot mixture of oil and resin.
The room of the winter chicken coop will be raised above the ground level by 60-70 cm. For the house, you will need to score four supports 100x100 mm. Under the mesh and the roof of the enclosure, you will need to drive 9 more piles (including the door) with a section of 50x100 mm.
But, before hammering in the supports, you need to lay out the basement belt of the foundation of the winter chicken coop.
For this:
- On the site, they mark the contour for the chicken coop, including the aviary for walking.
- Along the perimeter of the marking, you need to dig a ditch as wide as the bayonet of a shovel, up to a depth of 20 cm. The soil is immediately transported by wheelbarrow to the outskirts of the cottage, so as not to pollute the site.
- A mixture of sand with fine gravel screenings is poured to the bottom. Such mixtures are used for laying paving slabs.
- Lay the cinder block on the bottom in one chain, without breaking the masonry. The technology is the same as when laying paving slabs.
Immediately after laying the cinder blocks, the voids (internal chambers) are covered with sand and clay. Only those into which the supporting piles of the chicken coop will be driven are left empty.
Pits for the installation of supports are drilled with a garden drill to a depth of 60-70 cm. Each support must be leveled using a building level and a pair of paint cords stretched at the corners of the chicken coop base. After leveling, crushed stone screenings are poured under each support and rammed for fixation.
Foundation for a chicken coop
The next step is to drive the piles directly under the chicken coop. The winter chicken coop will stand on 6 vertical racks with a section of 100x50 mm:
- The front two (from the side of the facade) are obtained with a height of 3 m.
- The rear two are 2.5-2.6 m high.
- A couple more additional supports are installed on the median line.
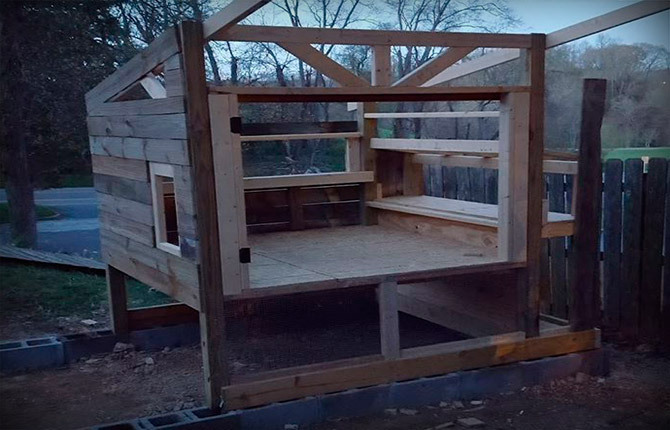
Immediately after installing the supports, they must be leveled using a building level and a plumb line, and then sewn up (tied up) with boards in 2 groups of 3 pieces. It turns out the strapping in the form of the letter "P".
The winter chicken coop is installed on the plinth not in the extreme position, but with an offset of 30 cm to the side. This is done specifically so that the side niche for laying hens is located under the roof overhang.
Next, you need to connect the poultry house supports with strapping boards at floor level. This will significantly increase the rigidity of the frame. To do this, boards 150x20 mm, 2 m long, are sewn from the back and side walls.
Arrangement of the floor and walls
Now it's the turn to make the most important details of the winter chicken coop:
- A niche for laying hens.
- Ventilation window.
- Manhole for chickens to enter the winter aviary.
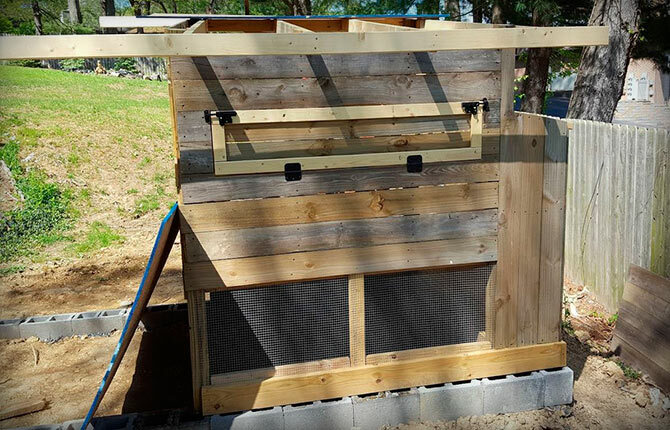
The most difficult stage is the manufacture of a niche. It will be located at a level of 10-15 cm from the floor of the chicken coop. In the winter version, the entire plane of the wall, from the base to the niche, is sewn up with one piece of plywood 15 mm thick. In this way, cold drafts are blocked and at the same time a support for the niche itself is formed.

The basis of the niche is a horizontal shelf made of 15 mm plywood, dimensions 30x200 mm. It is mounted horizontally with support on the wall of the chicken coop and additional vertical racks, and along the perimeter of the shelf it is hemmed with plywood strips. Insulation is laid inside and closed with plywood lining.
The upper part of the niche is formed from two horizontal rails, one of which is mounted on piles, the second - on the wall of the winter chicken coop. The roof is made with a slope of 50x30 mm rail segments. A heater is laid in the sidewalls of the frame, as well as in the ceiling. The rest of the wall is boarded up. The sidewall on the niche is made folding on canopies, always with two hecks.
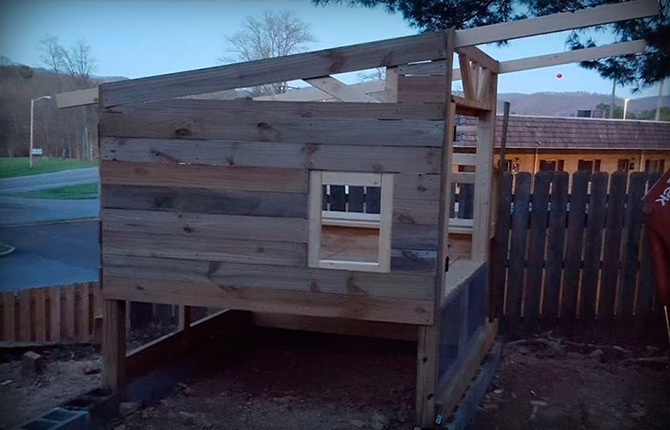
The ventilation window and the manhole cut into the walls of the winter chicken coop according to the traditional pattern. After the side and back walls of the chicken coop are completely sewn up with boards, two openings are cut into them.
From the inside, 2 vertical slats and 2 crossbars are sewn onto the wall. A folding canopy will also be installed for the manhole, and loops will be cut into the opening for the ventilation window and a frame sewn up with boards will be inserted. For a winter chicken coop, it is not necessary to make the ventilation window glass. In summer cottage conditions, it can be sewn up with boards or plywood with an insulated backing.
Ceiling and roof construction
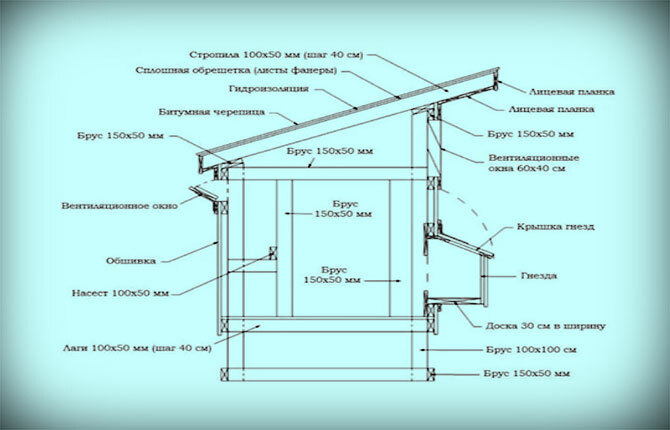
To form a roof slope, rafters 50x70 mm are sewn onto the vertical racks of the chicken coop, one at a time on the left and right above the side walls. They will be the basis (template) for the frame, as well as the insulation of the roof of the winter chicken coop.
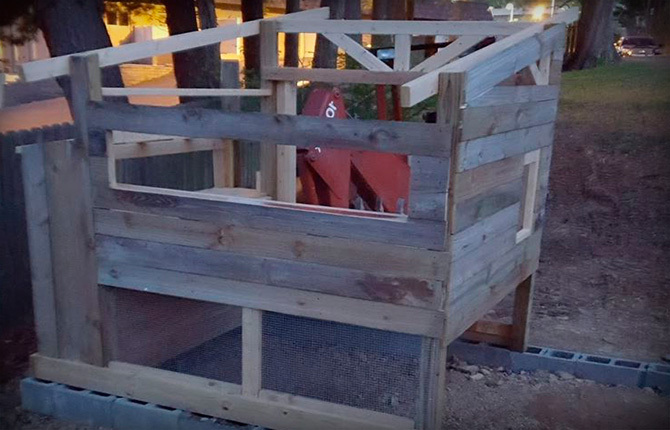
Two cross-beams are stuffed between the rafters, additional struts and a lower support under the slope rafters. The ceiling space along the upper wall trim is sewn up with slats. They will be laid roof insulation winter chicken coop.
The overhangs of the roof above the chicken coop are obviously made quite large. Of all the buildings available in the country, such a scheme is used only in winter chicken coops and terraces. Due to the large overhang area, a significant amount of snow accumulates on the roof in winter. The slope of the slope is small, so there is a risk of breakage of the frame. It makes no sense to make a gable roof for a winter chicken coop in the country, it is easier to increase the number and thickness of the rafters.
After laying a few more rafters, the front and rear cornice strips are sewn onto the ends of the rafter beams. This must be done without fail, otherwise it will not be possible to close the insulation correctly, and the roof of the winter house will lose heat a lot.
In addition, the cornice strips will be used in the future to form a canopy over the aviary of the winter chicken coop.
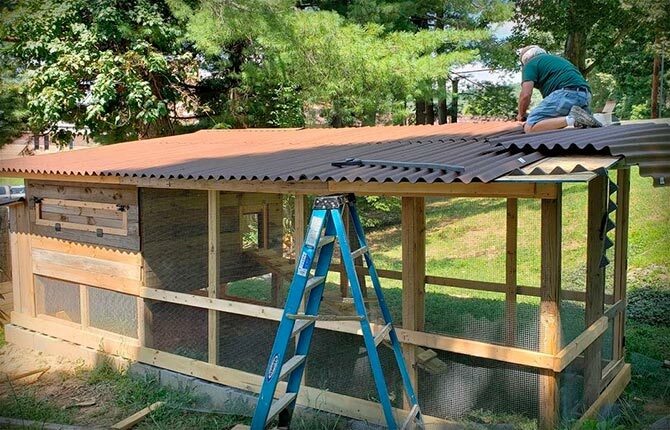
After installing the eaves, the rafters are sewn up with solid plywood. This design is used for all outbuildings in the country, where ondulin or shingles are used as roofing. Film waterproofing is laid on top of the plywood.
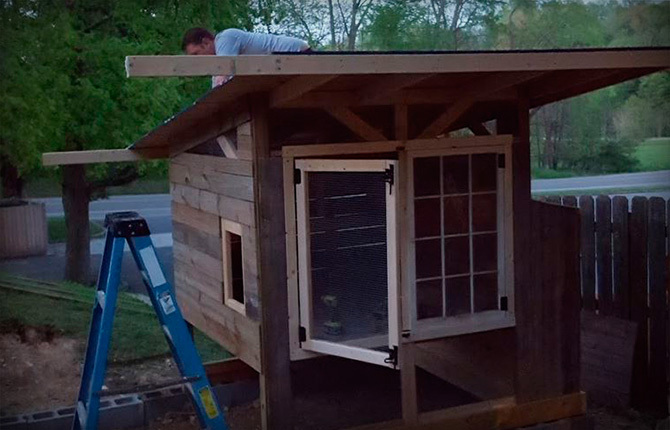
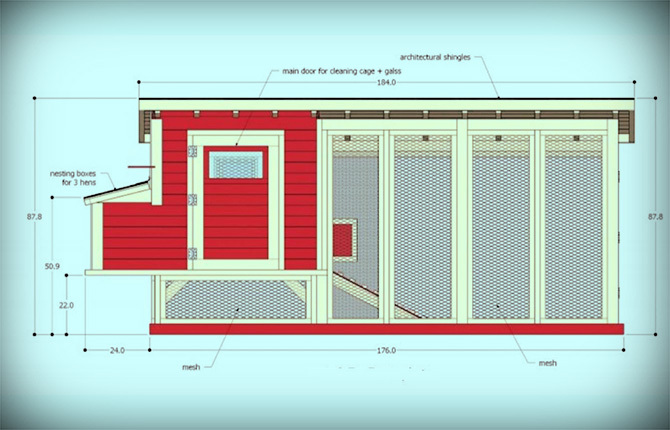
The facade of the winter chicken coop is completely open. This is an unusual solution for a farm building, especially in a summer cottage. Usually, the scheme, in which the front wall is made entirely in the form of glazed doors, is used only in closed gazebos and guest houses.
But for a winter chicken coop, it is important to ensure the maximum flow of light into the room. Chickens, as a rule, get sick less in winter if artificial lighting is replaced with natural.
Glazed doors are inserted into the chicken coop box along with the frame. It is quite difficult to make such a design in a dacha with your own hands, so it is better to buy a ready-made window block. The winter version, as a rule, has the possibility of additional installation of external plastic glazing in the frame.
Building a paddock
The open-air cage for winter walking of hens is carried out on frame technology. First of all, you need to tie the vertical supports of the fence with boards along the lower and upper levels.
As a rule, boards are sewn simultaneously in the upper and lower parts, and at the same time the mesh is stretched. For a small winter chicken coop in a dacha, it is better to use a plastic mesh or steel, welded type, but always with a polymer coating. Such material is easier to fix, and it rusts less.
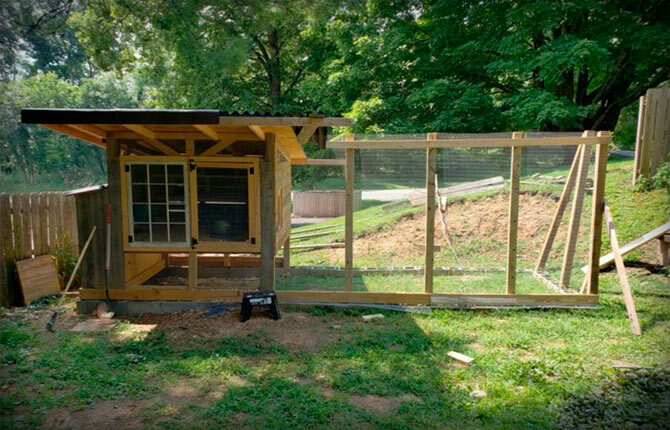
Next, you need to sew on the supports the middle strapping with a board, approximately at the level of the floor of the chicken coop. To form a canopy, wooden slats-rafters are laid on the supports. They will need to be adjusted in size and angle with the roof of the winter chicken coop. The ends of the rafters, like those of a chicken coop, are sewn up with a cornice strip. The slope of the canopy is stuffed with plywood sheet.
To form a canopy, it is not necessary to buy plywood. You can sew any material that is in the country. You can even croaker, which is always a lot in any country house. The main thing is that the material is rigid enough, since waterproofing will be glued on top of the wooden base and ondulin will be laid.
To enter the aviary, doors are cut into the rear side of the fence, opposite from the chicken coop. You can use any - do it yourself from rails and mesh or put old internal doors dismantled after the next repair in the country.

The last detail is a ladder for chickens. It is made of two boards knocked down by pieces of timber. The design is simple, and can be used in the country as a ladder instead of a ladder.
Ventilation
For winter ventilation of the chicken coop, two side windows are used under the roof itself. They are tightened with a steel mesh and partially closed with valves in winter. It is not recommended to completely close it, since water vapor accumulated inside the chicken coop is removed through these windows.
Sometimes ventilation openings are closed with a wooden frame with a vapor barrier membrane stretched over it with one-sided conductivity. This is done if mineral fiber mats were used to insulate the roof of the winter chicken coop.
In addition to the membrane, there must be a mesh on the ventilation, preferably a small one, otherwise mice and other animals living in the country will constantly visit the chicken coop.
In the summer version, ventilation is provided by a hinged shutter window embedded in the rear wall of the winter chicken coop.
Lighting
In winter, two types of lighting are used. In summer, the light is not turned on. One fluorescent lamp is installed under the ceiling above the glass doors. The light flux is directed downward at an angle, into the floor of the chicken coop. This is enough to see the interior of the chicken coop from the opposite edge of the dacha.
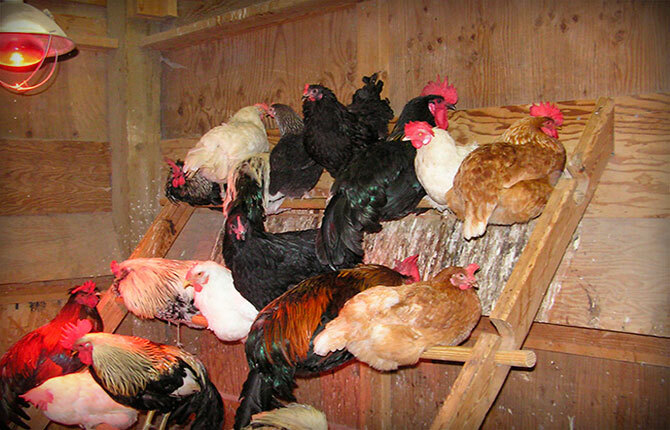
The second type of lighting is red lamps of 200 watts. They are usually turned on at night or in winter when it is very cold.
At night, lighting is left only on cool days. Usually the summer season in the country is over, but it is not yet cold enough to turn on the heating.
Heating
Most winter chicken coops built in summer cottages are heated by decomposition of the litter and installed ceiling heaters. But this type of building is too small to use an infrared heater. The minimum distance from the incandescent spiral to the object should be within 2.5-3 m.
Therefore, in this case, the heating of the chicken coop is provided by a graphite film heater laid on the lower part of the walls. Heating foil, usually 50 cm wide, is laid around the perimeter and on the floor in the layer niches.
If you lay a film heater on the floor, then the film will need to be covered with wooden boards, respectively, the heating efficiency of the winter chicken coop will be less. Under the heating film, a substrate of foil-wrapped polyethylene foam must be laid. It is needed in order not to heat the wooden floor, but to transfer heat into the chicken coop.
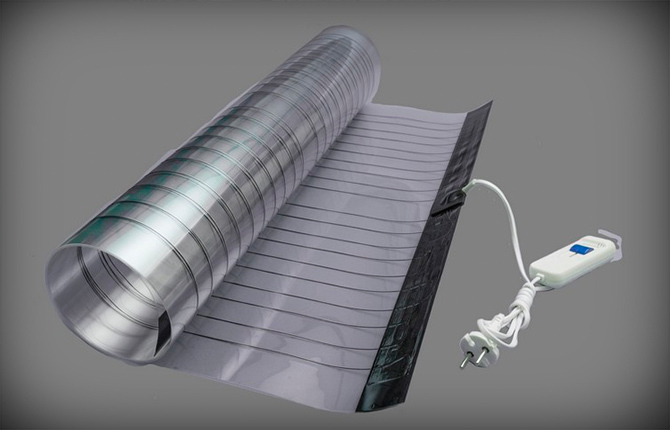
The film heater power is 150-300 W/m2. That is, if in a winter chicken coop (6-7 m2) a heating film is laid on the walls along the contour and partially (one strip) on the floor, then as a result the heating area will be 8-9 m2. With a specific heat transfer of 150 W / m2, 1.2-1.3 kW will be obtained. This is quite enough to heat the winter chicken coop even at air temperatures down to -15 ° C.
A step-down transformer is not needed, wiring can be laid directly from the meter in the country.
The only thing that needs to be provided is a turn-on timer and a thermostat-regulator so that the chickens do not burn out and there is no waste of electricity. With such heating, the winter chicken coop can be completely left in the country for a couple of days without supervision.
Warming
The method and scheme of thermal insulation, each owner of the cottage chooses independently. In most cases, unlucky builders simply paste over the box of the winter chicken coop with foam or foam boards. But it is better not to do this, the effectiveness of such thermal insulation is low. If desired, you can insulate the floor under the chicken coop by gluing a foam board 50 mm thick.
As per video:
Compressed mineral fiber boards are best suited for thermal insulation of chicken coop walls. You can use the scraps left from the insulation of the roof of the cottage, or beg at any construction site. Pieces of insulation are placed on a pre-laid membrane, in the space between the ceiling and the roof of the winter chicken coop.
Walls are usually not insulated, but there are exceptions. For example, if a place in the country for a winter chicken coop is chosen on a “patch” blown from all sides. Sometimes this is found already in winter, during the first frosts.
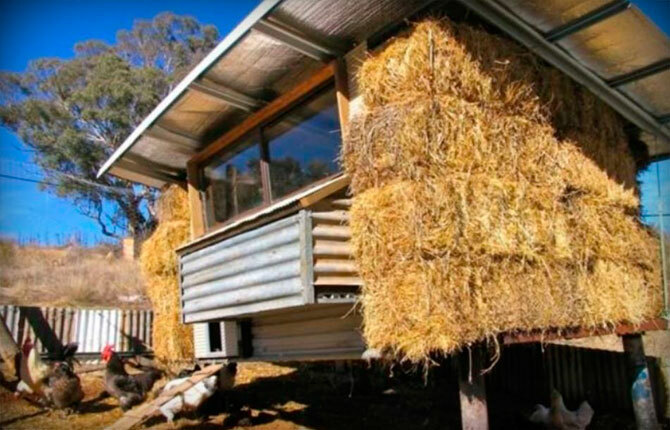
In this case, the problem is solved simply - you can insulate the walls of the winter chicken coop with the help of hay, reeds or straw rolled into bales. In terms of efficiency, such insulation is much higher than polystyrene or mineral wool. But if you make thermal insulation on an ongoing basis, then the material will need to be treated with a solution from biological pests.
Interior decoration
No additional wall cladding inside the chicken coop is provided, with the exception of a film heater, it will need to be covered with sheets of fiberboard 4 mm thick. Everything else is ordinary boards. Any wiring inside the room is placed in plastic corrugations.
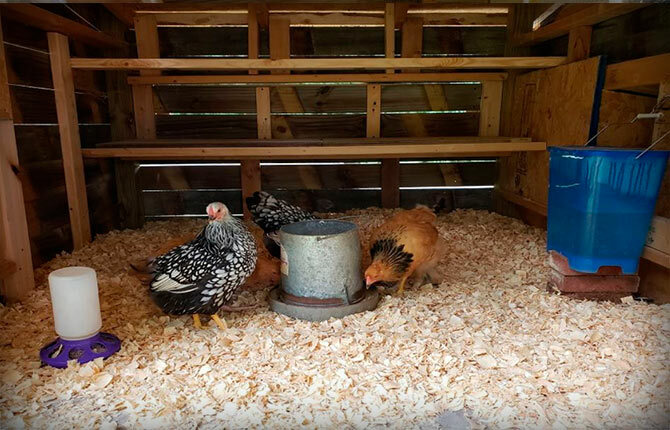
Perching poles are stuffed under the rear wall of the chicken coop, usually chickens choose a place away from the front door. The floor is covered not with sawdust, but with large chips, it blocks the heat from the film heater less. Often they put boxes with additional food, separately with ash and pebbles.
Sometimes a plastic tray is placed on the floor in a winter chicken coop (under a perch) to collect litter. It is easier and faster to clean up without cooling the room.
In winter, in addition to the valve, a dense cotton fabric is sewn onto the manhole for the exit of chickens. It blocks the gaps well and does not prevent the chickens from entering and leaving the chicken coop.
It will take at least a week to build a simple winter chicken coop in the country with your own hands. Although most of the work is simple and does not require the skills of a carpenter, it takes a lot of time, since you have to build from scraps and often from what is left in the country after repairs.
Tell us about your experience in building a poultry house in the country - what can be improved in this project? Write in the comments!