The old construction wisdom says: if it is possible to do it without complicating the process or design, then you need to do it that way. A columnar foundation today is considered one of the simplest and most accessible schemes. Anyone who has at least minimal experience in construction work can build it with their own hands.
The content of the article:
- What is a columnar foundation
- Advantages and disadvantages
- Design Features
-
Types of columnar foundation
- Monolithic reinforced concrete column foundation
- Wooden column foundation
- Prefabricated column foundation
- Rubble concrete column foundation
-
Do-it-yourself columnar foundation: instructions
- Preparatory stage
- Excavation
- Frames for reinforcing columnar foundation supports
- Heel assembly
- Installation of supports
- Trim or grillage
- Results
What is a columnar foundation
There are several varieties of this type of foundation. A columnar base for a small building can be made from a variety of materials. The specific version of the pillars, as well as the material for their construction, is selected depending on the load, the size of the structure, and the characteristics of the soil.
All existing options for a columnar foundation share common characteristics:
- each support (pillar) perceives only compressive load;
- the post is made short and thick enough to avoid deformation of the supports under the influence of torsional or bending loads;
- The columnar foundation system does not have a rigid adhesion of vertical surfaces to the ground.
Simply put, even if a columnar support is dug into the ground, it is always to a shallow depth. Each post has the ability to deviate by a small angle (literally a few degrees) from the vertical position, but not deform or bend. After the lateral load is removed, the support of the columnar foundation returns to its previous position.
A columnar foundation is visually similar to a pile foundation. But, unlike pillars, piles are driven into the ground to a considerable depth by impact loading or in another way that ensures reliable adhesion of the vertical surface to the compacted rock.
The pillars are simply placed on the prepared site. The top layer of soil is always removed to avoid the influence of germinating grass and roots. Then a pit (pit) is made, at the bottom of which a cushion of gravel or crushed stone is laid.
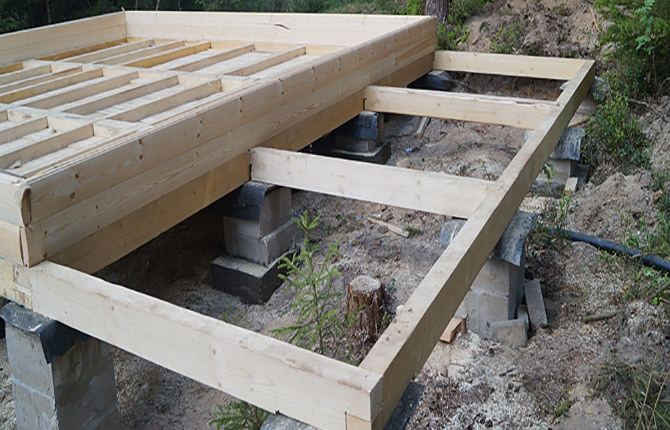
When building simple and very light structures (open gazebos, sheds, even frame houses), the soil is simply cut (leveled) with a shovel, the surface is covered with a mixture of sand and crushed stone, after which it is compacted with wooden tamper. On such a base you can place poles made of cinder blocks or wooden logs. The height of the foundation above the ground level is usually slightly greater than the width of the support.
We also read: Brick for the plinth
Advantages and disadvantages
There are quite a few positive aspects to this type of foundation. Many amateurs build columnar foundations and use them for their own construction without calculating the characteristics and bearing capacity of the soil.
There are three main advantages:
- Simple design that does not require expensive equipment. You can build a columnar foundation with your own hands two to three times faster than a slab or strip foundation.
- Properly planned arrangement of supports ensures uniform distribution of vertical load throughout the foundation. If a mistake is made, it can be eliminated using a jack and reworking the pole.
- A columnar foundation, despite its simplicity of design, can withstand significant vertical loads. It is necessary to correctly calculate the pressure on the support and take into account the bearing capacity of the soil.
There are more disadvantages, but if you follow the technology for constructing columnar foundations, you can compensate for almost all the disadvantages.
There are four main disadvantages:
- It is recommended to place it on soil with low heaving levels.
- A columnar foundation does not provide reliable support for buildings with a large windage area.
- It is impossible to make a basement or cellar.
- It is not recommended to install on slopes with soft clayey, sandy-clayey soil. The very first rain can cause the foundation to “spread”.
In this case, some of the pillars may sag and even topple if the foundation piping is done incorrectly, without fixing the supports. Therefore, it is sometimes necessary to use drainage and insulate the base.
Essentially, a columnar foundation is a budget option for a lightweight foundation for a frame building, a small wooden shed, or a summer bathhouse. Summer residents even use poles for arranging terraces and decking. Even pallets with seedlings are lifted onto supports made of rubble and wood.
Design Features
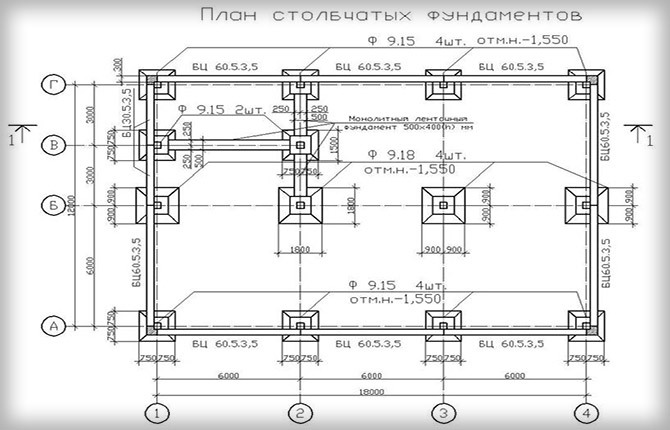
A columnar foundation is formed in the form of a field of 10-20 supports arranged in a certain order. Sometimes a checkerboard pattern is used, but more often it is a row pattern, when the pillars are installed in several rows with a pitch of 100-180 cm. The cross-section and thickness of each support is selected depending on the material used. If the foundation is made of blocks, then the height of the pillars must be carefully maintained.
Each support is assembled, laid out or cast individually at the installation site. After shrinkage, the upper platform (end) is trimmed and leveled to the horizon. This is important, otherwise the frame or strapping beam will put pressure on the support with a small overturning moment. If you do not level the horizon of the “top” of the pillar, then after the first winter the support may topple, and accordingly, the base part of the walls will sag.
An important element of the foundation system is the piping of supports. By itself, a set of pillars placed on the site is not capable of supporting the building even on a carefully leveled ground surface. The strapping is a wooden beam or a metal profile. It is laid on support pillars and point-fixed on each one using an anchor or embedded pin.
Important! The fastening must be point-based, that is, the beam must be fastened at several points, otherwise, due to vibrations of the supports, part of the fastening will be torn off. There will be only one left, if you are very lucky, then two anchors.
Types of columnar foundation
The specific design and material for the manufacture of supports are selected depending on the nature of the soil and relief surface, weight, as well as the material from which it is planned to build a veranda, gazebo, barn or summer kitchen. For frame buildings, a columnar foundation is usually built from blocks, bricks, concrete or rubble concrete. The support frame can be made of wood.
If the future building will be assembled on a metal frame, with the pillars tied with a square pipe or a channel, then the columnar foundation will need to be cast from concrete, always with a backfill fittings.
The same type of foundation is used for various extensions to houses. Why? Brick supports hold up no worse than concrete ones, but it is quite difficult to lay out all the pillars of brick at the same height. Therefore, the columnar foundation is made of concrete or, more often, rubble concrete.
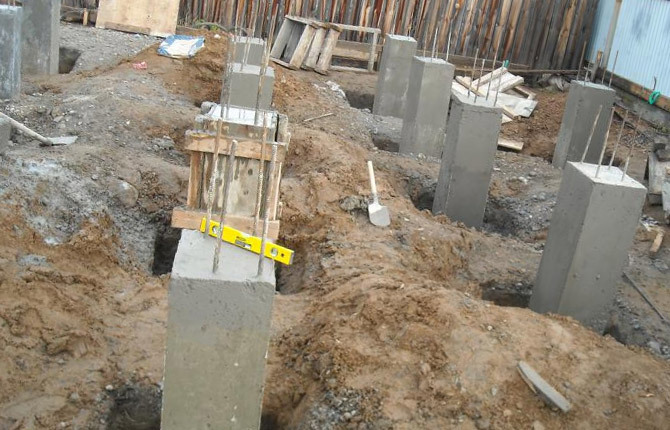
Monolithic reinforced concrete column foundation
The most affordable option for making it yourself. Monolithic supports are formed on site by pouring concrete into the formwork. Essentially, a monolithic concrete pillar is the same pile, but cast on site, without driving it into the ground with a pile driver or hammer.
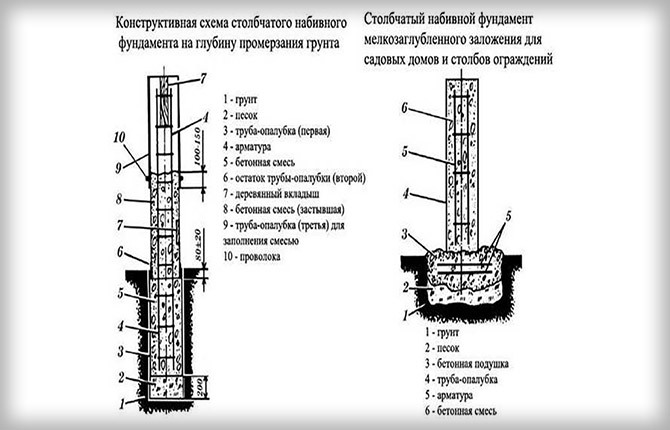
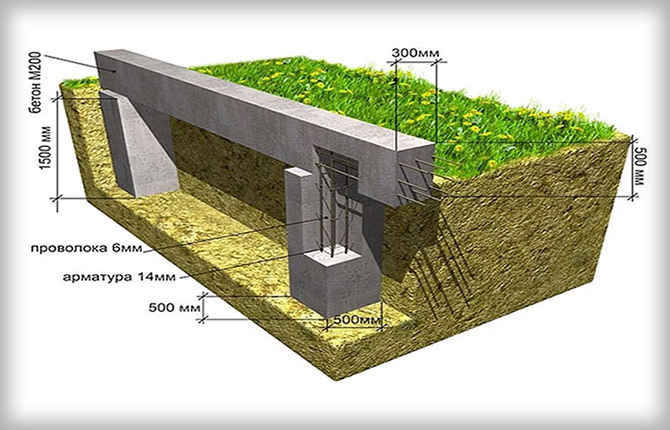
Classic pillar casting scheme
The main difference between monolithic supports and brick or rubble concrete supports is the depth of embedding. For a brick pillar, a gravel base is made at a depth of 30 cm, this is enough for a columnar foundation up to 50 cm high. For a monolithic scheme, the depth level must be at least 60 cm; for heavy structures, the depth is increased to a meter.
This is not related to the strength of the structure itself; if the technology is followed, monolithic supports are more durable than brick ones. Greater depth is needed so that the formwork box does not deform under the pressure of the concrete solution.
The manufacturing scheme for a monolithic support is quite simple. Box or tubular formwork is installed in the pit. In the first case, it can be a plastic, metal or wooden box, in the second, asbestos-cement pipes with a diameter of 100-200 mm are usually used. Roofing felt waterproofing and reinforcement are laid inside and filled with concrete. After a couple of days, the support of the columnar foundation is ready.
If the supports are poured in winter, then the formwork must be insulated, and in cold weather the pouring must even be heated. In summer, they try to remove the formwork as soon as the solution hardens (up to two days) to ensure an influx of oxygen and moisture into the thickness of the concrete that is gaining strength. Although according to the instructions at +20OFrom up to 5 days. In addition, formwork in hot weather prevents the monolith from cooling evenly.
This is the most common type of columnar foundation; it has gained popularity due to its relatively simple and repeatedly tested manufacturing technology.
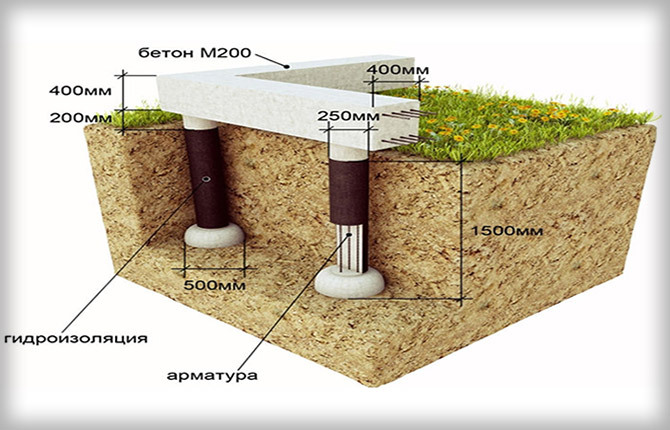
TISE technologies
Columnar supports can be made using a new, less common technology of local pouring of supports into the ground. Sometimes such elements are referred to as piles, citing the large depth of immersion of the pillar body into the ground. But since the concrete structure is cast in the ground and not driven, as is customary for piles, the load-bearing characteristics of TISE supports are much worse than pile ones.
The TISE support is a reinforced concrete structure, which is obtained by pouring concrete into a cavity cut into the ground with a special tool. The casting must be reinforced. The entire load is absorbed by the columnar foundation thanks to the expanded lower part of the support - the support heel.
Making a TISE support is quite simple, but in terms of load capacity it is inferior to classic monoliths. That is, a columnar foundation made from TISE elements turns out to be relatively weak and does not tolerate soil heaving well. Often the frozen soil simply tears the vertical part of the column away from the heel and pushes it upward.
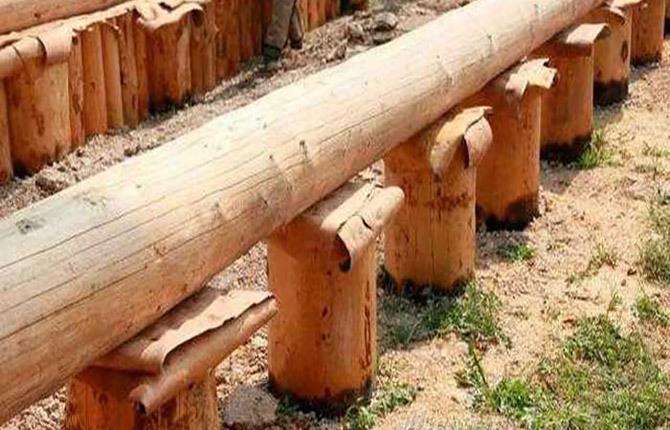
Wooden column foundation
It is rarely used in modern low-rise construction, but until recently, huts and log houses in swampy lowlands were built exclusively on a columnar foundation made of wood. At first glance, wood is not the best material for a foundation. The way it is. The material of most trees quickly rots when in contact with soil bacteria and fungi; the compressive strength is much lower than that of concrete and brick.
But from practice it is known that there are many examples of old buildings on a wooden columnar foundation that have stood for more than a hundred years and have practically retained their original characteristics.
Wood foundation material
For the wooden foundation, old trees with very dense wood were used. Typically, oak was used for wooden columnar foundations, sometimes even stained, but most often larch or heat-treated pine. The tree must be over 30 years old.
Trunk and logs with a diameter of at least 35-40 cm and a length of 70-90 cm were selected. The workpiece for the columnar support should not have knots or traces of fungus, or rotten areas.
The material was freed from bark, but the sapwood was not removed. It was necessary to properly dry the outer surface of the post so that it would turn out without cracks or damage.
Before installation, the workpiece was fired with fire until charred, then impregnated with birch tar and coated with clay. Clay lubricant was applied immediately before assembling the columnar foundation.
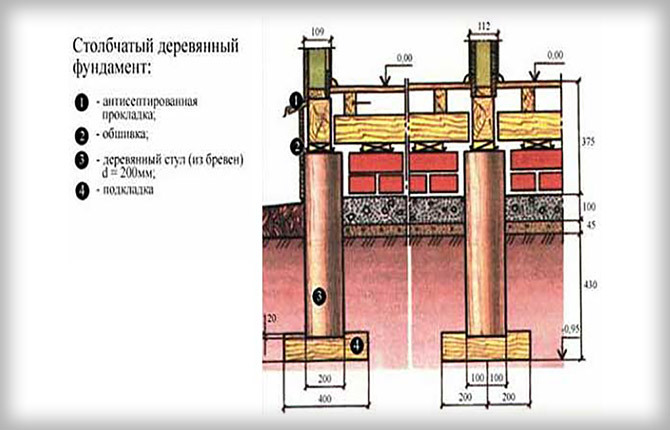
For huts or log houses, a fairly large amount of wood was required, so the lower embedded part (or bed) for the columnar the foundation was made of burnt pine, and for the support itself they used oak stumps or logs as the most resistant and durable material.
Installation diagram of columnar foundation supports
Wooden foundations are often used today. For example, if there is a forest nearby and it is possible to use old oak stumps. Typically, a wooden columnar foundation is made according to the classic fence construction scheme:
Drainage of the site is being arranged;
- in places where supports for a columnar foundation are installed, mini-pits are dug, the bottom is covered with a mixture of sand and gravel;
- the lower part of the support is impregnated with processing oil, coated with hot resin, then with clay, dried and placed in pits;
- The vertical column is leveled, then filled along the contour with a mixture of sand and clay.
Thanks to their low height, the individual supports are stable enough to support the weight of a small frame building. The bearing capacity and durability of such a structure is usually limited by swampy soil.
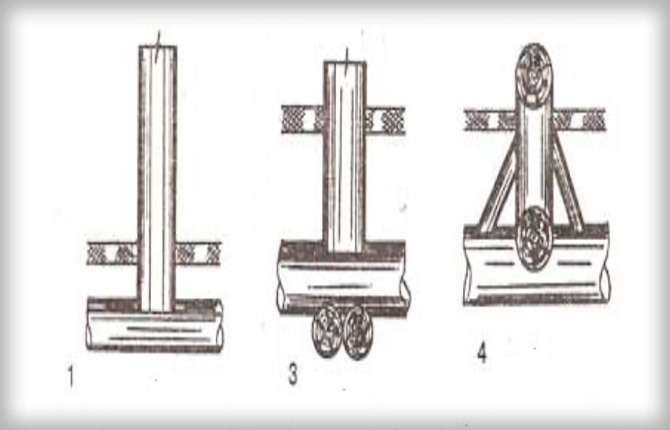
For areas with high groundwater levels, old schemes with embedded elements are used. That is, the supports are installed not on the bottom of the pit, but on a bench. This is a tarred wooden block, the upper part of the surface of which is cut off and made flat.
The bed is placed on a bed (a pillow made of gravel, clay and sand). Lime and liquid glass are often added. Sometimes builders completely cover the bed and the lower part of the support with liquid glass. In this case, the resistance and durability of the columnar foundation increases significantly. After installing the vertical post, the hole is filled with a mixture of crushed stone and clay.
Sometimes the bench is made in the shape of a cross, but the parts are not knocked together, they are simply laid in a hole in a cross. If it is necessary to make a relatively high columnar foundation, then the vertical supports are reinforced by stuffing the struts.
In modern low-rise construction, the bench is laid on freshly poured concrete mortar. Then a “penny” or “sole” of concrete is formed at the base of the pillar. Thanks to pouring, the bearing capacity of a columnar foundation increases by 50-60%.
In addition, this design perfectly withstands the load on clay soil. But it is not suitable for soil with a high frost heave coefficient. The concrete “sole” is often cut off by ice.
Important! The stability and ability to support the load of a columnar foundation on wooden supports is determined not by the strength characteristics of the wood, but by the bearing capacity of the soil.
The installation scheme involves almost doubling the support area of a wooden deck or block of wood. If the clay soil can withstand a load of at least 2 bar (2 kg/cm2), then with a vertical element diameter of 25 cm, one support can withstand a load of up to 900-1000 kg.
If the field of a columnar foundation consists of 20 elements, then it is quite possible to install a full-fledged one-story timber or frame house with an area of up to 40 m2 on it2.
Prefabricated column foundation
This type of foundation is used exclusively for very weak and marshy soils. The main disadvantages of this scheme are the high cost and labor intensity of construction. The manufacture of a prefabricated base is justified only when using ready-made elements cast from concrete using an industrial method.
Prefabricated columnar foundations can be used for normal soils. But for highly heaving soils, a special cutting of the post is required so that the ice plug does not damage the base.
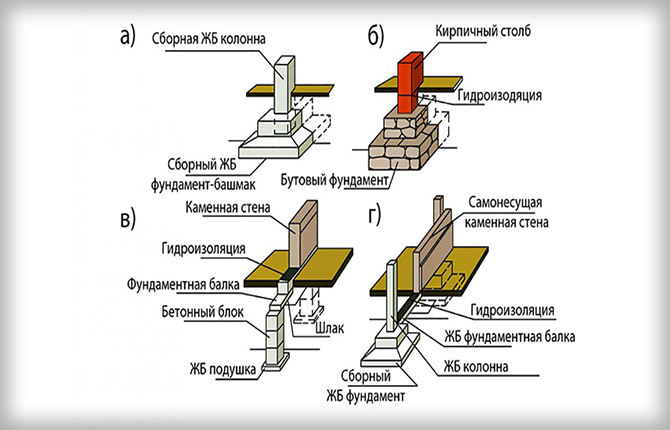
Assembly design
Each support is shaped like a mushroom turned upside down. The cap is a slab laid in the ground on a gravel bed. It can be round, but more often it is made square, with a mounting hole in the center.
The slab must be reinforced with a reinforcement cage made of rods up to 6-8 mm. Moreover, the reinforcement scheme is selected depending on the nature of the load. The more vibrations and shocks a columnar foundation experiences, the more layers of reinforcement and the smaller the diameter of the reinforcement.
The “mushroom” leg is a vertical support. It is reinforced in a standard way according to the scheme used for concrete piles. During assembly, the leg is inserted into the mounting hole, the ends of the reinforcement of both elements are connected, leveled and covered with a mixture of gravel, sand and clay.
The load-bearing capacity of a prefabricated columnar foundation is 5-6 times higher than that of a wooden one.
There are also small-sized options for prefabricated columnar foundations. In this case, instead of a slab, so-called support “shoes” are used. They are cast concrete, necessarily reinforced, and the shape is trapezoidal. The base plate is made up of several shoes, on top of which the support is installed. Such a foundation can withstand vibrations well and can be used when the soil is heavily watered.
Material for foundation supports
Support parts are cast from hydraulic grades of cement 300-400 units. The composition of concrete includes:
- washed quarry sand;
- gravel or crushed stone, also previously washed from clay and dirt.
- cement with additives that seal the surface of the casting and prevent the penetration of moisture.
Sometimes the workpieces are additionally coated with protective mastics. They are needed for waterproofing and reducing the adhesion of the concrete surface to the expanding frozen soil. Without protection, there is a risk of damage to the poles.
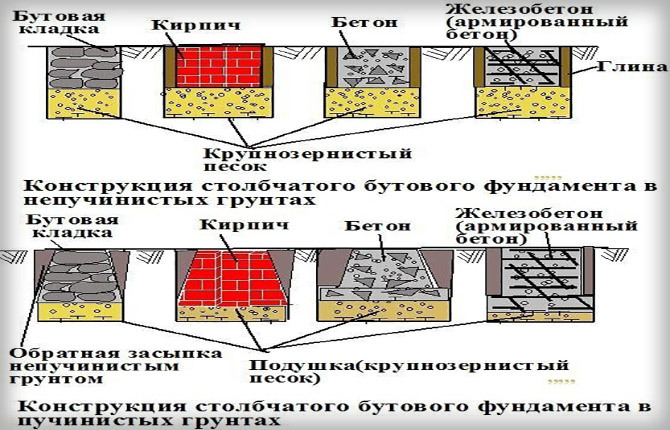
Rubble concrete column foundation
It is used in low-rise construction, in areas with low groundwater levels. Rubble concrete columnar foundations are used to a limited extent in industrial construction due to the large amount of manual labor involved. But for private developers it has long become the main method of constructing columnar foundations.
There are two ways to make a rubble concrete support:
- classic masonry;
- pouring a rubble concrete monolith.
The second method is considered more productive; its construction technology is almost identical to MZT strip rubble concrete foundations. The masonry method is less expensive, but requires a lot of manual labor.
How to fold a columnar foundation support
You can build pillars quite quickly if you use masonry mortar and flat stone as the building material. This is a natural flat variety of sandstone (quartzite), small in thickness, the size of paving slabs.
Each support of a columnar foundation is laid out by hand in approximately the same way as is done in the process of bricklaying. Before starting work, a concrete support heel is poured into the bottom of the pit; its dimensions must be larger than the cross-section of the pillar itself.
For each stone you have to find its position in the masonry. You have to look for several options for laying the sheet before you find a suitable place.
When erecting a pillar, you need to control its vertical position, so many private owners first drive an asbestos-cement pipe into the ground before laying the plaster. As practice shows, covering a pipe with plastic is much easier than simply making a solid masonry.
Do-it-yourself columnar foundation: instructions
On relatively weak sandy soils, using a columnar foundation may be the only correct solution. Driving piles will cost much more, and it is not a fact that their load-bearing capacity on sand will be sufficient to support a building, even a frame type.
Preparatory stage
First of all, you need to determine the depth of groundwater. At the same time, check whether there is a more powerful rocky base under the weak top layer. To do this, pits are dug to a depth of 2.5 m. If there is no direct water, then you can begin building a columnar foundation.
First of all, you need to mark the position of the supports on the site. To do this, stretch two cords (possibly painting ones) along the contour of the site and mark the position of the future supports of the columnar foundation.
Excavation
For each support you will need to dig a pit or hole up to 100 cm deep. The shape and dimensions do not matter, preferably 30-40 cm larger than the cross-section of the future pillar. All soil is collected and removed from the site. There is a lot of work involved in casting concrete pillars, so accumulated piles of soil will get in the way.
The cords cannot be removed, otherwise the markings of the columnar foundation may “float”. They are removed only after the heel has been filled, the reinforcement cages have been assembled and installed at the bottom of the pit.
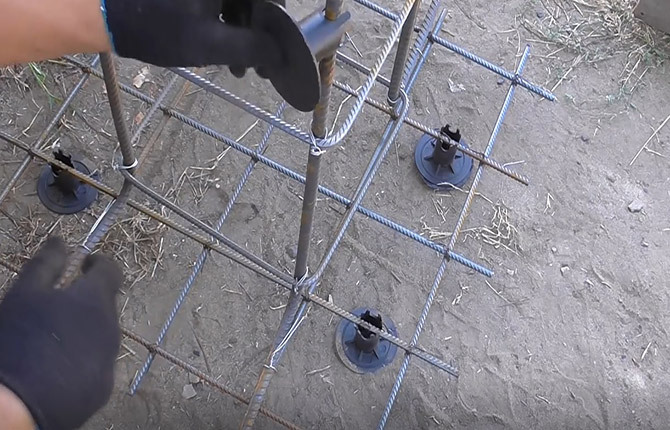
Frames for reinforcing columnar foundation supports
Each pillar must be reinforced with reinforcement cage. It is made separately and placed on the bottom of the pit after the heel is poured, but before the formwork is installed.
First you need to knit a lattice to reinforce the supporting surface of the heel. It can be made from 6-8 mm reinforcement, but the specific diameter does not matter, since the distributed load on the sole is less than on a vertical post.
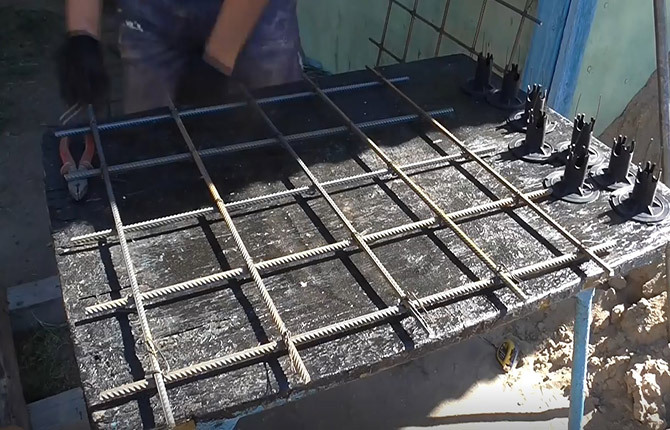
A box-shaped frame made of reinforcing rod is tied to the grid with wire. The dimensions of the frame are chosen such that there is a gap of 3-5 cm from the reinforcement to the outer side wall of the column.
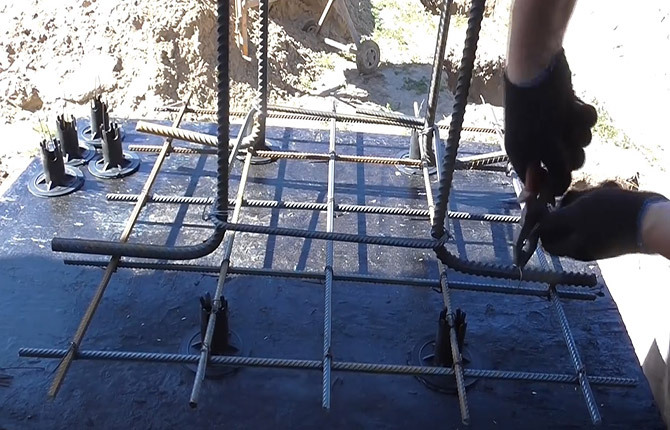
In addition, you will need to tie small blocks to the lattice bars or use ready-made supports to reinforce the poured floors. This will allow you to properly align the reinforcement cage in the future after it is installed in the pit. This is the easiest way to give the frame and formwork a strictly vertical position.
Heel assembly
Before pouring the heel, the walls of the pit must be leveled and cleaned so that the soil does not crumble onto the fresh concrete pour. Next, a small amount of crushed stone with sand is poured onto the bottom and compacted. A layer of roofing material is laid on top, the edges must be wrapped onto the walls.
The next step is to pour a leveling layer 3-4 cm thick. The solution should be liquid, the crushed stone should be fine, almost sifted. After 4-5 hours, the mixture hardens so much that the reinforcement frame of the post can be installed on top of the pouring. It is aligned vertically and fixed with spacers.
Now you can fill the heel itself. The thickness of the fill is selected within 10-15 cm. The time between leveling and final filling of the heel should not exceed 5 hours.
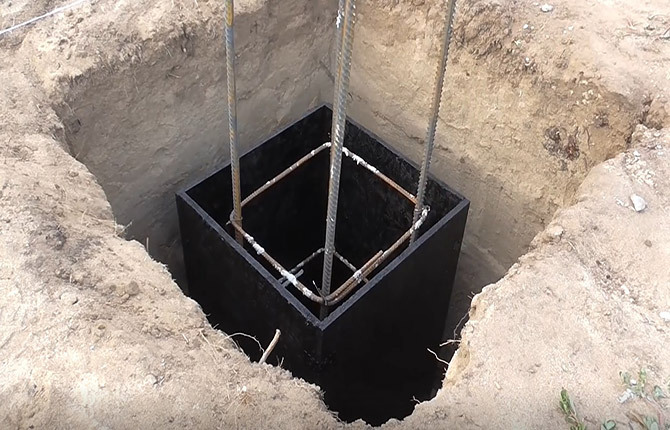
Installation of supports
Now you will need to form the supports of the columnar foundation themselves. To do this, plastic or wooden formwork is placed on each frame. It also needs to be correctly aligned vertically. The distance from the formwork walls to the reinforcing bars should be approximately the same.
A small amount of coarse crushed stone is poured into the bottom of the formwork. This is necessary for temporary fixation of the box.
The final pouring of columnar foundation supports is carried out in one portion; it cannot be divided into several sessions. Therefore, you first need to calculate the total required amount of concrete solution. It is best to prepare one portion of concrete with a concrete mixer per one or two supports of a columnar foundation.
If the foundation needs to be done quickly, then you can use an automixer for 1.5-3 liters of concrete. Pre-assemble the frames, install steel or wooden formwork boxes, and make pouring level marks on all of them. It’s easier this way so you don’t have to trim the posts manually later. After marking, you can fill all the pillars with one portion from an automobile concrete mixer.
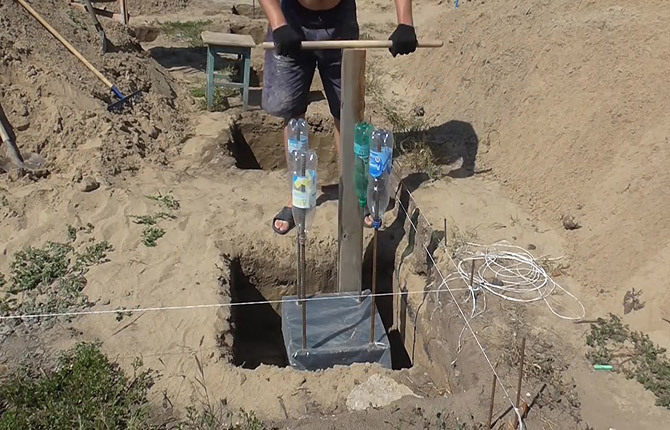
Plastic formwork cannot be filled with concrete to its full height. A heavy concrete mixture will simply crush the walls and some of the material will spill out. Before pouring, approximately 5-7 liters of heavy viscous mortar are poured into each formwork with a shovel and lightly compacted.
Next, fill the remaining space of the pit (sinus) with old soil mixed with sand and crushed stone. When filling the formwork with concrete, water is poured over it to compensate for the crushing force of the concrete mass.
If there is enough time for construction, then the supports of the columnar foundation can be cast using two or three sets of collapsible wooden boxes. After installing the board formwork, it will need to be wedged inside the pit. After two or three days, depending on the air temperature, the box can be removed and used to fill the next element of the columnar foundation.
Important! After pouring, the ends of the reinforcement cage should extend above the concrete. Subsequently, it will need to be tied to the reinforcement of the concrete grillage or welded to the channel.
Trim or grillage
After the supports of the columnar foundation have been cast, you need to frame it with a profile or pour a concrete grillage along the contour. The specific option is selected depending on the nature of the building. For timber and frame buildings, channels are usually used. But in this case, at the stage of pouring the pillars, it is necessary to embed mounting studs or anchors into the concrete.
If you plan to build a house made of foam concrete or gas blocks on a columnar foundation, you will have to make a cast concrete grillage. It is poured into wooden formwork. Steel wire reinforcement must be laid inside, which will then need to be properly tied to the reinforcement frame of the foundation supports.
The final choice should be made at the design stage. Before choosing a method for making a columnar foundation. Channel tying will cost more, but in the end the structure will be much more reliable than concrete.
In addition, it will be necessary to insulate the pillars and fill them with a mixture of sand and clay to protect them from moisture. Vertical concrete surfaces must be painted or coated with bitumen mastic.
Results
You can make a columnar foundation with your own hands quite quickly. The overall labor intensity and cost of constructing pillars is much lower than that of other types of foundations, and the strength and stability are almost always higher.
Tell us about your experience in arranging columnar foundations for a house. What details of the work do you need to pay special attention to? Also save the article to bookmarks and share it on social networks.


