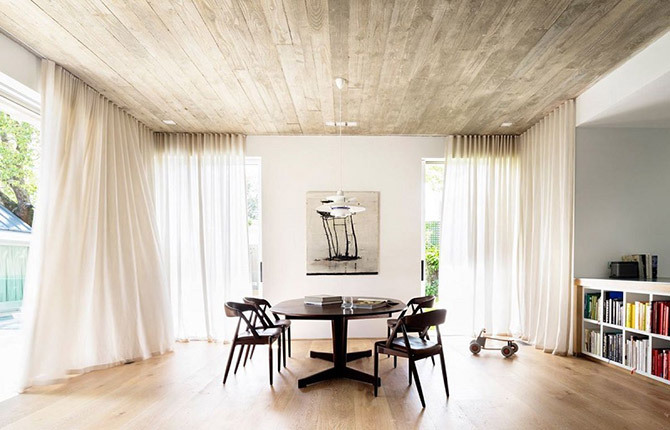
When updating a living space, you can cover the ceiling slab not only with plasterboard panels or stretch the canvas, but also make “wood cladding”. The laminate on the ceiling will not change in appearance and will last for decades. Installation can be carried out not only by a coating laying specialist, but also by any man who knows how to handle tools. The choice of colors, textures, and sizes is quite diverse, which will allow you to create a unique ceiling covering.
The content of the article:
-
Choosing laminate for ceiling cladding
- Selection by room type
- Selection by class
- Advantages and disadvantages of laminate ceilings
- Types of laminate for masonry
- Laminate sizes, their features
-
How to lay laminate flooring on a ceiling - masonry ideas
- Focuses attention
- Letter "G"
- Along with the floor, walls
- With repetition on the floor
- Step-by-step instruction
- Required Tools
- Methods for attaching laminate flooring to the ceiling
-
How to fix laminate flooring on a ceiling with glue
- Surface preparation
- Instructions for gluing lamellas
-
How to install on a frame
- Preparing the sheathing
- Installation instructions
Choosing laminate for ceiling cladding
Placing the laminate at the top rather than at the bottom will give the room an unusual look and will attract the eyes of guests. Inserts from boards can be used to decorate a suspended ceiling or to divide a room into sections. Such options can be found when renovating a studio, in loft spaces, as well as in an apartment in country, industrial, even classic style. Which laminate is best to choose for upstairs installation depends on several criteria. Everything is designed in advance.
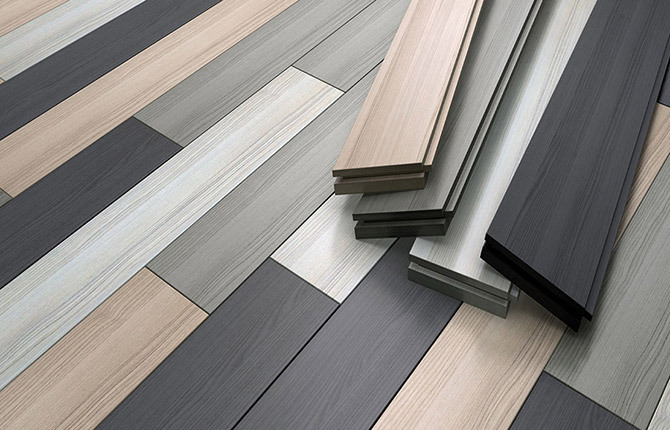
Finishing the ceiling with laminate begins with choosing the color of the material. The following colors can be found on the shelves:
- bleached oak;
- nut;
- metal;
- birch beige;
- mocha;
- black industrial.
It is important that the color of the flooring on the floor and ceiling is the same and has the same texture.
Selection by room type
For the dining room, kitchen, living room, bedroom, the laminate ceiling should be light and delicate. If you plan to create such a covering in a study or office, then you can take brown or black boards. If preference is given to a dark ceiling, then it is not recommended to implement the idea in a small area. This idea is suitable for a large office, studio apartment, hall. In classic rooms, you can lay wood-look laminate flooring. For living rooms, you can also choose an antique pattern, slightly worn, scratched canvases.
We read: How to lay laminate correctly
Selection by class
It doesn’t matter what level of moisture or wear resistance the laminate ceiling will have. You can install material of class 21-23 or class 31. It is not necessary to buy thicker models.

Thin panels can be purchased, except in situations where it is necessary to improve the soundproofing functions of the coating.
Advantages and disadvantages of laminate ceilings
Compared to suspended ceilings or other types of ceiling structures, laminate flooring has advantages in use:
- it is not heavy;
- durable, does not bend, does not scratch;
- has a moisture-proofing coating, so it is used to cover a bathroom or bathtub;
- mold and fungi do not form on it;
- no harmful components are used in production;
- it is easy to care for, wipe off dust;
- a glossy surface will reflect light into the room, making the room brighter;
- simple installation;
- provides protection from extraneous noise and sounds;
- costs less than other ceiling cladding materials.
However, laminate also has disadvantages:
- may make the ceiling slab feel like it hangs too heavily over the room;
- in a room with a small ceiling it can take away some of the height and distort the appearance of the space;
- it is necessary to foresee in advance how everything will be installed so as not to make a mistake;
- it cannot be installed alone, 1-2 assistants will definitely be needed;
- may bubble in rooms with a constant damp environment.
We read: What is the difference between parquet and laminate
Types of laminate for masonry
There is no classification of laminate types. Countries may have their own separate labeling.
Classification by composition:
- SPC (multilayer strong compound of calcium carbonate, PVC material);
- vinyl (flexible, similar to linoleum, there is visible damage on it that cannot be repaired, you just have to change the panel);
- quartz-vinyl (retains wear resistance, moisture resistance for years, does not depend on water, sun, heat, scratches);
- veneered (close in quality to parquet);
- cork (in combination with laminate makes the coating stronger, more durable, and more resistant to aggressive influences.
Classification by size, pattern type:
- rectangle shape;
- square;
- with one stripe;
- with two stripes;
- with three stripes.
Classification by texture:
- under the tree;
- under a stone;
- metal;
- with photo printing.
Classification by appearance:
- natural;
- with embossing;
- with chamfer;
- classic;
- semi-antique;
- in country style;
- waxed;
- gloss.
Thickness classification:
- thinner than 7 mm;
- up to 9 m;
- thicker than 9 mm.
You can buy panels for the ceiling that are treated with a reflective composition. This type of slats is suitable for decorating a non-standard room.
Laminate sizes, their features
Slats are often produced with a length of 120 cm. The generally accepted size of the canvas is no more than 140 cm. To cover large rooms, panels are produced that reach 180 cm in length, and for work in small, narrow spaces - 60 cm. Small slats are also suitable if you plan to decorate the interior with a herringbone pattern that imitates a parquet board.
Not recommended use non-standard long sheets for installation on the ceiling. To attach them, you need to carefully level the surface, since a long laminate may not press tightly, and sagging of the panels will be visible.
Short slats do not need to be laid on the ceiling. It will be long, tedious work, and the effect may not be to everyone’s liking. In addition, you will need more short material, which means you will have to pay more money.
The width most often chosen is 20 cm. Some manufacturers produce 10-centimeter variations (longer for laminate imitating parquet).
An important parameter is thickness. It should be noted that the panel is a “layer cake”, which includes layers such as:
- chipboard panel;
- stabilization;
- moisture-resistant layer for goods of the corresponding class;
- decor;
- protection.
Depending on the class of the laminate, the presence of decor, protection, moisture resistance, the width of the lamella can vary from 8 to 12 mm. The purpose also affects the thickness. For a room where people will not often be present, you can use class 32 models (8 mm thick). For a living room, hallway, or a room in which many people regularly pass, you need to take a more soundproofing class above 32. In such models the width is increased.
How to lay laminate flooring on a ceiling - masonry ideas
Laminate flooring can be laid on the ceiling in various ways. When choosing one or another technique, it is important to pay attention to the dimensions of the room, whether the room is high or low, as well as what picture the owner wants to see at the top. How the masonry will look depends on where you plan to lay the laminate: in an apartment, house, extension.
Focuses attention
This tactic is used in cases where it is necessary to shift attention from some visible defect in the room’s furnishings. The method is used in cases where it is necessary to emphasize the geometry of the surface. To divide the space into zones, not the entire ceiling, but some of its sections are covered with laminate.
Between the walls and the laminated ceiling, plasterboard is fixed into which lamps are built in. Or you can combine laminate panels with walls. This ceiling has an original shape and allows you to zone small apartments.
Letter "G"
When using this method, the panels are attached not only to the ceiling, but also to one of the walls. Only a separate part of the top is selected.
Most often, the method is used when finishing the kitchen. With its help, the dining and kitchen areas are separated from the living room. This design option looks impressive in large rooms, so it is recommended to use it when decorating a country house.
Along with the floor, walls
In this case, not only the ceiling, but also the walls and floors are covered with laminate. The finishing is done in a single color scheme, thereby creating a separate space. It contains a bed, a play area for children, and a hallway or bathroom. This modern technology is often used for zoning.
This design of the walls and ceiling in the attic looks unusual. A fully laminated room or some part of the living space stands out and becomes a kind of place of attraction for all family members, guests, and friends.
With repetition on the floor
Laminated panels can be fixed to the ceiling or floor. This design solution will create the appearance of a flat room. The combination of finishing materials on the walls and ceiling will give the interior completeness. It is not necessary to cover the walls; the floor should only be covered with laminate. You can lay out the area under the laminate ceiling with tiles or make it stone.
The main thing is to use similar shades of both laminate and other types of coating. It is not necessary to achieve an exact match of colors, but execution in the same range will be correct. It is important to use geometrically identical patterns on both surfaces. Then a pleasant visual symmetry will be maintained.
Step-by-step instruction
You can install a laminate ceiling with your own hands. Before you begin attaching the panels to the ceiling, you will have to choose one of two installation methods.
Installation of lamellas at the top can be on:
- frame lathing;
- layer of glue.
Before directly attaching the boards, you need to carry out preliminary rough work and, if necessary, level the coating. The installation instructions are clear; even a novice repairman can complete the installation. If it seems like you can’t handle it alone, you can call a friend or brother for help. Together, the work will be completed faster, and the quality of the ceiling will be higher.
Required Tools
In order for the work to be carried out quickly, without interference, you need to make sure that the installer has at his disposal the entire set of tools necessary to install the ceiling:
- manual impact machine;
- tool for adjusting surface level, leveling;
- ladder (“goats”);
- roulette;
- drill;
- hammer;
- carpenter's hammer;
- saw;
- screws or glue;
- wooden beams or aluminum profile;
- structures that will act as supports for already fixed panels;
- rags to quickly wipe compositions off the board;
- marking tool.
Methods for attaching laminate flooring to the ceiling
Laminate can be glued to the ceiling, or it can be attached to a frame. In the first case, the surface to which the panels will be glued must be absolutely flat. There should be no unevenness, as this may after some time affect the evenness of the final coating.
In the second case, you first need to build a frame and lathing around the perimeter of the ceiling, and attach lamellas to it. This type of fastening is more reliable. The ceiling is attached to self-tapping screws, so there is no danger that the panel will simply come off if a low-quality adhesive was used.
How to fix laminate flooring on a ceiling with glue
A glued ceiling will not take up much height in the room. It is chosen when the walls and ceiling are low and the room is small. Initially, you need to level the ceiling slab, remove old whitewash and plaster, and sand down all rough spots.
After this, the ceiling needs to be puttied and primed more than once. Of course, you will have to spend several days, or even weeks, until the compositions dry, but you will get an even, smooth base for the laminate. The adhesive method involves installation on a special solution designed specifically for such work. When choosing an adhesive, you need to ensure that it meets the following parameters:
- was resistant to water;
- its degree of adhesion was high;
- did not respond to changes in temperatures from low to high or vice versa;
- did not contain allergens.
No need to skimp on ingredients. It is better to buy two-component expensive glue than to glue panels with PVA.
It must be remembered that the adhesive composition is toxic, so you should use a respirator during the installation process. Compliance with all requirements will allow you to maintain the height of the ceiling and install a level top in any room: in the kitchen, hallway, in the bathroom.
Surface preparation
Installation of laminate flooring on the ceiling using glue must be done on a completely flat base. You can level the base with putty, prime the surface, and cover the base with metal sheets. It is important to wait for each leveling layer to dry completely in order to avoid the appearance of unpleasant phenomena such as fungus and mold after installing the ceiling.
You also need to check if there is a large difference in the ceiling level. If such a problem is discovered, you will have to level the level with putty. If the difference is more than 5 cm, then it is better to install the ceiling on a frame and abandon the adhesive method.
At the preparatory stage, you also need to think about how the lamps will be located, how many there are, and what type of lighting device will be installed. This must be done in order to install all cable channels. All wires must be “buried” in cement or adhesive mortar so that the seams from the wiring do not protrude and do not interfere with gluing the panels to the base.
Instructions for gluing lamellas
Installation is not difficult:
- Apply glue to a small part of the ceiling the size of one panel.
- Apply glue to the inner surface of the lamella, i.e. one that will not be visible from below when looking at the finished coating.
- Apply the sealed compound over the panel lock so that the ceiling does not fail or lose its outwardly attractive appearance.
- You need to start gluing from the far corner of the room, on the left side of the door. You can use double-sided tape as an auxiliary tool.
- The panels should be installed parallel to the window opening. If the installation comes from the balcony, then perpendicularly.
- The slats need to be fastened in the same way as brickwork. The seams (end seams) should not be aligned with each other.
- To ensure reliable adhesion, you can place support beams under the glued lamella.
- The next board is laid like this: treated with glue, sealant, and then inserted the ridge into the groove.
- Snap the lock, pressing the canvas to the ceiling.
- If the installation takes place in a small room, then you can connect all the panels on the floor, coat them with glue, treat them with an airtight compound, glue the ceiling, and attach the entire structure to the top.
- Install supports that will support the structure around the perimeter of the room.
How to install on a frame
In order not to waste energy and time on applying putty and drying the solution, you can use another method of installing the laminate on the ceiling. It is worth laying wires and other elements of lighting fixtures under the frame.
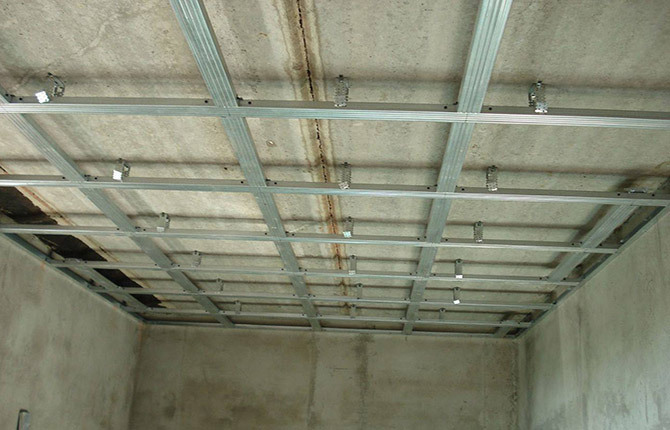
Preparing the sheathing
If there is old plaster that does not hold well, it is better to knock it down. Otherwise, it will crumble while working with a drill and interfere with the fastening of the frame. The following is done in stages:
- First you need to mark the future frame.
- Mark the locations of the transverse and longitudinal beams, designate the places where the sheathing elements will be attached.
- According to the completed drawing, secure the frame and install the sheathing.
- Before installing the laminate, it is necessary to run the wires, determine the locations for the lamps, and cut a hole in the laminate for the lamps.
- The frame itself must be attached to the wall with self-tapping screws or on hangers. If you use a wooden frame, then it is better to use self-tapping screws; if you use aluminum, you can use hangers.
Some craftsmen recommend constructing a frame or sheathing made of wood rather than metal.
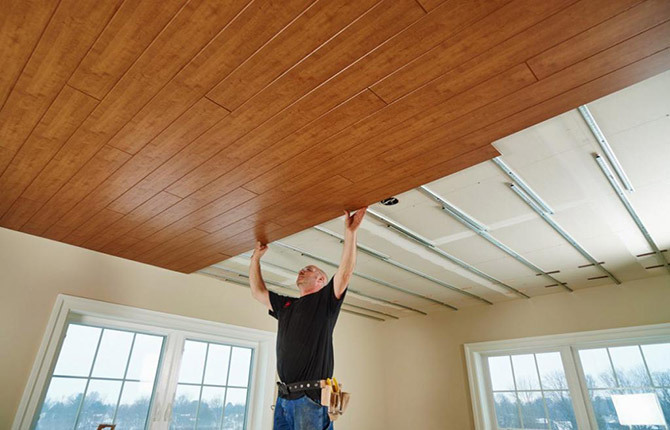
Installation instructions
Installation is not difficult:
- Measure along the wall the level at which the ceiling will be mounted.
- Wooden sheathing beams or an aluminum profile will need to be fastened at a distance proportional to the length of the lamella.
- Create a lattice from wooden or metal beams.
- Connect the sheathing elements together with dowels.
- The result should be a strong structure that can support the weight of the ceiling made of laminate panels.
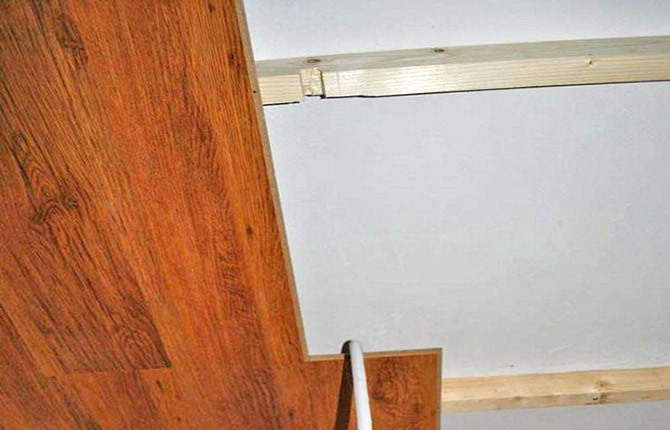
- The laminate is attached using a screwdriver. Don't worry that the “hats” will be noticeable from below, this is not the case.
- The frame can be secured to metal strips with clamps. It should be remembered that installing them is more difficult than hammering nails. In some cases, the locks on laminate panels will have to be cut a little to make them fit with the clamp.
- Between the panels and walls it is necessary to leave a gap of no more than 1.5 cm.
- You can hide the gap by gluing fillets onto liquid nails.
The idea of laying laminate flooring on the ceiling with your own hands may come to the mind of someone who knows how to use tools and has laid laminate flooring on the floor in an apartment himself. Installing the panels is not difficult; it can be done by two people or one. Using laminate for the ceiling is creative, unconventional, and harmonious in any interior.
What class of laminate do you plan to install on the floor slabs? Share the link on social networks and bookmark the article.