Photography is a wonderful combination of technical skills and creativity. At the center of this combination are key camera parameters such as aperture, shutter speed and ISO. In this article, we'll dive into understanding what camera ISO is and how it affects the quality of your photos.

The content of the article
- ISO Definition
- How does ISO work?
- Practical application of ISO
- Errors when using ISO mode in various types of cameras
- ISO in different types of cameras
- In which cameras is the ISO option considered to function better?
- Conclusion
ISO Definition
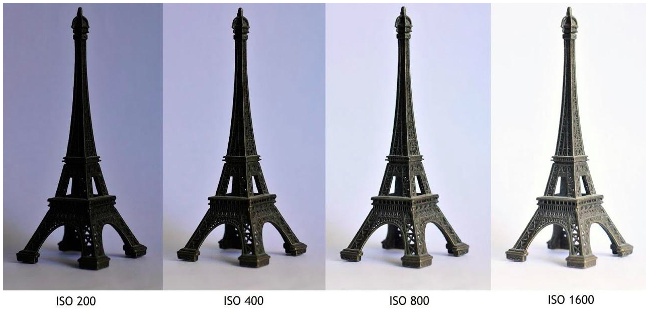
What is ISO in a camera? ISO is a measure of the sensitivity of your camera's sensor to light output. As the ISO value increases, the camera's sensor captures more light, resulting in a brighter photo. This becomes very useful in low-light conditions, when the increased sensitivity of the sensor helps create a bright and clear frame.
ISO is a tool in the camera that allows you to adapt to different lighting conditions. It is an essential element in a photographer's tool palette for creating quality images in a variety of lighting conditions.
How does ISO work?
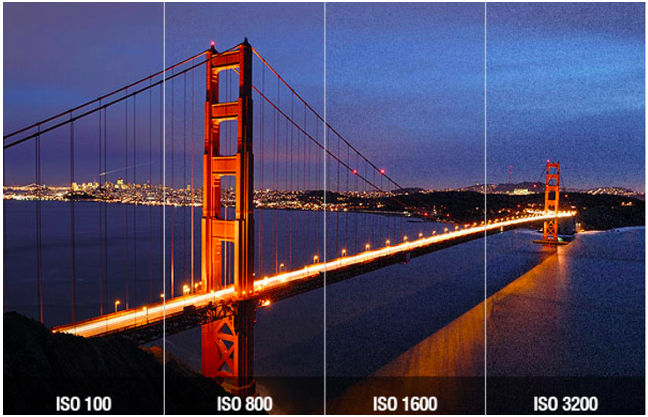
When you change the ISO in your camera, you are actually increasing or decreasing the gain of the signal that comes from the camera's sensor. At low ISOs (such as 100 or 200), gain is minimal and the camera is best suited to working in well-lit environments. At higher ISOs (such as 800, 1600 or higher), the gain increases, allowing the camera to see better in the dark.
However, increasing the ISO in photography can result in increased noise in the image. Noise is random spots of color or light in a photograph that should not have been present in the actual scene. The higher this setting, the more noise may appear in the photo.
Using the ISO mode on your camera or smartphone can help adapt your device to different lighting conditions and help you take better photos. Here are basic instructions on how to do this:
- Assess current lighting conditions. For bright sunlight, you may need a lower ISO, while dimly lit conditions will require a higher ISO.
- Open the camera settings on your device.
- Find and select an ISO or sensitivity option.
- For bright conditions, set your ISO to a low value, such as 100 or 200, to reduce the camera's sensitivity to light and provide a clearer image.
- For dark or dimly lit conditions, set a higher ISO such as 800, 1600 or higher to increase the camera's sensitivity to light and brighten the image.
- Take a test shot to check the exposure.
- If the image is too dark or too bright, adjust the ISO and shoot again.
- If possible, also adjust your shutter and aperture settings to further optimize exposure.
- Experiment with different ISO settings in different lighting conditions to better understand how it affects your photos.
By following these basic steps, you will be able to better understand and use ISO mode to improve the quality of your photos in various situations.
Practical application of ISO
Setting your ISO is an important step in the preparation process for shooting. It helps adapt to lighting conditions and achieve the desired effect. For example, shooting a moving subject indoors without flash may require increasing the ISO to reduce shutter time and avoid blur.
Also, the camera's ISO setting allows you to take good photos in dark conditions without using flash, which can distort colors or create unwanted shadows.

Errors when using ISO mode in various types of cameras
Mistakes in ISO control can have a significant impact on the quality of your photos, regardless of the type of camera you use. Here are some common mistakes to avoid with different types of cameras:
- Mistakes using DSLR in DSLR and non-DSLR cameras:
- Setting the value too high may cause increased noise levels in images, especially in dark or dimly lit environments. Conversely, setting your ISO too low can result in underexposed, dark photos unless you adjust your shutter speed or aperture accordingly.
- Misunderstanding the relationship between ISO, shutter speed and aperture can lead to unsatisfactory results. This takes practice and an understanding of how each of these parameters affects exposure.
- Errors in compact cameras:
- Many compact cameras may have a limited range of available ISO values. Setting the ISO too high in these cameras often results in significant noise levels due to the smaller sensor size.
- Some users don't notice that their camera is set to auto ISO, which can lead to unpredictable results, especially in changing lighting conditions.
- Bugs in smartphones:
- Although many modern smartphones have advanced cameras with the ability to manually adjust ISO, the error ISO setting may result in unwanted noise levels or lack of brightness Images.
- Ignoring other available settings such as HDR (high dynamic range) or night mode may result in users Setting ISO incorrectly in an attempt to compensate for low light, instead of using these useful smartphone camera features to improve quality picture.
ISO in different types of cameras
What is ISO in a phone camera or in a professional camera is one of the key parameters that every photographer should understand and be able to use correctly. It affects how much light reaches the camera sensor and can make a big difference in the appearance of your photos.
An interesting point is that modern smartphones now also offer ISO settings, allowing even mobile photographers to control their cameras' sensitivity to light.
In which cameras is the ISO option considered to function better?
Your camera's ISO function is critical for shooting in a variety of lighting conditions, especially low light conditions. Some cameras are known for their excellent ISO performance, allowing photographers to capture sharper images with less noise, even in difficult lighting conditions. Nikon Z6 II, Sony A7 III and Canon EOS-1D X Mark III cameras handle ISO well.
Conclusion
Experimenting with different ISO settings can help you find the optimal balance between brightness and noise in your photos. Understanding ISO in a Canon camera or any other camera is an important step towards creating expressive and technically advanced images. This setting plays a key role in how your camera perceives light and therefore how your final photo will look.


