Perform any electrical work can save a lot of money and time. To carry out these operations, it is necessary to study their features, the order of execution, etc.
It is these questions we are going to do in this article, we consider the features perform electrical work. The information is presented in the form of step by step instructions provided with detailed photos, which illustrates a gradual process of installation.
And although the connection circuit breaker dvuhklavishnogo two bulbs may seem daunting at first, but, having understood the principle of functioning of such a device, with the installation to handle even the novice electrician.
The content of the article:
- General information about dvuhklavishnom switch
-
switch assembly features
- Step # 1 - The execution of preparatory works
- Step # 2 - selection and installation of appropriate Escutcheon
- Step # 3 - the subtleties of working with wires
- Step # 4 - Installation and connection of the circuit breaker
- Step # 5 - completion of installation works
- Step # 6 - testing scheme
- Conclusions and useful videos on the topic
General information about dvuhklavishnom switch
The switch of this type most often used for lighting in two adjacent rooms or to control mnogorozhkovoy chandelier. First Embodiment traditionally used to separate embodiment WC or luminaires installed in different rooms.
If both lighting device which is to include a single point, it is wiser to install a single device with two keys instead of two identical one-button switch.
If organized in such a way to manage a chandelier, you can adjust the brightness of the room, including only a portion or all of the light bulbs at the same time. Such a scheme may be useful in the kitchen, such as to enable the upper and lower beam.
Not very experienced master may not be easy to understand with schemes and switch the connection procedure with two keys. But if you understand the principle and sequence of works, then no problem.
switch assembly features
Let us assume that our task is to equip the new building wiring, which has not yet been touched by the hand electrician. Consider the features of the implementation of electrical work in stages.
Step # 1 - The execution of preparatory works
To begin to prepare the necessary tools and materials:
- and a single-pole automatic RCD;
- switch with two keys;
- junction box;
- two candlesticks;
- din - rail to set the device to protect the wiring and hosts;
- the appropriate size and type Escutcheon;
- power cable;
- electrical tape;
- belt with perforations for cable installation;
- fixing elements;
- a screwdriver, a Phillips and flat, with a screwdriver or attachments;
- voltage indicator,
- knife, wire cutters, pliers, etc.
Begin to connect with the preparatory phase. First you need to install a junction box, which will be assembled and connected in accordance with the scheme of all the wires.
To protect the circuit from damage and overload the machine will need, and to protect the landlord from shocks in case of leakage current RCD is required. These devices must be mounted in the control panel houses or apartments, where they provided suitable places.

Wiring plan, double switch will complete the connection of all the elements and wires correctly. Understanding the principles will greatly facilitate the installation
If for some reason this is not possible the installation, the RCD and the machine is mounted on DIN rail, fixed directly on the wall. After that you need to put podrozetnik for the switch.
Enclosures should be chosen depending on the material of the wall: a concrete or drywall. Concrete device used and on other similar grounds: for brick, gas and foam concrete, expanded clay blocks, etc. The wall makes a hole the right size, and then fix the box gibsovym or cement solution.

Starting with the installation should the installation of safety devices (typically plate), and the junction box for the switch Escutcheon
Step # 2 - selection and installation of appropriate Escutcheon
To work on a plaster board using other models and methods of installation Enclosures. They are provided with spacer elements which allow to fix the device in the hole. The same charge Enclosures for wall mounting with a covering of particle board, plywood etc.
Now you can start wiring. In accordance with the scheme drawn up to do the layout and pave Stroebe, if planned concealed cabling.

To connect the switch to Enclosures should be left about 10 cm wire. Cores should be cleaned from the insulation by 10 mm

Enclosures intended for installation on concrete, mounted in an opening and fixed plaster or other suitable binding solution
Choosing podrozetnik for the switch, you need to pay attention to such nuance. New models of such devices are made of plastic, they have a diagonal of 67 mm. Old, usually metal, analogs little more, they have a diagonal of 70 mm. This small difference can be crucial.
Modern dvuhklavishnye switches are perfectly suited to the 67-mm Enclosures. Lock mechanism inside by using the spacer legs or screws.
In three additional metal models millimeter can greatly complicate the installation of the circuit breaker, since the length spacer legs which are usually located on the sides of the mechanism might not be enough for its reliable fixing.

For installation in the false wall of plasterboard or other lightweight material Enclosures should be taken, which are fixed with spacer devices
If you are installing in podrozetnik new model, in addition to the thrust should be to use a more reliable way of fastening screws, for which there are holes on the metal switch box. Before starting work, make sure that there is no voltage on the communication.
Step # 3 - the subtleties of working with wires
For dvuhklavishnogo switch must take a three-wire cable, which is complemented by a ground residential. Such cables have a double insulation: internal, for each conductor, and an outer, for the entire cable.
First, the power supply cable, is fed to the protective device, then paving line from the protective device to the junction box.

From the junction box should go four wires: to the RCD and the machine, to the switch, and two - two lamps
From box to the wire lead Enclosures, and then two more lines - to lights. The junction box should be left to the ends of about 150 mm, and enough reserve in the 100 mm Escutcheon.
Now you need to set the RCD and the machine. Denomination protection devices shall be determined separately for each case depending on the power of illumination.
Most often installed in apartments on the two poles of the RCD to disconnect when the need for two separate lines at the entrance to each of them put a unipolar machine. Both lines in the case of small power consumption can be connected to a unipolar RCD protection, after which a circuit comprise unipolar machine to protect the wiring.
Then you need to perform a connection of the individual cable segments in a common network. To do so, remove the outer insulation layer. Usually beginning with the wire leading to the switch box of the safety devices, and then released from the isolation of the individual wires.
Under insulation is three wire, insulation which different color.

Internal insulation of three-core wires are color coded for each core: for phase and ground zero. It is necessary to strictly observe this labeling
One core is designed to zero, the second - to the ground, the third - for the phase. It is necessary to remember what color wire is selected for each function.
Before connecting the ends neatly freed from isolation. Thus it is necessary to make sure that the color coding of leads connected to the machine, the same as those that come from it. If the neutral wire is held at the top of the right side, and bottom of it should also be right.
Ground for lighting is not always provided in the standard residential schemes. In this case, the third wire remains unused.
If there is a ground loop, you should connect it to further protect the lights from possible accidents. This circuit is connected to the appropriate terminals on the lighting fixtures. The new models of lamps usually have contacts for grounding.
This precaution when connecting dvuhklavishnogo switch two lamps required, if the lighting is installed in a bathroom or other high humidity. Earth conductor, which were not used, it should be insulated and laid so that they do not interfere with carrying out further installation work.
Step # 4 - Installation and connection of the circuit breaker
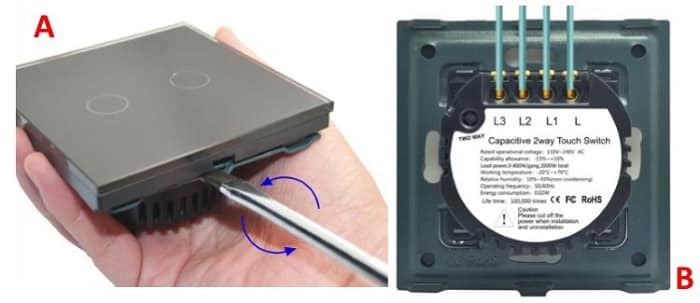
Outside the standard model of the switch consists of two buttons and a decorative frame, although the design may vary. Behind them is a working mechanism. To open it, you need to remove the keys. To this end, each of them to hook a screwdriver and disconnect. Some manufacturers make the edges of the keys are small protrusions that facilitate the process of disassembly.
After the keys are removed, you need to remove the decorative frame. To do this, unscrew fasteners and open the latch. Contact the device may vary depending on the model. Usually they are made screw or self-locking. Now you can hold the connection and installation of the switch.

In addition to the lugs to fix the switch in podrozetnik using screws. First it is necessary to align the position of the device by means of level
After removing the outer layer of insulation on each conductor must be removed about 10 mm insulation coating - clean. Pre-worth exploring features of construction of the device, paying attention to the type of contacts. The switch is necessary to expand the reverse side and considered.
There is usually a scheme by which you can connect properly. If the instrument of such information is not available, it is necessary to look in the manual, or use tools to determine which contact is intended to enter phase two and which are outputs.
Lack of adequate labeling - a rare case, typical of some older switch still Soviet times or cheap poor quality devices made in China. Sometimes it helps to simple logic: the input and output are almost always located on opposite sides. Entrance is only one, and outputs in such switches is always two.

Input and output contacts are usually located on opposite sides. Log phase is designated as L, and the connection of outgoing contacts - arrows
Typically, the letter L designates the place to connect the input of the phase conductor, and the arrows on the opposite side - the place wiring responsible for the work of a single key.
Mine, which is often covered with white isolation, must be attached to the input phase, and the remaining two veins, which in the photo have a blue and yellow-green color to the appropriate jacks. After all contacts are connected, it is necessary to deploy the device and install it in the Escutcheon.
In a self-locking contact model connection is extremely simple. Bare wire edge, simply snap it into place to connect. There is mounted a clamp that automatically fixes the connection spring. Thus, connect all three wires.
You need to carefully follow the color-coded single cores. Once they are inserted into the slots, you need to pull back a little bit to make sure that the connection is secure. If you need to remove the fixed core of the screw terminals, the connection must be disabled.
For this purpose, next to each clamp keys are provided, they may be arranged at the ends of the device. By pressing a button opens the clamp and the wire can be easily removed. On switches with screw clamps contact input and output designation for the wire is often missing.
Typically the top is the input phase, at the bottom - two outputs. In the design of such devices has a plate to which are attached movable output pins, their function obvious. To fix the contacts in such a device, it is necessary to unscrew clamp screw, inserted in a hole edge of the stripped wire to then wrap back fasteners.

arrows indicate the screws on the left of the output contacts double switch, to the right - on the screws that adjust the position of lugs for mounting the device in Enclosures
Thus it is necessary to make sure that the edge of the insulation has not appeared at the fastening point. Two more screws in such devices are used for fixing the clamping lugs. They unscrewed to complete the installation of the switch in the Escutcheon. Now you're ready to connect fixtures.
Step # 5 - completion of installation works
It is necessary to take a suitable wire length and place it in the prepared canal or a wall / ceiling according to the markings. It is necessary to clean up the mine and connect it to the desired contact. If it uses standard plastic terminalsIt is sufficient to clean up the 5 mm wire.
Similarly, supply power to the second lamp. Here unused ground wire need to be insulated. We must now take the power cord, which will connect the junction box and the wire coming from the junction box to the switch. The ends of these wires should be released from the outer insulation.

If the ground wire (here yellow) are not used, they must be isolated and removed during installation

individual connection lived in a junction box can be done by twists, it is a simple, but not the most secure option
Cores trimmed by about 40 mm. Then you need to connect to twist two phase wires. Movement is recommended in a clockwise direction.
Twisting the first can be done manually, but then need to strengthen the connection with a pair of pliers. It should be left only 5-7 turns of twist, izlischek remove cutters.
This connection method electrocommunications considered obsolete and even banned in PUE p2.1.21.
Professionals recommend to use for the installation of cables the following methods:
- soldering;
- welding;
- molding;
- szhimnye compound (screws, clips, etc.)
Features popular and reliable ways to connect the wires, we reviewed the following article.
If the earth wire at this stage is not used, it is recommended once again to take care of its insulation. Now you need to clean the interior and exterior end of the phase wires leading to the lamp. It needs to be connected to one of the wires that come out of the switch.
Similarly, the need to do with the phase conductor that leads from the second lamp, it is connected with the second conductor, leaving the switch.
Again, should insulate all unclaimed ground wires and put them into the junction box. If the ground is provided, the appropriate wires need to consistently connect. It remains to complete the connection of zero lived, one of the power wires and two more from the lamps. They simply rolled together.
Step # 6 - testing scheme
It now remains to screw light bulbs in lamps cartridges and check the operation of the circuit.

At the end of the assembly wiring diagram of double switch will look something like this. At this stage, you need to perform the test: turn the RCD and the machine, and then the key - alternately or together. After checking the protection device must be disabled
First you need to turn on the RCD and the machine. Thereafter alternately check the operation of each key switch, and then turns on and off two lamps simultaneously.
If done correctly, the lamp will light up and go out in accordance with the position of the switch keys
Then you need to turn off the security devices and insulate all the connection points and complete the installation dvuhklavishnogo switch, setting a decorative frame.
Conclusions and useful videos on the topic
Illustrative dvuhklavishnogo switch installation process can be found here:
In reality, to connect such a device is not difficult, you only need to understand the order of operations, and to comply with safety requirements. Better and easier to use modern tools and materials, because they are easier to install and they are best combined with each other.
Do you want to clarify obscure points of the switch assembly, which we have not elaborated on in this article? Or you wish to add the above material valuable comments / advice based on personal experience? Please write your questions in the comments section, express their opinions, add useful recommendations.