The idea of controlling lighting devices using touch switches is not new, similar switches or light switches were produced in the last century. But the dimensions of such devices were significantly larger than typical, which caused installation problems. It is also worth noting that the cost of the first touch switches was quite high, of course, this did not contribute to popularity. With the development of technology, the situation has changed radically, and today capacitive, infrared and remote switches are in stable demand.
Content
- Design and principle of operation
- Scope of application
- Additional functionality
- Capacitive Switch Advantages
- Connection
- Choosing a touch light switch
- Finalization of typical devices
- DIY touch switch
- Security briefly
Design and principle of operation
Despite the variety of models of touch communicators, most of them have a typical design, consisting of the following elements:
- Housing made of heat-resistant plastic (see And in fig. 1). The dimensions of the structure allow installation in a typical mounting location of a conventional switch.
- An electronic unit (B), it includes a power adapter and a semiconductor switch control circuit.
- Board with capacitive sensors (C).
- The front panel (D), as a rule, is made of quartz glass, other materials can be used in budget models.

Now we will tell how such devices work. The electronic unit monitors the status of the sensor. When a hand touches a certain place on the front panel of the switch (it is marked accordingly), the sensor capacitance changes. The electronic unit detects this and changes the state of the non-contact semiconductor switch, which opens or closes the circuit.
Scope of application
Initially, this type of switch was planned to be used to turn on / off the lighting, but the design turned out to be so successful that its scope expanded significantly. Today, most modern household appliances have touch control, as an example, kitchen stoves, hoods, microwave ovens, etc.

The only restriction on connecting to touch switches is the power of the equipment, its permissible parameters are indicated in the device passport.
Additional functionality
The modern technical base made it possible to install microcontrollers in the electronic control unit touch switch, allowed to significantly expand the functionality of the switches and allowed them to fit into the concept of smart houses. Such switches can be controlled by voice, infrared or radio remote control, a smartphone via WI-FI or a programmable timer.

Touch switches can be used in conjunction with sensors that respond to movement or light levels. In the first case, such devices include a lamp, a table lamp or other lighting devices when someone enters a room, such as a bathroom. In the second embodiment, the light will turn on in low light conditions.

Some manufacturers, for example, Livolo produce touch switches with a dimmer function or control combined sockets, which can connect almost any household appliance.

Capacitive Switch Advantages
Speaking about the advantages of this type of switches, their following qualities should be noted:
- Long term of operation. This is greatly facilitated by the lack of moving parts and contact groups.
- Compatible with all types of lighting products. Models with a dimmir are available for LED strips and energy-saving lamps, if such a possibility is provided. In addition, it is allowed to switch any circuits that meet the operating conditions of the circuit breakers
- Availability of additional features.
- The ability to integrate into the Smart Home system.
- Large selection of color and design solutions.

Hares switches Kopou range - Lack of mechanical contacts.
- The touch sensor can be installed in a standard “glass” for a hidden wiring switch.
Now briefly about the shortcomings. First of all, it is necessary to note the difference in cost with conventional mechanical switches, but it has become much less than 10-20 years ago. The price of inexpensive Chinese touch models today is much cheaper than for mechanical switches of well-known brands, such as GTS or Electronics.
Sometimes flickering of LED lamps connected to touch switches is observed. This may be due to both the low quality of the light sources themselves and budget models of switches. The problem can be fixed in two ways:
- Use products of famous brands (Jazzway, Panasonic, Sapphire, Funry, LightaLight, Tronic, Sesso, etc.).
- Connect a 0.1 uF 630 V capacitor in parallel to the LED lamp.
Connection
The installation of touch switches practically does not differ from the installation of conventional built-in and overhead mechanical switches. Details about this process can be found on our site. Recall how to do this using the example of the kg020gs model from FD Electronics.
Connection Algorithm:
- Remove the glass panel (see A pic. 7). This is convenient to do using a thin slotted screwdriver.
- We make the connection of the installation wires (In Fig. 7), according to the scheme given in the passport.
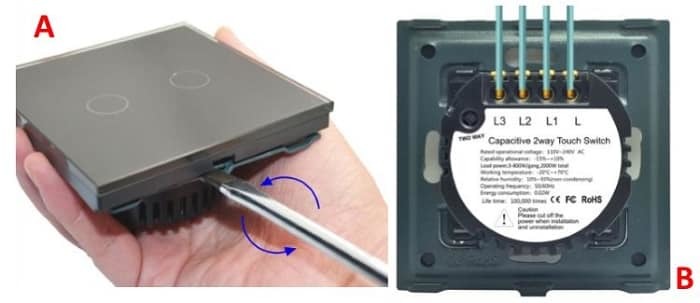
Figure 7 The first and second stage of connection - We fasten the board with touch contacts (A fig. 8).
- We connect the panel with the button marking (In Fig. 8).

Some manufacturers, for example, Livolo, produce 220 V feed-through switches (their connection diagram is shown in Fig. 9). With their help, you can control lighting from several places.

Each of these switches controls indoor lighting from different locations. The concept involves the use of a primary switch and one secondary (or more). There are three terminals on the main devices, a phase is connected to one, zero to the other, and a control conductor to the third. Accordingly, such contacts are marked as: L - phase, N - zero and Com - control wire. Assistive devices
Secondary switches are connected through two terminals: N - zero and Com - control contact. Labeling from different manufacturers may vary, therefore, it makes sense to study the instructions. An example is the connection diagram of the electronic dimmer et0802193e, or its analog tt6061a, which can be controlled with a light touch of the hand.

Choosing a touch light switch
Before you purchase a device, you must determine its functionality. To do this, consider the following criteria:
- The power of the connected equipment and its connection diagram.
- Execution corresponding to the type of wiring.
- Operating conditions (if you plan to install in the bathroom, then a device with moisture protection is selected).
- Possibility of remote control (remote control or smartphone).
- Compliance with the design of the interior of the room, etc.
Having decided on the main tasks, you can begin to choose a manufacturer. Naturally, preference should be given to well-known brands whose products are reliable. But at the same time, it is necessary to take into account the presence in the model range of switches of devices with the necessary functions. For example, Delumo has devices controlled by a radio remote control, while Sonoff specializes in Wi-Fi devices, Capsens Domuns lamps Line is “sharpened” only for its touch switches, etc. There may be many nuances, so we recommend that you study the various options.
Based on practical experience, in addition to well-known brands such as Legrand, Vento Electriс, Wemmon, Fanri, Merten, CGSS, Steu, Schneider, Ariston, etc. can be recommended.

We recommend that you track reviews on a network that publishes ratings of the best manufacturers. Selection criteria are made both by the model range of manufacturers, taking into account functionality and cost, and by other indicators.
Finalization of typical devices
Many are not satisfied that the touch zone on the panel is quite small, and to fix the signal, you need to make a touch in the specified location. We give an example of how to increase the area of indirect contact of the surface.

You should take the wire and gently solder it to the place where the signal from the sensor is supplied on the sensor board (for this you need to study the circuit diagram of the device). The connected wire is laid around the perimeter of the housing. As a result, such a frame allows without amplification of the signal level to trigger the sensor when touching the front panel.
It should be noted that such an improvement voids the manufacturer's warranty.
DIY touch switch
For those who like to work with a soldering iron, we can recommend several touch switch circuits, which will be easy to assemble with your own hands. Let's start with a simple field-effect transistor circuit; this is precisely the principle that was laid down in the first sensor devices.

Designations:
- Resistance: R1 - 10..15 kOhm (must be selected for the sensor), R2 - 3... 5 MOhm.
- Capacitors: C1 - 1000 pF (suppresses false alarms), C2 - 33.0 μF x 50 volts, C3 - 470 μF x 50 V.
- Transistor VT1 - KP 501A.
- Relay K1, any type can be used for which the tripping current does not exceed 150.0 mA.
The circuit is powered from a source with a voltage of 12... 24 V.
Now consider the option based on the NE555 asynchronous RS flip-flop. The device diagram is shown below.

Designations:
- Resistors: R1 - 1.0 MΩ, R2 - 1.0 MΩ, R3 - 1.0 kΩ.
- Capacitors: C1 and C2 - 15 nF, C3 - 10 nF, C4 - 0.1 μF, C5 - 100.0 μF x 25 V.
- Diodes: D1-D2 - 1N4001, D3 - typical indicator LED.
- Integrated circuit - NE555,
- The relay is the same as in the previous wiring diagram.
The given circuit does not need to be configured.
Concluding the topic of home-made sensor devices, we should mention the Ardunio system. On this platform, you can assemble a switching device that can be easily integrated into the Smart Home. In addition, such a device is easy to configure for independent operation, in accordance with a given program.

In addition, the system allows you to create several profiles for specific tasks. True, this will require programming skills. You can get more detailed information about the Ardunio platform on our website.
Note that in the above diagrams, a power source with a voltage of 12-24 V is required to power the control circuit. For this purpose, it is best to use switching power supplies. As such, the electronic balance of LED and energy-saving lamps is great. Detailed information on this topic can also be found on our website.
Security briefly
When connecting touch control of light sources, the same number and rules that are prescribed for mechanical switches should be followed. That is, before starting work, it is necessary to disconnect the line where the installation will be made. Further, we adhere to the following standards:
- The circuit breakers must be connected to the network so that the phase is switched, not zero.
- If a ground wire is used in the power supply, it must be connected to the corresponding terminal.
- If a stranded wire is used for installation, then its ends must be crimped or tinned. Otherwise, contact may break, which will lead to heating of the connection.
- Do not use a touch switch with obvious signs of structural damage.
- The load must match the switch.
- How to disassemble the light switch?
- How to install the outlet with your own hands?
- How to transfer the outlet with your own hands?
- DIY power strip


