A cottage and a shower are needed at the dacha, because only thanks to these facilities it is possible to spend time with relative comfort on your own plot. Do you agree? And they should be built before the start of garden work.
If there are no centralized water supply and sewage systems (and usually it happens), you need to think about the project of a country toilet with a shower with a separate cesspool. The best option - combined buildings with a partition under the same roof. We will tell you how to be a joint project of the toilet and shower, and what is required for its implementation.
The article presents useful recommendations from experienced professionals on how to properly design and build a joint construction with their own hands. The material is accompanied by thematic videos that will help put into practice the drafted project, as well as enrich with new ideas.
The content of the article:
- Features of the combined design
-
What to consider when developing a project?
- Step # 1 - the choice of materials for construction
- Step # 2 - Cesspool Construction
- Arrangement of a toilet without a cesspool
-
Independent construction of a toilet with a shower
- Stage # 1 - arrangement of the sump and foundation
- Stage # 2 - construction of the structure
- Stage # 3 - arrangement of shower and toilet
- Photo instruction for home craftsmen
- Conclusions and useful video on the topic
Features of the combined design
Combined shower and toilet are one building under a common roof. The premises are separated only by a wall, and the entrance to each of them is separate. Above the shower is placed above the tank. It is installed on the roof and supply water through the pipes, install a tap and a watering can.
If a washbasin is provided in the toilet, then water should come from the common tank. Similarly, water is supplied to the toilet if they decide to install a standard toilet with a sink.
However, at the dacha rarely put such plumbing fixtures, much more often they manage with a standard “hole in the floor” with a cesspool.

Before building a cesspool, you should make sure that it does not poison the life of your neighbors. Otherwise, conflicts, court proceedings, fines of the state fire inspection and technical supervision are not excluded.
If a cesspool is used to accumulate waste from the toilet and shower, it should be located no less than 20-25 meters from the source of drinking water. In areas where it is not possible to comply with the rules, it is necessary to carefully concrete the bottom of the pit.
This is to avoid accidental contamination of drinking water with fecal bacteria.
A toilet with a shower is built at a distance of 10 m from residential buildings (both its own and neighbors). Violation of sanitary norms in this case threatens with flooding of foundations and basements if the pit is crowded during spring floods and / or depressurized. The distance to the fence should be at least 1-3 m.
When planning the location of the toilet with a cesspool should take into account the distance not only to buildings, but also to communications:
- asbestos cement pipes - 5 m or more;
- to cast iron pipes with a diameter of less than 20 cm - 1.5 m;
- to cast iron pipes over 20 cm - 3 m;
- to gas - 5 m and more.
It happens that the site is too small or its location does not allow to maintain even the minimum distance between objects recommended by the SNiP. In this case, you should consult the BTI, how to resolve this issue.

When developing the project of a country toilet with a shower it is necessary to think over its location. We offer one of the possible plot planning options.
Building a toilet and a shower under one roof has several significant advantages:
- Compactness. Cottage is a place not only for recreation, but also for growing vegetables, fruits, berries. Each square meter should be used with maximum efficiency. Construction of the combined construction solves the problem of lack of space.
- Saving building materials. Any construction - it costs, and the lower they are, the better. Especially expensive is the foundation. If it is one for two rooms, it is already a cost reduction. If you add more savings on roofing materials and load-bearing walls, the benefit is obvious.
- Time saving. The construction of two structures takes much longer than the construction of one. You get two vital designs for almost the same period as one, because the most energy-intensive works (digging of pits, pouring foundations) are done at once for both structures.
- One drain hole. Arrangement of the drain hole requires effort, time and money. If she is alone, this is a significant savings. An additional plus is less unpleasant odors in the area, since There is only one “aromatic” zone.
There is one serious drawback, but a big one: when bathing in the shower, the smell from the toilet may disturb, but this is a solvable problem. If the ventilation pipe is brought out above the roof of the building, unpleasant odors can be avoided altogether.
Below there is a video that describes in detail the design of the ventilation of the odorless toilet.

Toilet and shower with cesspool need periodic maintenance. We'll have to negotiate with the aspenizatorsky services and arrange the building so that the hose length is enough for pumping out the sewage, and for the machine to equip the access roads
Before building a summer shower, you should carefully consider how water will be drawn into the tank. Ideal - pump and hose.
If it is not possible to pump water from the source to the tank, it will have to be carried by buckets manually and lifted onto the roof of the building, and this is quite difficult. To facilitate the work, you need to plan a wide comfortable track.
Image Gallery
A photo of

The device shower and toilet in one building allows you to save space on the site and reduce construction costs. Of the many options for such structures is difficult to choose the best design.

One of the most affordable and easy to implement, if you plan to build an object with your own hands, is the construction of lumber

Wooden hozbloki with a shower and a toilet are built on frame technology: from a bar construct a frame and sheathe it with a board

Foam-concrete blocks, gas silicate blocks, silicate and red bricks are used in the construction of capital complexes of shower and toilet.

Instead of a rather time-consuming plating with a grooved board or block-house, it is not uncommon to use a carcass trim with a siding, polymer or metal sheeting.

The choice of the foundation for the construction depends on the type of storage capacity of the toilet, the variant of the floors of the shower and the weight of the structure

If sanitary building erected above the cesspool, then in the house construct a toilet seat, located directly above the cesspool.

If inside the pavilion is planned to install a dry closet, pour slab foundation. Before pouring, mount the formwork and put a ladder with a drain into the gutter or septic tank.

Sanitary unit with open shower

Made of sawn timber hozblok

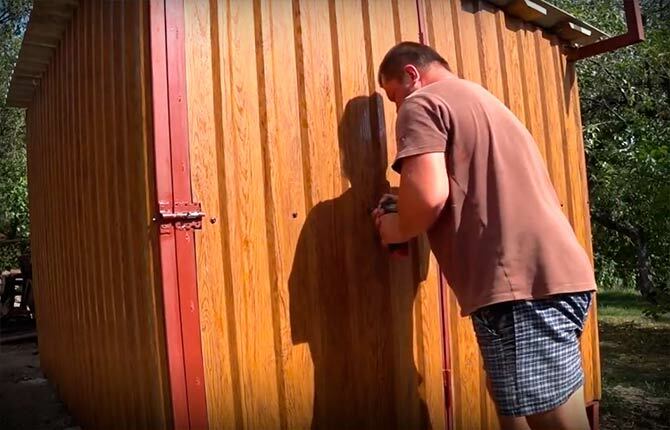
Painted wood construction

Capital construction of foam blocks

Siding sheathed

Pillar foundation for a lightweight object

Shower and toilet over the cesspool

Pavilion for a shower and dry closet
What to consider when developing a project?
As for any other facility, for a combined toilet with a summer shower, first of all, a project is prepared.
When developing it, one should take into account such nuances:
- The layout should be comfortable.. Separate entrances are provided for each room, so care must be taken to ensure that access to both doors is free. A toilet and a summer shower should be comfortable to use. If there are children, elderly people or disabled people in the family, their needs should be taken into account.
- The project takes into account the features of building materials, finishing. The loads on future structures depend on this and, accordingly, the choice of the type of foundation.
- The area and height of the premises are calculated based on the personal needs of family members.. Most often they build structures of 2.75x2 m or 3x3 m. The height can be 2 or 2.5 m, depending on the height of family members. Too low rooms are uncomfortable, and in too high rooms it can be difficult to reach the shower head.
The calculation of the area also depends on the number of sanitary appliances and furniture. If you build spacious rooms 1,3x2 m, then there is enough space for a shower stall, benches, shelves and a washbasin. In addition, the rectangular shape facilitates the task of placing furniture and plumbing.

When designing, it is necessary to consider which way the door to each room will open. The choice of the place of installation of the washbasin and the possibility of people entering the toilet and a summer shower depend on it.
The more thoroughly the project is developed, the more comfortable and durable the construction will be. You should not begin construction earlier than every detail will be thought out, because building and rebuilding is much more difficult and expensive than providing all the necessary amenities once.
Step # 1 - the choice of materials for construction
The choice is small: it usually comes down to just two materials - wood and brick. For long-term construction, which will be used for decades, it is better to choose a brick. It is durable, tolerates the effects of negative external factors.
The disadvantage is that you have to build a solid foundation. This involves considerable expenses.
Wooden construction is cheaper, it can be built faster, but it is not the most durable option. On the other hand, it is difficult to build capital structures on loose soils, and for them it is better to choose lighter wooden structures. If desired, they can be trimmed outside, so that the tree is less spoiled.

Wood conquers with the beauty of its natural pattern. It “breathes”, thanks to which the rooms always have a comfortable microclimate. But still it should be used only for temporary construction and must be treated with antifungal impregnation.
Sometimes built metal toilets combined with a summer shower. This is a difficult task, because need a welding machine.
The building itself may not meet the expectations and quickly collapse due to corrosion, because in the shower there is constantly increased humidity. Another option is slate, but it is fragile, and the walls of it are short-lived.
Step # 2 - Cesspool Construction
There are two main types of cesspools - with filter bottom and sealed. The first ones are simpler in construction and do not require special expenses for operation, and for cleaning of sealed pits it is necessary to call the vacuum trucks.
There is a caveat: although many gardeners build filter pits, it is prohibited by sanitary standards, because can cause pollution of aquifers.
For the construction of a cesspool choose a variety of materials and structures:
- brick;
- reinforced concrete rings;
- solid concrete;
- plastic containers or metal tanks;
- improvised materials.
Capital leakproof pit is the easiest way to build a brick. To do this, dig a square pit of the desired diameter, compact the soil, equip a sand pillow and fill the bottom of the pit with concrete.
When the material hardens, they build brick walls (the construction should rise 10-20 cm above the ground), plaster and waterproof the bitumen mastic. Detailed instruction on the construction of a brick drain hole we brought here.
Often also build leaky brick pits. In this case, make the filter bottom, and put a brick in a checkerboard pattern, leaving gaps. Such structures do not waterproof, because the water goes into the ground, and only the sludge remains in the pit itself, which needs to be occasionally removed.

With waterproofing brick pit may be difficult, because bitumen mastics are not always durable. Their lifespan depends on many factors: composition, correctness of application, operating conditions, climate
It is best to build a hermetic pit from solid concrete or reinforced concrete well rings. For waterproofing septic of rings use penetrating compounds or bitumen, bitumen-polymer mastics.
Combinations of different types of materials are possible to create a durable and reliable waterproofing layer.
Volumetric barrels with a bottom (for hermetic) or without it (for filtering) are installed as cesspools. To get acquainted with the scheme, calculations and rules of arrangement of the pit from the barrel, go by this link.
It is also possible to construct a structure from scrap materials, for example, from old used tires. There are plenty of options, especially if the drain from the shower is equipped separately.
Arrangement of a toilet without a cesspool
Sometimes it is not possible to build a cesspool due to the close occurrence of the aquifer. Then you can remove the drain pipe from the shower to the compost pile and put a bio-toilet or powder-closet. Dry closets are sold in finished form. They are suitable for installation both on the street and in the premises.
Powder-closet is a structure with a small sealed pit in which sewage is sprinkled with peat. The pit is regularly cleaned, bringing its contents to compost. If you do not live in the country during the entire summer season, this is a good option.
To make it more convenient to use powder-closet, a toilet seat with a lid is made, and a container with waste is covered with a covering. It is best to provide a special door for removing the tank. Ventilation is required.

Although powder-closet is not particularly convenient to use, you can not worry about the pollution of soil and groundwater, because impurities do not leak into the ground
Relatively recently, an interesting modern type of powder-closet - peat toilet. The principle of its operation is the same, but the tank with peat is located directly inside the structure. When it is filled, it is removed and cleaned. After that, the toilet is again ready for use.
We recommend to read our article on the specifics and toilet cleaning methods peat and liquid type.
Let us consider an example of the construction of a complex of a shower room with a toilet for the dacha, located in a frame building 3 m long and 1.5 m wide:

In addition to the listed materials, clamps for fixing lining will be required, about 300 pieces will be required, the same screws for wood, OSB sheet 1 m², hinges for hanging doors, linoleum
An example of building a utility block with a toilet without a cesspool will help to understand the intricacies of the process:
Image Gallery
A photo of

The bottom of a shallow pit, no more than 0.5 m deep, is poured with a layer of sand, leveled and rammed. We install paving slabs on the leveled ground, then gas silicate or foam concrete blocks. We set them up to the level

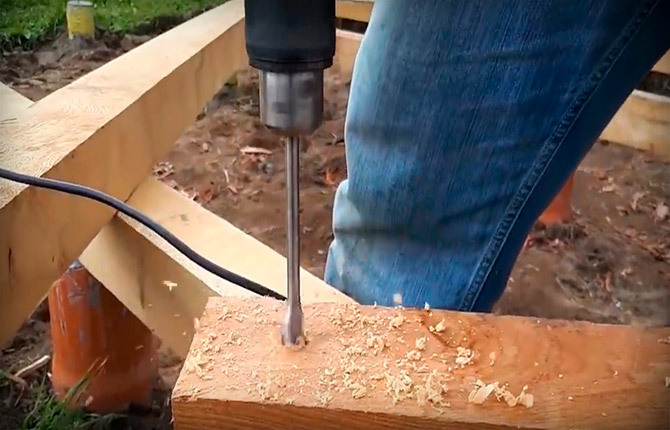
We build a harness from a 100 × 100 mm timber. The longitudinal elements are simply laid on the supports, the length of the crossbars is measured after the fact and we note the dimensions of the cut in half of the tree

Fix the bottom strapping on the supports with anchors. Having measured the dimensions of the cuts, in order to install ordinary logs, we write them down and install them

We process by impregnation all the details of wooden construction. In the example used antiseptic Senezh, 5 liters of liquid is enough for full processing

Install the vertical frame supports made of 100 × 50 mm bar. They are fastened to the bottom trim by metal mounting angles. We fix the position of the supports with temporary cuts to precisely make the top trim

From the side of the main facade, we put short supports on the top trim, which are washed down at an angle. On them and on the rear timber strapping lay rafters and crate

Floor sewn board 100 × 40 mm. The length of the floorboards mark in fact. In the case of assembly, the floorboards of the two segments try to ensure that the seams in the adjacent rows do not coincide, but fit into the gap

In the two extreme flights we install a harness from a timber in which door frames will be mounted. We sheathe the building clapboard bottom up, positioning the elements up the comb

Step 1: Installing the support pillars for the frame

Step 2: Assembling the frame trim

Step 3: Layout the base of the host

Step 4: Processing of wooden components by impregnation

Step 5: Install the Vertical Frame Struts

Step 6: Frame construction for the roof structure

Step 7: Laying the board on the base of the lower floor

Step 8: Covering the frame of the sanitary complex
Having completed the lining of the facade and rear wall, proceed to the arrangement of the windows, the installation of the doors and the arrangement of the internal space:
Image Gallery
A photo of

In the side walls of the building we construct a trim from a timber for installation of window frames

We sheathe clapboard side walls. Install in the doorways are made according to the actual size of the box with canvas

By the actual size of the windows we prepare beadings, with which we will fix the glass in the frame

Install the glass in the window frames, fix the light-conducting elements of the window with pre-prepared beadings

We assemble the frame for the construction of the stool. We count the height of the vertical supports taking into account the convenience of using the toilet.

We sheathe the stool OSB or plywood. Put the top panel on the hinges so that the resulting box can be opened to remove the filled container

We glue the floor and the toilet seat with linoleum - an easy-to-care material that is resistant to chlorine-containing agents.

In the compartment with a toilet, we install a seat with a lid for the toilet. In the shower compartment, we drill a hole for the drain, put a pan with a siphon, the outlet from which we put in the hole

Step 9: Binding Device for Window Installation

Step 10: Paneling the side walls and hanging the doors

Step 11: Harvesting glazing beadwork

Step 12: Glazing of the summer house windows

Step 13: Assembling the frame for the construction of the toilet seat

Step 14: Covering the cushion frame with sheet material

Step 15: Pasting the floor and the seat with linoleum

Step 16: Finishing the shower complex with toilet
Independent construction of a toilet with a shower
Consider the option of building a toilet with a summer wood shower with your own hands. The construction is relatively light, it can be installed on almost any soil. Under it will require a column base.
The roof can be equipped with a gable and covered with metal tile or other suitable material.

If desired, under the gable roof, you can arrange additional space like an attic for storing the necessary details or garden tools
Before construction, you need to purchase materials:
- bars (for upper and lower trim, vertical supports, roof frame);
- edged boards (for crates, subfloor);
- OSB-sheets (for finishing floor, ceiling);
- pipes (for sewage and ventilation);
- plywood (for formwork);
- metal tile (for the roof);
- bulk materials - gravel or crushed stone, sand;
- metal corners (for mounting bars).
Timber must be dry (permissible humidity not higher than 22%). On boards and uneven bars there should be no defects: knots, cracks, signs of fungal damage.
Stage # 1 - arrangement of the sump and foundation
To begin with, the plot is laid out for the foundation and cesspool, and then proceed to earthworks. Under the pit they dig a pit with a perimeter of 1 x 1.5 m, a depth of 1.5 to 2 m. Walls are reinforced with either concrete or brickwork, and the bottom is concrete.
When the pit is ready, you can begin to build the foundation. Under it make small holes (20 cm) with a depth of 0.8 m. A sand pad (10 cm) is placed on the bottom of the holes and carefully tamped.

To strengthen the concrete set 3-5 bars of reinforcement. To keep them well, they can be connected with strong metal wire.
Formwork, fittings are installed in the finished wells, concrete pillars are poured and left for 2-3 days to solidify the material. After that, you can already remove the formwork. If it is hot outside, it makes sense to cover the concrete during the drying period so that it does not crack due to the rapid evaporation of moisture.
Stage # 2 - construction of the structure
A drain pipe is installed under the shower so that moisture does not accumulate under the structure and does not destroy its lower part. After that, you can proceed to the construction of the lower strapping.
The bars are connected with wooden elements, and fastened to the concrete with metal pins. Above the pit make a metal frame of the channel.
For the construction of walls in the corners set the frame of the bars, and in the place of the doorway put two pillars at a distance of 77 cm from each other. If everything is installed correctly, you can proceed to the arrangement of the upper trim. It is attached to the screws, metal corners and plates.
The ridge board is attached to the top trim. The rafters are made of boards with a step of 65 cm, after which they install the crate. Boards should protrude 20 cm beyond the edges of the vertical design. Later they will serve as a visor. Further wind boards fix and cover a roof with a metal tile.

The position of all vertical elements is calibrated by level. Deviations should not be, because this threatens to quickly collapse the finished structure
The floor is made of boards with a minimum thickness of 4 cm. They are fastened with screws to the bottom trim. Immediately make the frame "steps" for future elevation and sheathe it with boards 2 cm thick.
It remains to insulate the structure with polystyrene foam and blow out the cracks with construction foam. Exterior walls and ceiling sheathed boards.
Stage # 3 - arrangement of shower and toilet
To arrange the drainage system, they dig a ditch and lay down a sewer pipe, which is connected to the drain. The floors in the shower are covered with rubble, reducing the thickness of its layer near the drain hole.
Crushed stone is poured with concrete so that, after solidification, the floor will turn out with a uniform inclination to the sink from all sides. The surface is waterproofed with bitumen mastic.
On top of the concrete floor is laid wooden with a distance between boards of 1.5-2 cm. The walls are sheathed with boards and treated with waterproofing agents, antiseptics.
After that, all surfaces are opened with two layers of yacht varnish. Similarly, wood cladding is treated.

The surface of the concrete floor should be smooth, so that the water does not linger in the grooves and freely go to the drain
A tank is placed on the roof of the structure, drain pipes are removed, and ventilation is installed in the toilet. It remains only to install the doors, take care of connecting the electricity for the use of the premises in the evening, install the shower head and equip the toilet seat.
Photo instruction for home craftsmen
The construction of the sewer system will require more money, time and effort, but in the operation of such a utility unit will be much more convenient:

The drains from the shower / toilet complex are discharged through the sewer pipe into a collection tank, which will need to be pumped out regularly as it is filled to 2/3.
For the device complex shower-toilet with drain hole from the shower box, you must first develop a shallow pit.
The sides of the pit are 4 m, the depth is 0.3 - 0.5 m, then:
Image Gallery
A photo of

To fill the low strip foundation from the board and wooden boards we collect the formwork. Height of a design is 0,5 m. Inside we install fittings from a steel ridge bar of 8 mm

Pour the mortar into the constructed formwork at one time. In order for the solidifying concrete not to break the formwork, we join the sides with ties from the pieces of the bar

After the concrete hardens, we remove the formwork, inside the circuit we collect the sewer network. First, the area is filled with sand. Then we put two sewer releases, we connect them to one discharge pipe

On the sand, the space inside the concrete walls is laid out with foam plastic, we put the reinforcing mesh on top, then we pour the concrete solution

Ribbon foundation around the perimeter is covered with roofing felt. On top of this waterproofing put the bottom trim of the future frame

Using anchors fixed to the foundation of the bottom trim we assemble the frame of the complex building, inside which we are going to arrange the toilet and shower

The hinged rafters of the tent roof converging at the top are connected with metal plates. To rafters we fasten the planesmiths raked down at an angle - rafters forming pitched planes

For laying shingles we construct a continuous crate of sheet material or edged board. Bituminous shackles are laid from the eaves to the ridge

Step 1: Construction of the formwork and installation of reinforcement

Step 2: Pouring mortar into the formwork with reinforcement

Step 3: Sewage system inside the strip foundation

Step 4: Laying the base under the floor

Step 5: Construction of the bottom strapping on the foundation

Step 6: Assembling the frame for the shower-toilet complex

Step 7: Assembling the Hose Tent Roof

Step 8: Crate Design and Coating
The skeleton of the building is ready, now we proceed to the wall covering and the internal arrangement of the block:
Image Gallery
A photo of

The frame is insulated with foam. We arrange crate for siding

Drain the sewer pipe to which both drains are connected, output outside the shower / toilet complex and connect to the storage tank

Inside the building we sheathe the walls with clapboard, for installation of which we use the internal crate that holds the foam

We arrange the floor in the shower room with a bias towards the water intake funnel. In the toilet, either we construct a wooden toilet seat, or we install an ordinary toilet bowl.

Step 9: Warming the frame and installing the batten

Step 10: Withdrawing and connecting the sewer pipe

Step 11: Wall cladding clapboard

Step 12: Arranging the Shower Stall
Conclusions and useful video on the topic
When choosing a project and building a toilet and a shower under one roof, it is easy to make a mistake. Sometimes even experienced masters have difficulties, and for beginners it is even more difficult to understand the nuances.
We offer video materials that can resolve some issues and enrich with new ideas.
The video shows one of the successful options for interior and exterior decoration of the toilet with a shower:
Step-by-step video instruction on the construction of a wooden structure covered with slate:
The video is devoted to the issue of ventilation, which allows completely to get rid of the smell in the toilet:
Actual information on the construction of a budget cesspool of tires:
There are many options for arranging the toilet and shower in the country, and they all have their own advantages and disadvantages. Correctly assess the conditions on your site and only the owner can choose the right project. The main thing is to take into account all the nuances and calculate your strength.
Having built a comfortable toilet with a shower, you will provide yourself and your loved ones with quite comfortable living conditions in the country during the entire summer season.
You have selected a suitable project for the construction of a comfortable country toilet, but you still have unexplained questions that we did not touch on in this article? Ask them in the block comments - our engineer will try to help you.
Or maybe you have already completed the construction of a toilet with a shower? Share a photo of your building and tell us how successful the chosen scheme was for you.