Every owner of a private house at least once faced troubles caused by an imperfect ventilation system. Agree, living in a house with a musty smell from moldy walls or rivulets of condensation on pipes and glass is not very comfortable.
To avoid problems with the ventilation system, it is necessary to think over every stage of its construction even before building a house, from the basement to the highest point above the roof. Some of the shortcomings can be eliminated in an already built building - for example, you can replace the air duct or install a deflector.
In this article, we will look at how to choose ventilation pipes for the roof and make the installation correctly, as well as give a few tips to improve the protective functions and traction. We hope that our recommendations will be useful for solving ventilation problems on our own.
The content of the article:
- General requirements for ventilation pipes
-
Installation instructions for roof ventilation
- Stage # 1 - preparation of materials and tools
- Stage # 2 - selection of the ventilation outlet
- Stage # 3 - making a hole in the roof
- Stage # 4 - installation of the transition assembly and pipe
- How to protect the ventilation duct?
- How to increase the draft in the duct?
- Conclusions and useful video on the topic
General requirements for ventilation pipes
Air ducts in the ventilation system occupy a significant part. Through these communications, the used air is removed to the outside or, on the contrary, it is supplied to the premises.
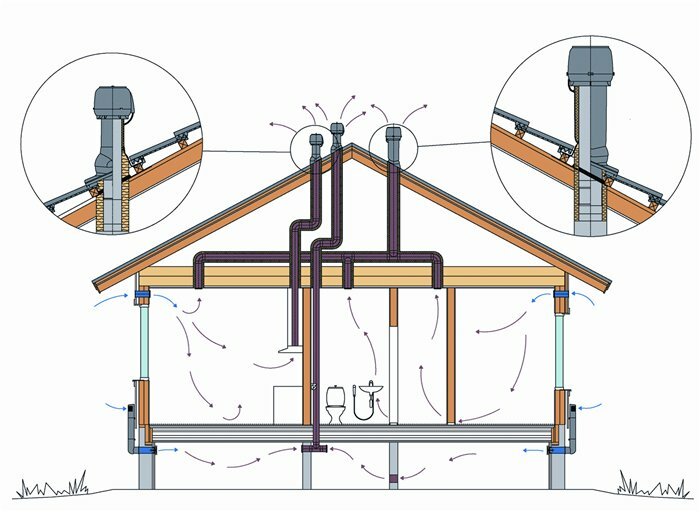
In a large multi-room cottage, it is recommended to install ventilation outlets in the kitchen, bathroom, toilet, basement, boiler room - in all places with a high level of humidity and a risk of gas or products entering the air combustion
The ventilation system is installed for years, therefore special requirements are imposed on pipes and other elements, and the installation process is subject to the rules.
We will consider a few important points regarding air ducts in the photo gallery:
Image gallery
Photo from
According to its characteristics, the material should be as strong as possible, resistant to various atmospheric manifestations - strong wind, rain, snow. These characteristics are met by galvanized or stainless steel, brick, modern polymers, aluminum
Air ducts are mounted from pipes of round or rectangular cross-section, and in rare cases they combine different types. Round pipes have the following advantages: smooth, without wall corners along the entire inner surface, less noise, easier cleaning
The dimensions of the elements are set by the manufacturers, but many standard sizes, thanks to generally accepted standards, are common. For example, the diameter of the air ducts can be 110, 150, 200 mm and more, the height of the roofing pipes is 0.5 m, 1 m, 1.5 m.
It is recommended to use pipes with a cross-section of at least 150 mm - they can easily withstand the load and provide air exchange in the required volume. The walls, on the contrary, should be thin - this increases the throughput and reduces the space for installation.
Considering that roof ventilation pipes are located outside, and even more so, at a high altitude, they should have increased strength and ring stiffness - to withstand powerful gusts of wind and impacts of large hail
Moisture resistance is a necessary quality to prevent the formation of corrosion, which can occur due to rain and condensation, and as a result, destroy the entire duct. From this point of view, polymer products are in an advantageous position. Fire resistance prevents the spread of fire
The lower the weight of the pipes and fittings, the lower the load on the roof or on the downstream duct. Lightweight pipes are easier to transport, install and connect, which is why many people prefer plastic products. Galvanized pipes are heavier, but the largest weight is in brick
The installation of air ducts in the attic and roof pipes is much easier if they relate to elements of the same set or, at least, made of the same material and have the same diameter
Material for the manufacture of ventilation pipes
Pipe shape and its effect on performance
Sizes of elements for the assembly of air ducts
Section and wall dimensions
Strength and stiffness characteristics
Moisture resistance and fire resistance
Low weight of communications
Possibility of quick and easy installation
If you decide to independently arrange the outlet of the ventilation pipe on the roof, then we recommend two options: from galvanized steel or from plastic. Both options are presented on the market of ventilation equipment in large quantities, from standard half-meter products to pipes of increased length.
For self-production, sheets of thin galvanized steel are usually used, which can be easily processed with improvised tools. It is suitable for roof mounting due to its characteristics, while the creation of a pipe, adapter and "fungus" is inexpensive.
Installation instructions for roof ventilation
From how you do vent pipe outlet on the roof, both the functionality of the hood itself and the condition of the attic space depend. We recommend purchasing in advance passages designed for a specific material - flexible or metal tiles, profiled sheets, slate.
Let's consider how best to mount the ventilation pipes on the roof so that the system works at maximum performance.
Stage # 1 - preparation of materials and tools
If you are going to work on the roof on your own, be sure to take care of comfortable clothes, gloves and shoes, select ladders to climb and move on the roof, and prepare a safety rope for your own security.

It is better to raise tools and materials for installation upstairs in advance, so as not to waste extra time and effort on constant descents.
You will need:
- ventilation tube;
- factory or homemade passage node;
- thermal insulation material;
- sealants and sealants;
- hammer drill or drill;
- jigsaw;
- screwdriwer set;
- scissors for metal;
- marker for marking;
- self-tapping screws or anchors.
The node of the passage is selected taking into account the type and slope of the roof.
There is a large selection of ready-made assemblies on sale designed for pipes of standard diameter - we recommend using them.
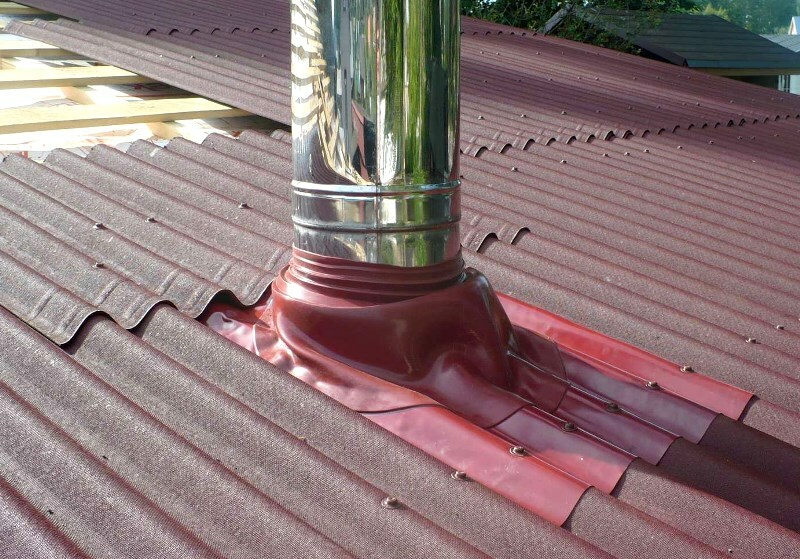
When making your own, keep in mind that the main qualities of the transition block are tightness and reliability. The assembly should strengthen the position of the pipe on the roof, as well as create an obstacle for moisture penetration under the roofing material.
For a more durable fixation of metal products, anchor fasteners are used, but plastic ones can be mounted on self-tapping screws.
Stage # 2 - selection of the ventilation outlet
The place of the exit of pipes to the outside is thought out, drawing up a project of a house. But sometimes you have to lay additional channels and act when the roofing is completed.
When choosing an exit point, they are guided by the documentation SNiP 41-01-2003, SP 7.13130.2009, and when choosing the height of pipes for the sewage system, they are guided by the recommendations SNiP No. 2.04.01.
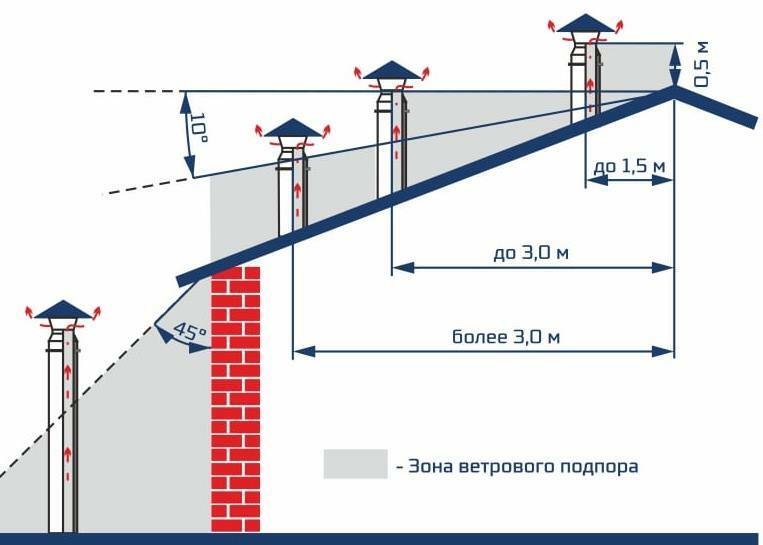
Installation diagram of ventilation pipes on the roof. The main determining factors are the distance of the pipe to the ridge of the roof, the angle of inclination of the roof
It is believed that on a flat roof the height of the pipe should be at least 0.5 m, and on a pitched roof its positioned at a distance of up to 1.5 from the ridge, while it should also protrude above the ridge by about 0.5 m.
If nearby are chimneys, then the hood is positioned at the same level with respect to the ridge, but it should be just below the chimney.
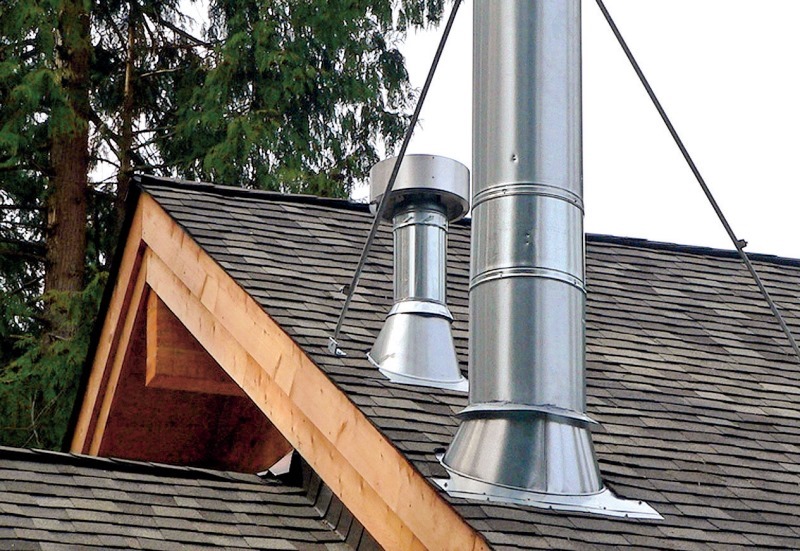
If the roof has a complex configuration and dormer windows are located on it, then it is much more difficult to find a place for installing ventilation. We'll have to look for an area where the air flows are stable, have the same travel speed
If the location is not correct, noise or hum from the jerky air may appear in the duct. We'll have to install resonators or additional risers.
Stage # 3 - making a hole in the roof
Having chosen the place of installation of the pipe, it is necessary to make a hole for the passage element. If the product is manufactured, then it is completed with a special template: it should be attached to the roofing and circled with a marker. When attaching homemade products, you need to focus on the size of the lower part of the node.
Then the layers of the roofing "pie" are removed, starting from the top. Metallic coatings are the hardest to work with.
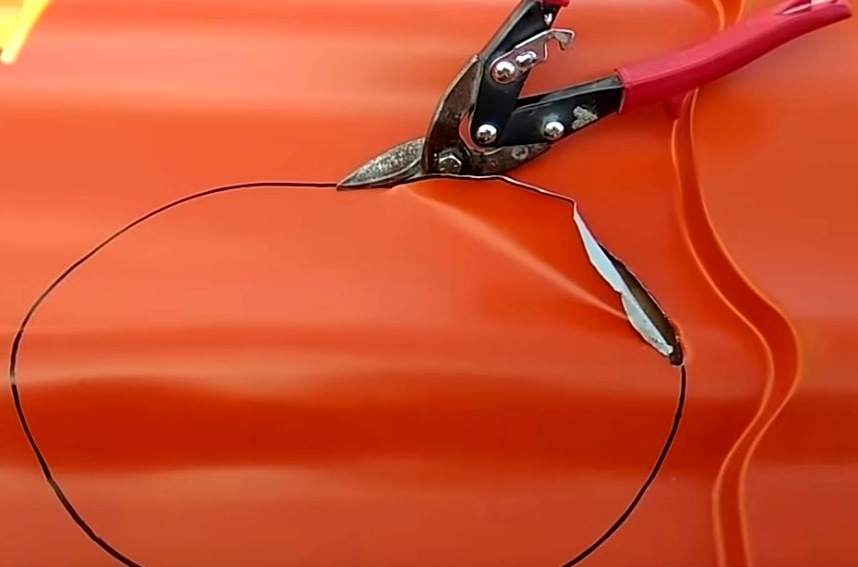
To make a hole in a metal tile, you first need to drill several holes along the marked contour, then use metal scissors and cut out the selected fragment
An inaccurate cut must be leveled with pliers - the edge should be smooth, without bends and deformations.
There is a lathing under the roof covering. If the boards are 100mm, then there is a chance that the pipe will fit between them. But if the boards are wider, for example, 150-200 mm or are installed at narrow intervals, then fragments will have to be cut out to mount the pipe. An unnecessary section of the board is cut off with a jigsaw or gradually drilled out with a screwdriver.
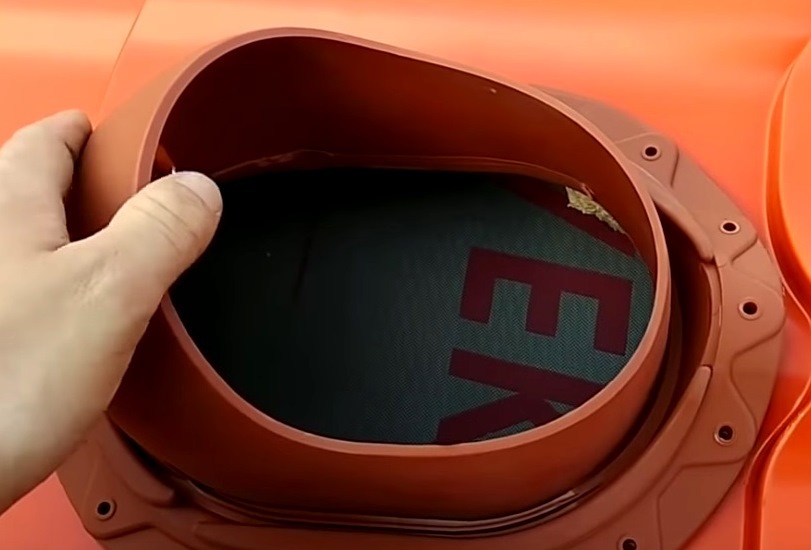
If the lathing does not interfere, at this stage you can try on the passage element - insert it into the resulting hole. It comes in like a sleeve, so the edges should be closely adjacent to the roofing, and the flange should be tightly pressed against the tiles.
There is a waterproofing layer under the crate. Together with the factory transition units, the kit includes water locks, designed just for installation on the membrane. They protect both waterproofing and insulation from water leakage from the roof.
We proceed in order:
- We put a water seal on the membrane.
- With a marker, draw around it along the inner contour.
- Cut a hole in the membrane along the contour.
- We apply a sealant to the water seal.
- We install a water seal in the hole, piercing the surrounding membrane with pins-holders.
- We fasten the device with self-tapping screws to the sheathing boards. For this, it is equipped with special "ears".
Seals and other elements may be included with the transition units - they must be installed according to the manufacturer's instructions.
Stage # 4 - installation of the transition assembly and pipe
First, we install the passage element. To do this, we apply it to the hole, find the correct position and mark the borders with a marker.
Then we apply sealant along the edge of the hole and on the grooves of the flange, press the pass-through assembly to the roofing and fix it with self-tapping screws. We recommend that you first fix the two side screws - at the extreme points, and then all the others. Try to keep some of the self-tapping screws not only in the tiles, but also in the crate - this way the fastening will be much stronger.
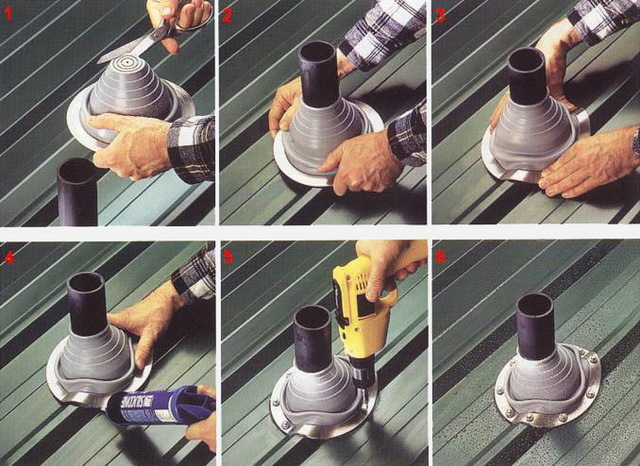
One of the options for installing a protective transition element. Installation is carried out after attaching the ventilation pipe to the sealant and self-tapping screws
If, after fixing on the self-tapping screws, a sealant emerges along the edges of the flange, this is not scary - this way the abutment will be even more tight.
When the sealant has hardened, the pipe can be installed. In the case of manufactured products, there is a branch pipe inside, the diameter of which coincides with the air duct. It is simply inserted into the inside of the pass-through assembly, while the expanded, sealed portion remains outside.

The pipe is mounted on self-tapping screws with roofing washers, choosing the most convenient position inside the assembly. It should point strictly upward, perpendicular to the ground, regardless of the angle of inclination of the roof, so when installing, use a level
From the inside, from the attic or attic, they bring duct. It is either joined to the roofing pipe directly, or connected by means of a transitional flexible element if the pipes are not located along the same axis.
How to protect the ventilation duct?
It is easy to see that the ventilation pipes that rise above the roof differ in their design. The fact is that some of them are not equipped with either a "fungus" or a deflector. These are pipes for sewerage service.
In the sewer pipes, the air is always warm, so any elements installed on top will be covered with ice in winter, as a result of which the pipe will simply stop working
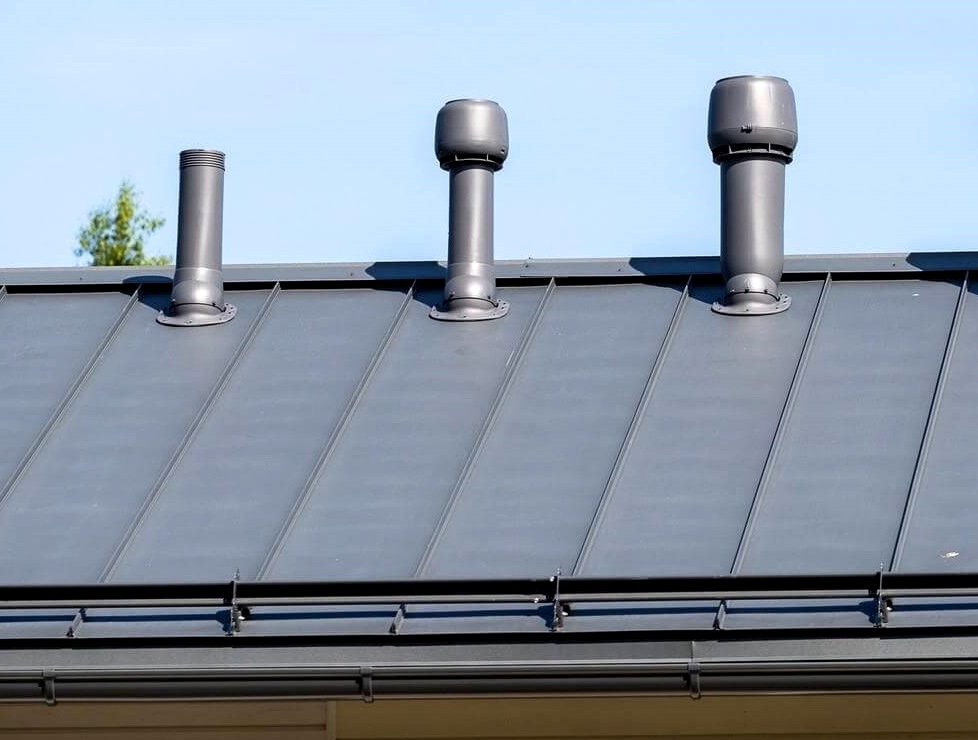
Fan pipes for sewage look "more modest" than other similar elements on the roof. They end either with a threaded head, if these are universal products, or simply with a truncated end.
But the rest of the ventilation ducts require protection. To do this, a device is attached to the upper part that prevents street debris from entering the channel: dry leaves, branches, dust, sand. The protective element has various names - "fungus", cap, weather vane, cover, "umbrella".
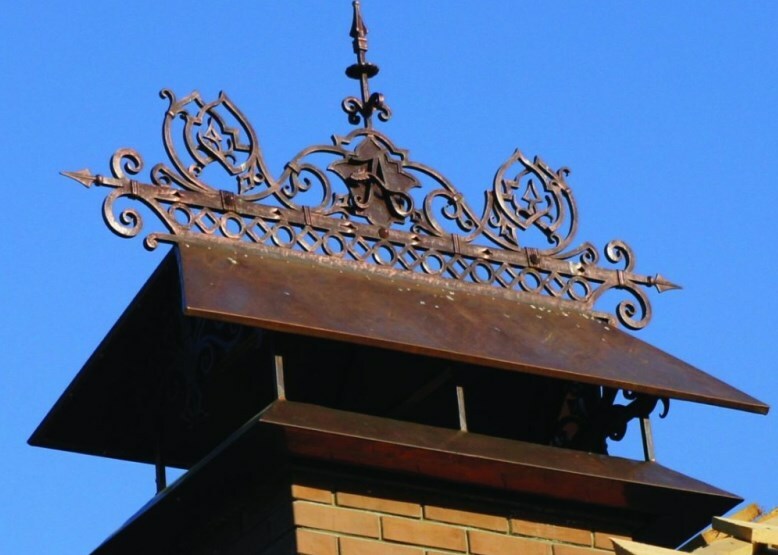
For beautiful cottages with expensive finishes, the corresponding caps are also ordered - forged, decoratively decorated, exclusive, combined with the railings of terraces and stairs
If you yourself want to make a "fungus" - it's easy. You will find a video assembly instruction at the end of the article.
How to increase the draft in the duct?
Duct performance can be increased by using deflector, which is also installed on the pipe and at the same time is a protective element.
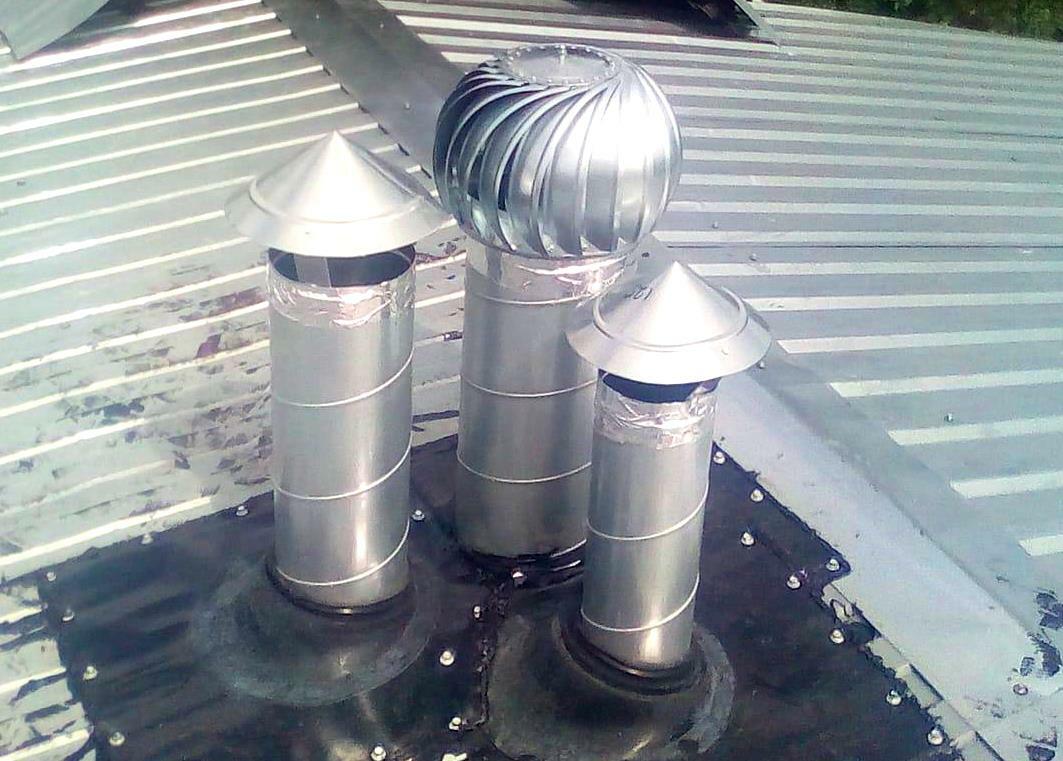
For factory products, the deflector is a nozzle that is larger in diameter than the pipe. It is screwed onto the upper edge along the thread
The principle of operation of the deflector is based on the strength of the wind. The built-in diffuser reduces the air flow and creates a low pressure area, which increases the draft inside the duct. It is estimated that installing a deflector increases ventilation efficiency by 30%.
Modern devices have a decorative appearance and do not spoil the overall appearance of the roof after installation. You can install the deflector yourself.
Conclusions and useful video on the topic
Installation of a pipe on a corrugated board:
Detailed video instructions for making an "umbrella":
Practical experience of installing a ventilation pipe on a roof from Ondulin:
A ventilation pipe on the roof is as necessary an element of home improvement as a chimney. Its functionality depends entirely on correct installation. When installing, try to adhere to the requirements of SNiP, manufacturer's instructions and safety rules.
If you correctly fix the transition unit and install the pipe, the tightness of the roof will not be affected, and the ventilation system will work properly and create a favorable microclimate in the house.
Do you have questions, find bugs or want to supplement the material with valuable information on the topic of the article? Leave your comments, share your experience, ask questions - the contact form is located below.


