If your house is still under construction, then it's time to think about a quality roof. Are you planning on opting for a hard surface like profiled sheets? In order for the ventilation of the roof from the profiled sheet to be properly organized, you should adhere to the recommendations and avoid mistakes. Redoing something will be problematic from a technical point of view.
The roof covering can deteriorate or even deteriorate from external factors. It would be nice to think about protection from uncomfortable temperatures, moisture accumulation, its penetration, as well as other unpleasant things that threaten your roof. If you do not draw the right conclusions about the air exchange on the roof, then in the worst case, the support system in the attic will suffer. In general, there is nothing complicated.
In our article you can familiarize yourself with the device of a roofing pie for covering from a profiled sheet. You will receive tips from which to compose a set of optimal solutions.
The content of the article:
- Ventilation in the roof made of profiled sheet
-
Correct air exchange in corrugated roofing
- Installing roof aerators
- Ventilation between waterproofing and insulation
- Other nuances in the arrangement of ventilation
- Conclusions and useful video on the topic
Ventilation in the roof made of profiled sheet
Roof ventilation device is a capacious stage of roofing work, along with insulation and waterproofing. The roof will not be threatened with destruction only under normal conditions in the attic and on the roof itself.
Houses need ventilation outlets, which are made on the roof. The condition of the roof depends on local ventilation. The growing demand for housing with an attic has led to the fact that local air exchange under and in the roof is organized more carefully.
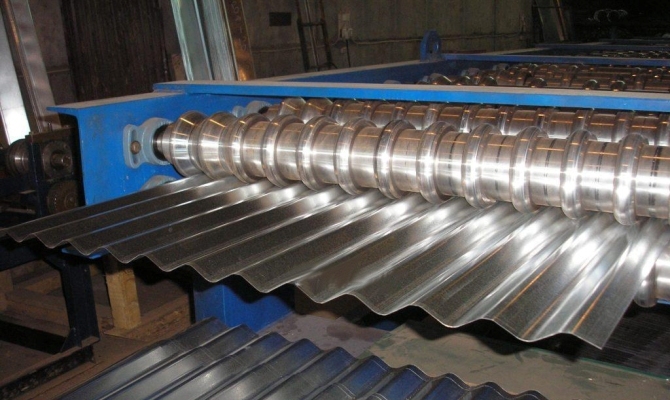
A professional sheet with a narrow pitch between waves is used on a smaller number of objects and mainly only in construction, but for roofs, the height of the corrugation is primarily important, it should be more than 44 mm
Profiled sheet (corrugated sheet, corrugated sheet) - facing material for roofs and walls, made of galvanized steel by cold rolling. In the process, sheet blanks are made wavy: with square, trapezoidal and other shapes. As a result, the material becomes stronger.
The roof of the corrugated board should be protected from:
- moisture;
- icing;
- elevated temperatures.
Ice forms due to heated air in the roof. The lower layers melt, but harden quickly if it's freezing outside. For corrugated board, frost on the outside is not a problem, but the ice will gradually fill the gutters.
Icing is also formed inside - from condensate. Warm air rushes out through the cake, enters the cold stream of the roof ventilation gap and turns into moisture. In summer, the profiled sheet protects well from rain, but it overheats if there is poor ventilation under it.
Correct air exchange in corrugated roofing
Ventilating the roof is easy. The air enters from the side of the eaves and rises to the top - the ridge (ridge). Leaves through the slots next to the ridge or special removers.
The air gap is made due to the lathing: it is used to separate the profiled sheet and waterproofing (waterproofing). Between the water protection and the transverse battens, the battens leave gaps due to the vertically oriented battens - counter battens.
These gaps become natural ventilation channels. A gap is also made between the insulation and the waterproofing, but not always. In the ridge, moisture protection is provided only by sealing, waterproofing is not laid there.
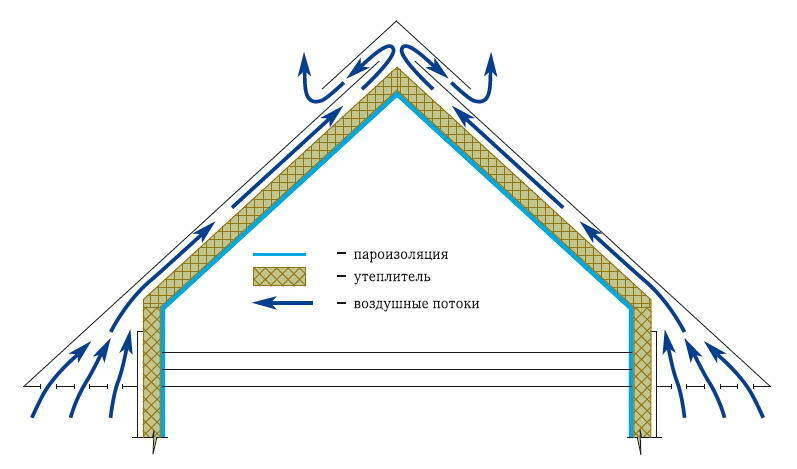
Conditional ventilation scheme with vapor barrier and insulation: extreme flows at the bottom enter the air vents, others enter through the soffits, and above the air comes out after turning under the ridge
Sometimes the crate is made solid, and not thinned out, that is, without crossed slats. Then they take moisture-resistant plywood boards with a thickness of about 1 cm, lay them on the rafters, but with the addition of transverse strips between them. These slats are picked up to 10 cm in height when placed on the edge. It turns out additional protection against moisture.
If we talk only about the insulating layers, then keep in mind that the waterproofing is the topmost one, below is the thermal insulation, the insulation, and under it is the vapor barrier.
Complete diagram of a standard corrugated roofing pie:
- At the very bottom there is a solid binder.
- Above is the base of the roof - the rafters. Between her rafters lay insulation sections. Under them is a thin vapor barrier layer. Install a vapor barrier before laying the thermal insulation and before joining the filing with the rafters.
- Even higher is the first air gap or waterproofing immediately.
- Next is the lathing and the main ventilation gap.
- The corrugated board is located above this air gap.
Lay the waterproofing sheets perpendicular to the ramp. Make several adjacent strips with an overlap of 10-15 cm and treat it with duct tape.
Move from the overhangs to the ridge. Install waterproofing sheets with small hanging waves between the planks. Allocate 1-2 cm vertically for each.
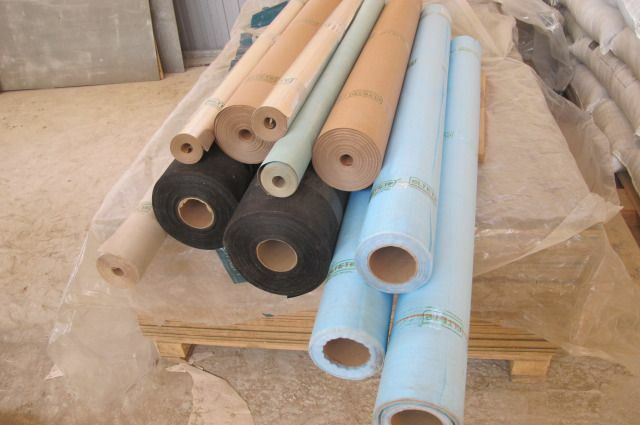
Waterproofing does not allow moisture to pass into the insulation and does not interfere with the escape of water vapor, protects the insulation from weathering and prevents heat from being blown out of it
Sometimes waterproofing is organized in two layers: under a row of counter battens and above it or over the entire sheathing. Ventilation will not get worse, and moisture will less threaten the roof and attic. Water protection is then placed on the insulation.
Sheds and roof sections above terraces / verandas do not need organized air exchange. For a roof with a very steep slope, minimal ventilation is enough, and for large areas of corrugated board, ventilation outlets - aerators are needed.
When the profiled sheets are laid, free space is left in place of the ridge. This is how natural ventilation is laid. This method also lowers the temperature, because on hot days the metal heats up quickly.
The corrugated board has grooves, which, in combination with ventilated ridges, makes the air exchange at the top of the roof more efficient. The grooves leave gaps between the sheet and the ridge, and even at the bottom of the overhangs. The holes at the level of the waves should be repaired, and below they should be covered with a net so that less snow falls. It will be worse if the gaps are filled with leaves and dirt: air exchange can then stop.
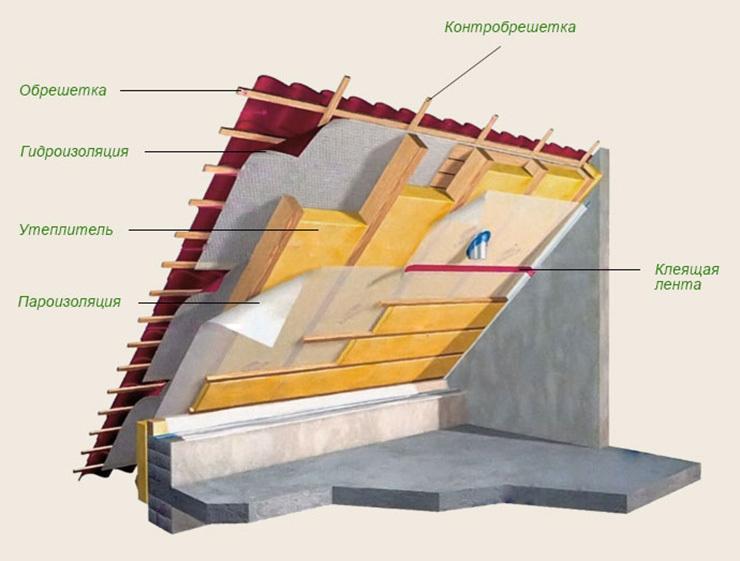
Roofing pie from the attic side: filing, vapor barrier, adhesive tape, insulation between the rafters, waterproofing, counter batten and transverse batten
Previously, the holes were reduced with sealants, about 2/3 of the height. I had to move from place to place and wait for the next layer to polymerize. Now the gaps from the waves of material are closed with embossed seals for corrugated board. They are made from foam materials.
Do not worry about ventilation - due to the structure of the seals, even the closed part will allow some air to pass through. In addition to uniforms, a universal tape is suitable for sealing. You will be able to secure it in the right places.
In houses with an attic, the roof is ventilated based on the safety of the structure, air exchange in the room and its temperature regime. At the level of the attic, the air itself moves actively, the cold displaces the warm above.
Ventilation is also designed to protect against moisture. Condensation will not enter the lower part of the roof if a waterproofing and vapor barrier membrane is in its way. Many ventilation slots are added to the design so that liquids evaporate.
Installing roof aerators
Aerators are also called fungi. They are used to enhance air exchange and remove moisture / steam. The devices are connected to ventilation gaps directly or through the roof. Aerators are solid and point.
Solid type appliances improve ventilation throughout the roof structure. They have foam filters and cover the entire length of the ridge. Devices are often called ridge, like a type of point. Due to the peculiarities of the structure, solid solid aerators cannot be combined with corrugated board.
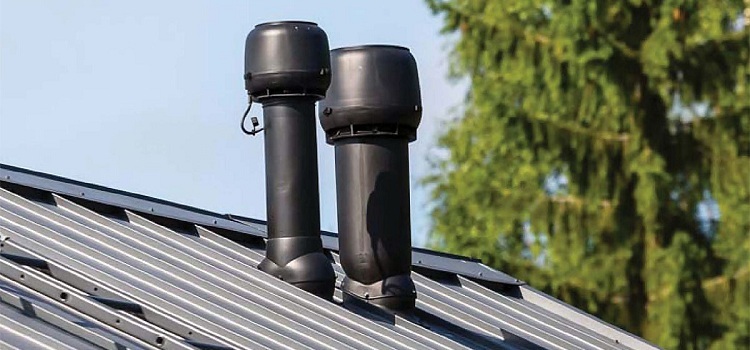
The recommended maximum distance for aerators closest to the ridge is 1.5 m, the second group (if any) should be placed no further than 3 m, and the height above the ridge can be increased to 50 cm
Point aerators are installed on separate parts of the roofs: pitched and ridge.
Point pitched devices are installed:
- on roof sections that get very hot - in as much as possible, if the whole roof is like that;
- on slopes of a large area;
- in places of roofs with complex patterns and bends.
Ideally, pitched aerators are installed at the highest places of the roof, under the very ridge. If there is a valley on the roof, then the devices are fixed not below the imaginary lines between the tops of these funnels.
Place at least one spot aerator per 60-100 m² of the roof. Mount the two units in relative proximity on parts of the roof where more moisture is expected. Use the wind rose for the area as a guide. The slopes will receive more rain from the side from which the wind blows more often.
If possible, install aerators at the same time as the roof. For their installation, choose the lines of joints between the thermal insulation: insulation mats partially absorb liquids. If the vapor barrier layer is broken, moisture enters the insulation from the house. Secure with dowels or anchors. The ventilated space under the ridge must be protected from leaks, and you need a sealing tape or sealant for this.
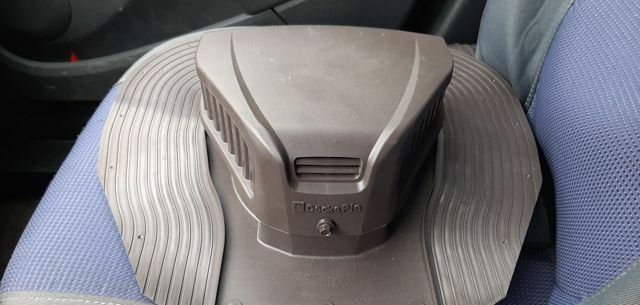
Point ridge aerators are not the most convenient for profiled sheets, but sometimes they are used on such a surface. For work, you only need to bring in a channel for supplying air, which has already entered through the air
Find the right elements for your aerator. Start with the mounting pad under the wave of the profiled sheet. Do not replace it with Master Flash, because it will be difficult to fold it under the relief. Insert the capsule into the mounting pad and slide the adapter onto it. Then attach the corrugated pipe, but don't use aluminum.
If you have to dodge obstacles in the attic, the channel will need to be bent. Aluminum is poorly suited for this. This part will be under the roof. Equip the outside with a deflector.
Ridge point aerators have a flattened shape, and are attached to the ridge itself or slightly below. Pitched ones are generally more beneficial, and in some cases are irreplaceable. A ridge aerator will not cope with air exchange in a slope that is elongated in height.
The situation will be the same if the entire roof consists of many bends and transitions. The air stagnates in these forms for a long time. Aerators for structurally complex roofs are planned simultaneously with the roof. Then you will need to see if the installation site fails.
Ventilation between waterproofing and insulation
Make a ventilation gap between the insulation and the waterproofing. This is how the air in the eaves of the ramp is expanded - at the level of the bottom of the sheathing, if you look into the thickness of the roofing cake. Make a gap from the vent to the top edge of the waterproofing.
After removing the waterproofing from the insulation, it will just as well protect from the liquid from above, and the moisture from the thermal insulation will begin to leave faster. The waterproofing film must also absorb moisture, but the air gap does the job better. The air from the gap will leave through ridge ventilation.
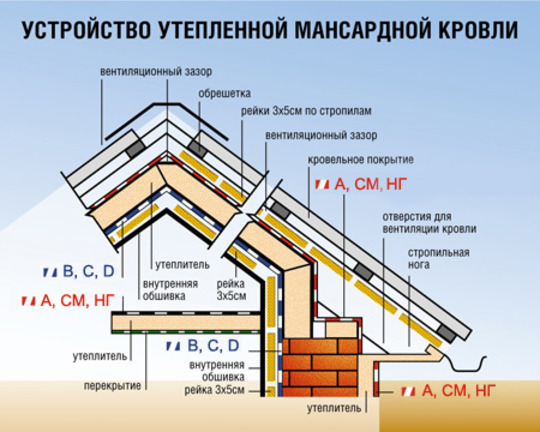
Option for the device of the roofing cake: combined steam and waterproofing B, C, D, membranes A, CM and NG against water, wind and harmful substances, reinforced thermal insulation
The gap between the insulation and the waterproofing film / membrane is isolated with stretched lines. The water protection is raised by at least 5 cm. The fishing lines are attached to the wood with a construction stapler.
The gap is made necessarily if the film acts as a waterproofing. In the case of a membrane, everything is almost the same: most products are not suitable for installation directly on insulation. You can make a gap, even if it is not mandatory, but remember that ventilation between the corrugated board and the membrane is more important.
Other nuances in the arrangement of ventilation
Air exchange largely depends on the design of the upper and lower edges of the roof. We are talking about the ridge at the very top and the vent at the edge of the ramp. For a roof made of corrugated board, strong natural ventilation in the channel is important, where the outside air rises, interacts with the inside and goes outside.
Arrange ventilation at the bottom:
- Take the ventilation mesh and cover the air vent. Secure with self-tapping screws. If you want, make holes in the soffits for more active air flow. The net is a necessary measure to protect against foreign objects, birds and insects.
- Install the eaves plank and maintain an interval to the airflow in width of at least 3 cm. Do not lower its lower end more than 10 cm from the air vent. The air itself can be hidden.
- Cut the polypropylene tubing to the full width of the free space. Secure the eaves with large self-tapping screws.
Then place gutter - on special holders and below the level of the eaves.
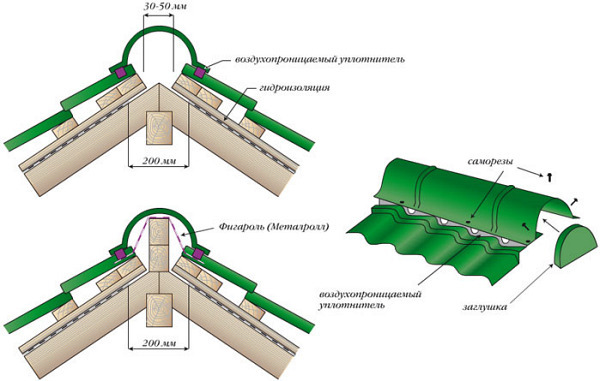
Ridge attachment methods without additional bars and wide boards, but with a vertical support element or with a strong attachment
The main air outlet is the ridge at the top of the roof. The shape of the ridge is very different, it often has branches, but the main branch falls on the upper half a meter.
At the gap between the tops of the slopes, a seal or more air-permeable ventilation tape is fixed.
Bars are attached to the tops of the roof sheets, and then the ridge cover is installed on top. The boards are taken 5 cm thick and laid in two, side by side, with a step of 40 cm or more. Form triangles upward. On both slopes, long wide boards are nailed perpendicular to the bars.
They will form the basis for the ridge cover. The latter is made with stiffeners, but relatively flexible in the center. Strengthening will prevent the edges of the ridge from moving and deforming.
On both sides of the ridge, air vents are left between the bars, which are then protected with a ventilation mesh. So that the wood does not catch the eye, cut metal strips to match the color of the mesh are screwed to it.
The open ends of the ridge are closed with plugs. Flat skates are suitable for flat skates, and those inclined on the hips are closed with conical skates.
Shed roofs with corrugated board are equipped so that the air moves without obstacles and passes through. Overhangs are also equipped with ventilated spotlights.
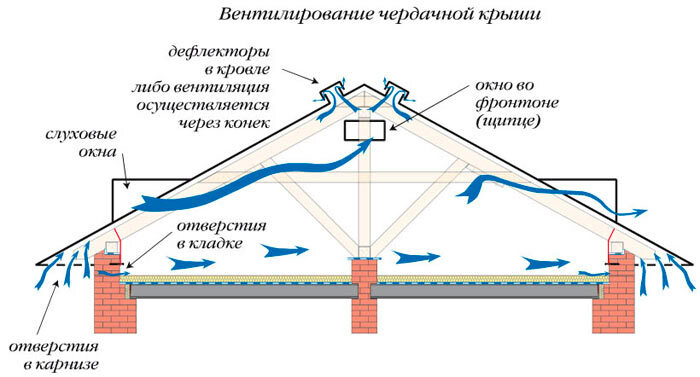
The cold attic can be ventilated in a different way: holes in the soffits and walls, two dormer hatches, a window in the gable, two outlets with deflectors on either side of the blind ridge
If you are not going to heat the attic, you can install there attic windows for ventilation. In this case, excess moisture in the roof will not appear. In a heated attic, you can maintain a small draft from ajar windows.
Conclusions and useful video on the topic
Roof ventilation nuances and experimental assembly of the roofing pie:
Ridge seal for protection from snow and cold:
The state of the cold attic six years after the installation of the corrugated board, and is it possible to lay waterproofing without counter-gratings:
You have learned what the air exchange system is under the profiled sheet roof. Now consider the climate in your area, the expected roof load and the type of roof you are planning. Add aerators to help wick moisture away. Make the air gap as wide as possible.
Take care of the passage of aerators and general ventilation through the roof, and only then calculate the covering of corrugated board. Don't forget about air exchange in the skate. Supervise your roof construction so that everything works out perfectly the first time.
Write comments, ask questions about roof ventilation from a profiled sheet. Share your experience with other readers if you had to do ventilation on the roof of your house. The contact form is located under the article.


