It is possible to solve such a widespread problem of "crying" windows in just a couple of hours, because often the cause of condensation is insufficient air exchange due to too wide window sills. Additional ventilation in the window sill is the main way to correct the direction of the flow of hot air emanating from the heating radiator and let it go to the glass unit.
With proper circulation of air masses and ventilation of the room, owners of plastic windows will be able to forget about excessive humidity, annoying puddles on the windowsill and fungus harmful to health. But what is such ventilation and how to arrange it correctly?
In this article, we will consider the principle of operation of a window sill ventilation system with a supply valve, we will tell you about the types of ventilation grilles and how to install them in plastic or wooden window sills.
The content of the article:
- The need to install ventilation in the windowsill
-
Window sill ventilation methods
- Ventilation through the openings of the grilles
- Installation of a duct with a supply valve
-
Installation instructions for window sill ventilation
- Option # 1 - drilling holes with a lattice cover
- Option # 2 - installation of a grill with cutting a groove
- Option # 3 - installation of supply window sill ventilation
- Conclusions and useful video on the topic
The need to install ventilation in the windowsill
Of course, high-quality plastic windows outperform old wooden frames in many ways. The modern design provides excellent sound insulation, retains heat in the home, protects against drafts and is easier to clean. However, the advantages of ergonomic window systems also include their disadvantages.
Tightness and the complete absence of natural ventilation often lead to the formation of condensation on the glass unit, even a correctly installed window. The cold, damp surface of plastic becomes an excellent medium for mold growth.
Sealed glass units and reliable seals prevent heat loss as much as possible. However, along with the heat, excess steam, carbon dioxide and carbon monoxide remain in the apartment. Old-style wooden frames made it possible to partially release air from the housing, even without ventilation. Modern window systems, the frames of which do not have an inlet channel, do not have such capabilities.

Old wooden windows cause intense heat loss. However, the presence of cracks allows moisture to leave the room more freely, so that condensation does not settle on the inner surface of the window leaf.
The main reason for installing an additional ventilation system in the window sill is to try to get rid of condensation. The glass unit remains cold due to the low temperature; after contact with warm air masses, microdroplets of moisture are formed on its surface, which can turn into real streams. Therefore, you need to take timely measures to get rid of excess moisture in the room.
However, if the air flow from the battery fully passes near the glass surface, condensation will simply not have time to form. And even a short airing of the room will provide good air exchange: heavy apartment air with unwanted impurities will leave the room, being replaced by fresh outdoor air.
Correct direction of the flow of warm air from the battery and periodic opening of the sash or installation supply valve on the window will relieve home owners from high humidity in the apartment, and from condensation on the glass.
Window sill ventilation methods
Depending on the initial depth of the window sill, the thickness of the outer wall and the planting depth of the window frame, air circulation near the glass unit can be ensured in two ways:
- using the natural passage of flows through the holes made in the windowsill for ventilation;
- thanks to the installation of a separate ventilation duct with a supply valve.
Each of the methods has its own characteristics both in the selection of materials and in implementation.
Ventilation through the openings of the grilles
The first method for improving air passage is simple enough and does not require any special skills.
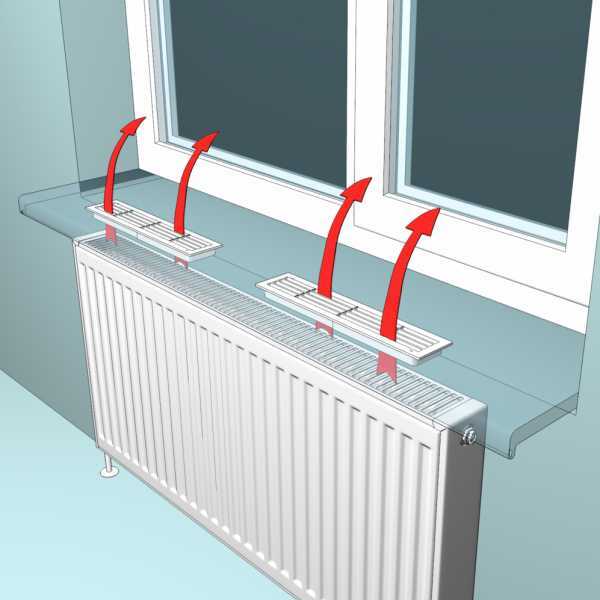
The figure schematically shows the direction of air movement through the ventilation holes in the windowsill, equipped with special grilles. The lamellas in these products have a certain angle, due to which the flow rushes towards the window.
Even an inexperienced craftsman can make the necessary holes and fix the ventilation grill. The method is suitable for window sills of medium and large depth, the protruding part of which significantly overlaps the radiator. Ventilation grilles will allow air to pass more freely through the window sill and in sufficient quantity to flow to the glass unit.
The grilles themselves can be made of different materials: plastic, aluminum, steel and even wood. The most ergonomic are metal products coated with a special paint that is resistant to high temperatures. Plastic is not less common on the market, but this material can deform over time and lose its original shade, which also will not add aesthetics to it after a year of operation.
The dimensions of the ventilation grill are selected based on the width of the window sill. In order for the window to warm up more evenly, it is better to install the grill along the entire window sill. Particular attention should be paid to the live section of the lattice - the size of the holes through which the air will pass. The larger their area, the more efficient the circulation will be.
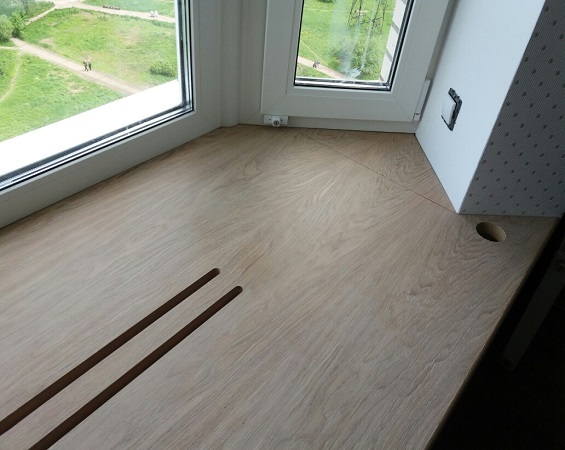
Grilles with a large distance between the lamellas, like ordinary wide ventilation openings, should not be mounted on window sills, which are actively used by the owners as a storage area, since small subjects
The lamellas themselves can be static or regulated. The second option is more preferable for installation, since it allows you to more accurately correct the angle of the air direction or completely block the air exchange.
Installation of a duct with a supply valve
A more complex method that requires more skill during installation and knowledge for the selection of a special complex - a window sill valve.
The method consists in arranging a special window sill ventilation system, which consists of:
- inner box with grillesthrough which exhaust air is taken;
- ventilation duct in the form of a pipewhich brings the flow out;
- outer grille with filtersthat do not allow street dust to pass through.
Indoor duct lamellas are usually adjustable, which allows you to change the intensity of the air intake. The channel itself is equipped with additional filters and reliable noise isolation, which will not allow too loud sounds from the outside to penetrate into the room.
The design may also have an engine that will provide a more efficient capture of outdoor air. To reduce heat loss, you should take a closer look at devices with heat recovery.
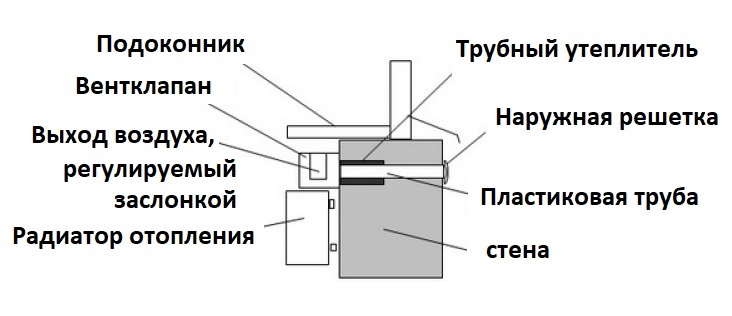
The figure shows the installation diagram of the supply valve under the window. Thanks to this design, natural ventilation of the room occurs, which prevents the formation of condensation.
Such ventilation systems are optimal for houses and apartments with thick walls and deep window sills.
The main advantages of the structures are:
- maximum and constant renewal of air in housing;
- the ability to avoid sudden changes in temperature or drafts that may occur when ventilating the room while opening a window;
- limiting the ingress of street dust during ventilation;
- reduction of heat losses.
However, a significant disadvantage of this method is that this measure will work properly only with properly functioning indoor ventilation ducts.
If there are problems with the draft into the mine, they must be solved before installing the window sill ventilation with a supply valve. You may need ventilation cleaning.
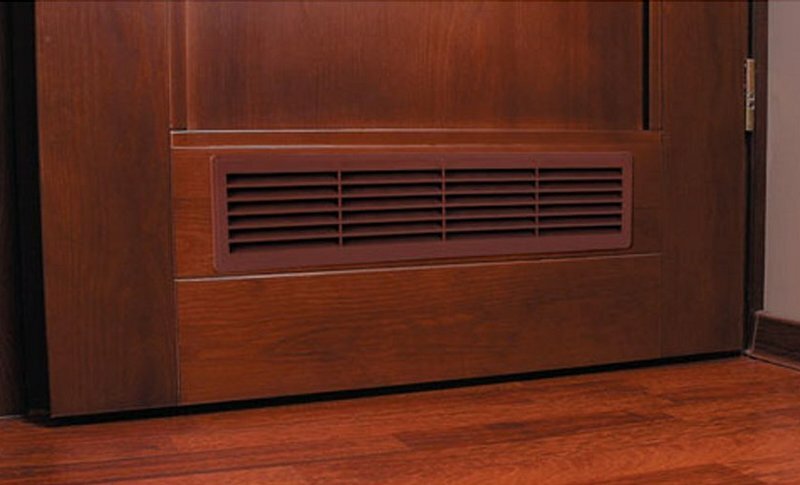
Additionally, ventilation should be uniform in all rooms. For this, interior doors must have ventilation grilles or have a lower gap between the door leaf and the frame.
To choose the optimal device for a particular room, it is worth focusing on the throughput of a particular system and the noise absorption coefficient. The usefulness of air exchange depends on the first parameter, the second affects the comfort of the inhabitants of the house. And the presence of soundproof membranes will significantly reduce the penetration of street noise into the apartment.
Installation instructions for window sill ventilation
Depending on the method chosen to create ventilation in the window sill under the plastic windows, the home owner or the master will have to perform certain manipulations.
Option # 1 - drilling holes with a lattice cover
This is the easiest and fastest way to slightly improve the circulation of warm air generated by the heating radiator.
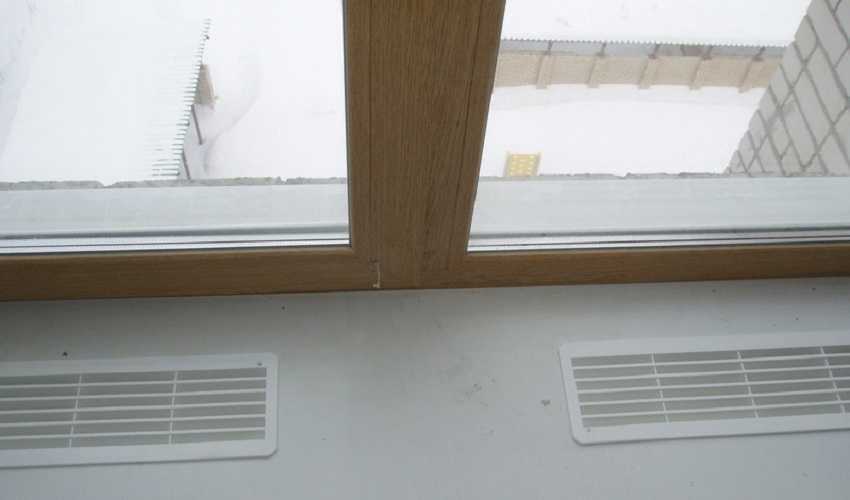
A decorative overhead ventilation grill in the windowsill hides the holes made and looks aesthetically pleasing. When installing, you should be careful and place the product so that the angle of inclination of the lamellas is directed towards the glass unit
For installation you will need: a screwdriver (drill) with a drill, a marking pencil, a ruler, an overhead grid of the required size, glue for fixing.
After preparing the necessary inventory, you need to follow a few simple steps:
- Match the dimensions of the ventilation grill you purchased with the length of the window sill so that the cover is centered, keeping the same indents from the edges of the window sill, and mark with a pencil.
- Attach the grate to the windowsill, focusing on the serifs, outline its perimeter.
- Inside the delineated area, make multiple holes with a drill, retreating from the pencil line about 1-1.5 cm.
- Close the perforated section of the window sill with a ventilation grill, fixing it with glue.
Virtually all work can be done in less than half an hour. The plastic shavings left after drilling can be easily removed with a vacuum cleaner.
Advantages: quick and easy execution, minimal set of tools, simple preparation for installation. But such a lattice protrudes above the level of the window sill. Also among the disadvantages is a decrease in the efficiency of the lattice section.
Such measures will make it possible to slightly improve air circulation and partially solve the problem of condensate settling.
Option # 2 - installation of a grill with cutting a groove
This method of installing a window-sill ventilation system is not more complicated than the previous one, however, it allows more it is aesthetically pleasing to hide the improvised ventilation duct in the thickness of the window sill, if you use a built-in ventilation lattice.
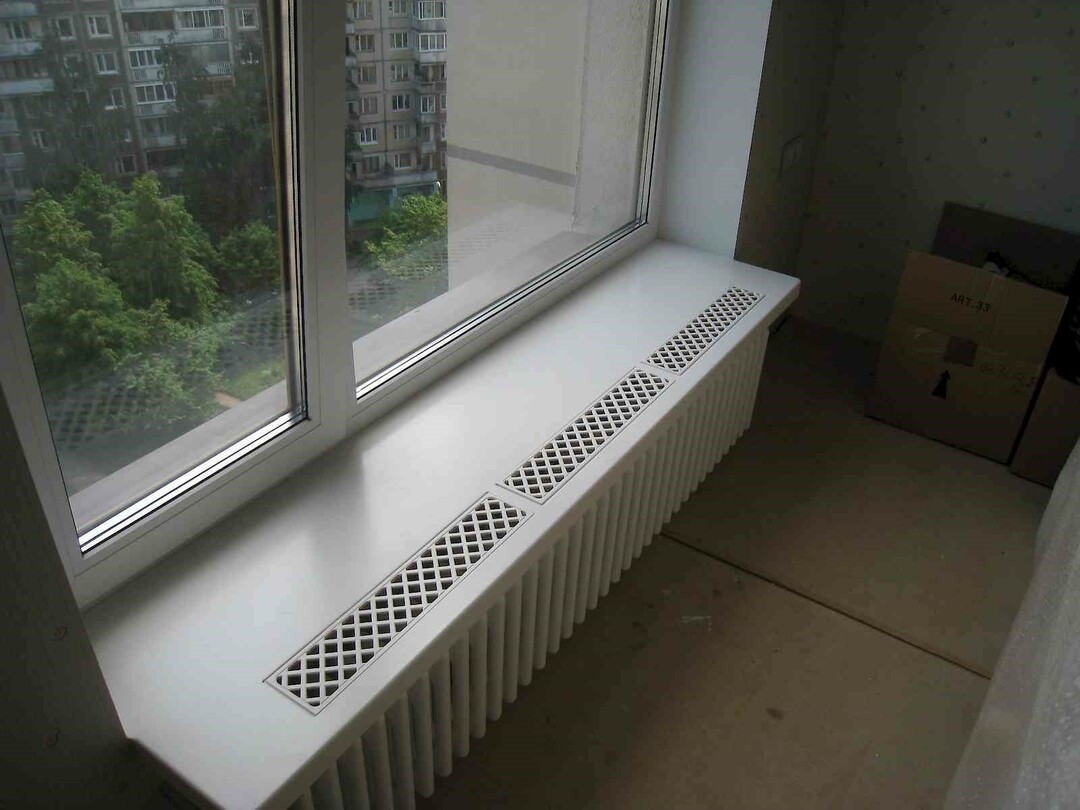
Such grilles fit more organically into the interior, since they do not rise above the level of the window sill. You can safely put indoor flowers on them without worrying about the stability of the pot.
However, you can install an overhead product using a similar method.
In addition to the tools listed above in the description of the first method, you will additionally need:
- jigsaw or grinder;
- a heavy object to use as a press if the grill is held in place with glue;
- bolts if the grille is attached with them.
After the preparatory work has been completed to mark the place where the grill will be located, you must perform the following steps:
- Drill four holes at the corner notches. The drill diameter of the drill should be larger than the width of the jigsaw blade.
- After inserting the jigsaw blade into one of the holes obtained, cut out the groove seat.
- Insert the grate into the hole to make sure the dimensions are correct.
- Fix the grille with glue or bolts. When using glue, place a press for better adhesion to the windowsill.
You can use no glue or bolts if you wish. Free dismantling of the grille will greatly facilitate its maintenance, since at any time the product can be taken out and rinsed with water.
The advantages of this method:
- ease of installation;
- installation of the lattice flush with the window sill;
- aesthetic appearance.
Among the disadvantages are the need for more tools and a violation of the integrity of the window sill.
Such a window sill ventilation system looks quite aesthetically pleasing, allowing full use of the surface as a storage area.
Option # 3 - installation of supply window sill ventilation
This is the most time consuming, but also the most effective way to correct the movement of air currents.
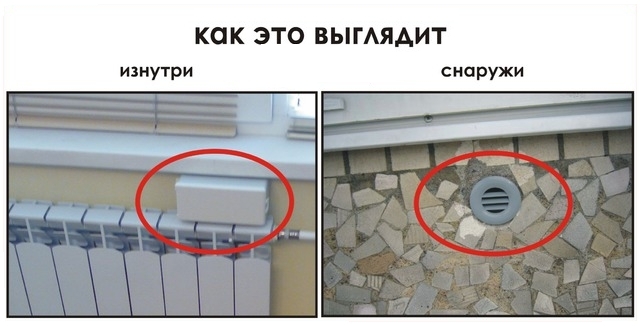
An additional ventilation duct with an inlet valve is not only extremely efficient, but looks quite attractive both inside and outside the building.
Such a measure allows you to fully replace the heavy apartment air with fresh outdoor air and get rid of excess moisture that provokes the condensation to settle.
The main working tool for installation will be a perforator with a crown capable of making a hole in the wall of the required diameter. Check for draft in the apartment ventilation duct. If the ventilation system is working properly, proceed with the installation.
Procedure:
- Select the installation location. The area between the heating battery and the window sill itself will be optimal.
- Disassemble the purchased product by disconnecting the indoor unit from it. Mark the place for installation, focusing on the places where the box is attached.
- Using a punch, drill the exit hole for the future channel at a slight downward angle.
- Wrap the ventilation pipe with insulation and install it in the duct. The outside of the device must be flush with the wall surface.
- Install noise insulation membranes and air filters following the instructions for the device. If the valve has a fan to generate additional air flow, connect this unit to the wiring, relying on the connection diagram in the passport.
- Secure the inner box with dowels.
For more detailed instructions on installing the supply valve into the wall, see next article.
The installed ventilation system requires minimal maintenance. However, the user should still clean or change the filters at least once a year so that the equipment does not lose its effectiveness.
The advantages of this option:
- the most efficient ventilation method;
- full air exchange;
- removing excess moisture from the room.
Among the disadvantages are more complicated installation, violation of the integrity of the wall, higher cost of work due to the price of the valve to be bought.
It is still more appropriate to entrust the selection of the supply valve and the work to a specialist. The master will be able to accurately calculate the required performance of the equipment and install it correctly.
Conclusions and useful video on the topic
An experienced craftsman shows how to install ventilation grilles in a plastic window sill:
The installation of the supply valve, performed by specialists, is described in detail in the video below:
The ventilation system for the windowsill is a reliable method of eliminating unwanted condensation on plastic windows and preventing the formation of mildew and mildew. Air circulation can be improved in fairly simple and inexpensive ways, simply by installing additional ventilation grilles in the window sill. However, if a new ventilation duct with an efficient supply valve and a heat recovery system is created under the window, the replacement of heavy and humid air will take place constantly and without heat losses.
What method of getting rid of condensation do you use? Tell us your story of installing ventilation in the window sill, share your experience of using such a system, participate in discussions - the contact form is located below.


