There is a new door to be installed in the room and you doubt that you can cope with this work? Special professional training is not required here. It is enough to be able to use a hacksaw, a chisel, to have a level, a hammer, a screwdriver at hand. And we will tell you how to do the work in our article - we will consider how to install an interior door, we will give a detailed description of each step.
Illustrations and diagrams will complement the overall picture. After watching the videos on the installation of the door frame, you can confidently get down to work.
The content of the article:
-
Stages of installation of an interior door
- Stage # 1 - preparation of tools and materials
- Stage # 2 - measuring the doorway
- Stage # 3 - installation of locking fittings
- Stage # 4 - collecting the door frame
- Stage # 5 - inserting door hinges
- Stage # 6 - installation of the frame and door in the opening
- Stage # 7 - installation of the handle and the counter panel of the lock
- Stage # 8 - installation of platbands
- Installation of a door and a frame with a threshold
- Conclusions and useful video on the topic
Stages of installation of an interior door
Before proceeding with the installation of the box and the installation of the interior door, it is necessary to check whether all the materials and necessary tools are at hand.
You also need to take care not to spoil the surface of the door set and flooring. To do this, lay corrugated cardboard or a laminate underlay on the floor before starting work.
Stage # 1 - preparation of tools and materials
Prepare the tools you may need during the installation process.
Include in the required set:
- level,
- roulette,
- hammer,
- screwdriver or screwdrivers,
- drill,
- a hacksaw for wood,
- chisel,
- pencil.
As a rule, all consumables required for installation (self-tapping screws, anchor bolts, nails, hinges) are included with the finished door. If they are not in the set, then you should take care of their purchase in advance, as well as the handle with a lock and platbands.
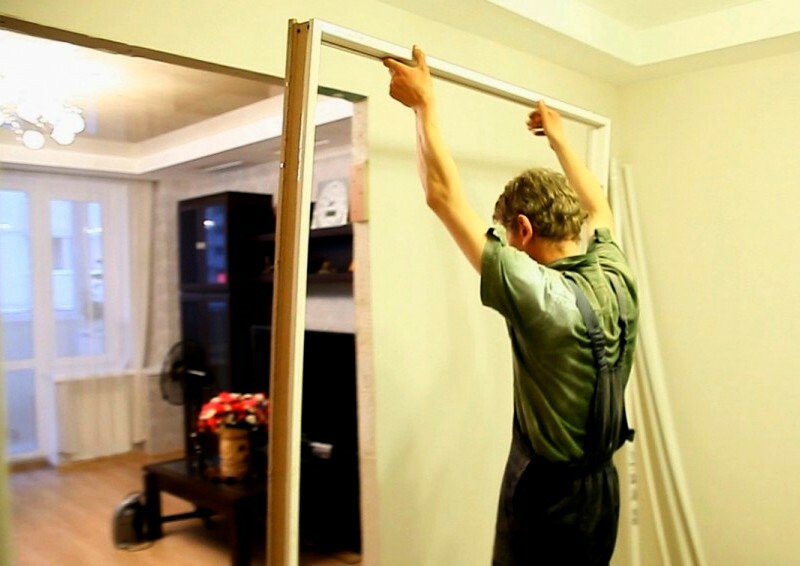
An example of installing a door frame in an opening: if the frame is mounted without a door and a threshold, then at the bottom its width is fixed with a rail or a spacer bar
You may need extras if there is a difference in the thickness of the wall of the doorway or if the opening is too wide.
Also prepare some spacer wedges, foam, a few pieces of cardboard or fiberboard to fix the gaps.
Stage # 2 - measuring the doorway
First you need to decide in which direction the doors will open. They are installed so that the canvas goes into the room. The exception is the doors to the bathroom, the bathroom due to the small space and the likelihood of accidental blocking. Where the doors open depends on where the hinges will be placed.
In order to buy doors of the right size, and then install correctly, you need to accurately measure the doorway. Please note that it must be at least 120 mm from the corner. This is necessary in order to then close the joint between the box and the wall with a platband, leaving room for the corner of the baseboard and its plug. If the part of the wall from the corner to the doorway is smaller, then it needs to be built up with a bar or board.
Door leaf size standard:
- height - 2000 mm,
- width - 900, 800, 700, 600 mm.
To determine the desired size, it is necessary to add two thicknesses of the side element of the box to the width of the door leaf (this is about 100 mm) and still have a small gap of 20 -30 mm. That is, if the opening is wider than one meter, then it needs to be increased.
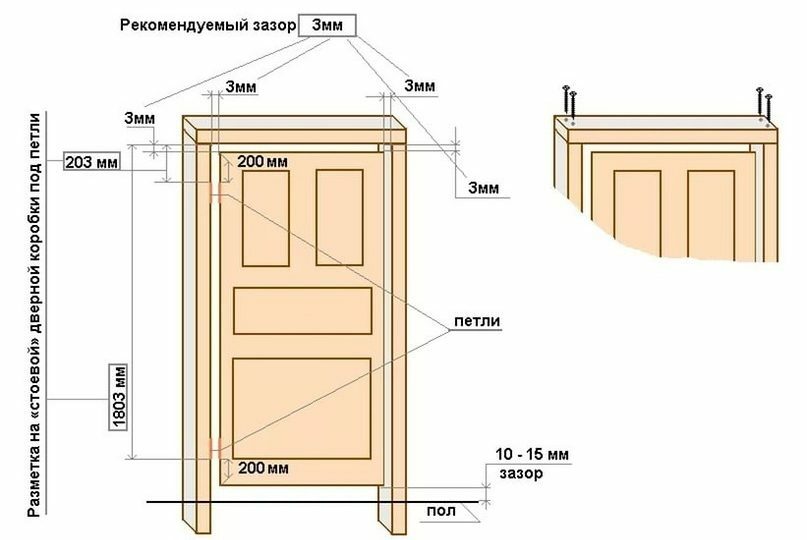
The diagram shows the main parameters of the door frame and door, the optimal width of the gaps, the location of the hinges, the fixing points of the self-tapping screws are shown
If the opening is narrower than the box, then you will need to reduce the thickness of the vertical rack. This must be done on the wrong side where you plan to place the hinges, since the load on it is greater. In any case, the thickness of the vertical rack of the box should not be reduced by more than one and a half centimeters. The vertical height of the opening should be 2000 mm + 60 mm.
Using a level, it is necessary to check the horizontal level of the floor surface. In the opening, two points are marked on both sides and the measurement is made to the floor level. A difference of more than 3 mm is undesirable. According to these measurements, the box racks will be trimmed.
It is worth considering one more point: if the doors are purchased in advance, and the openings are perfect, then there will be no problems. In the case of narrow openings, they will have to be expanded. This is a very dusty job, you need to measure the openings in advance and, if necessary, do all the dirty work until the finish is complete.
Stage # 3 - installation of locking fittings
In interior doors, a handle with a latch lock is often installed. It can be rotary or push-on, but this is of no fundamental importance for installation.
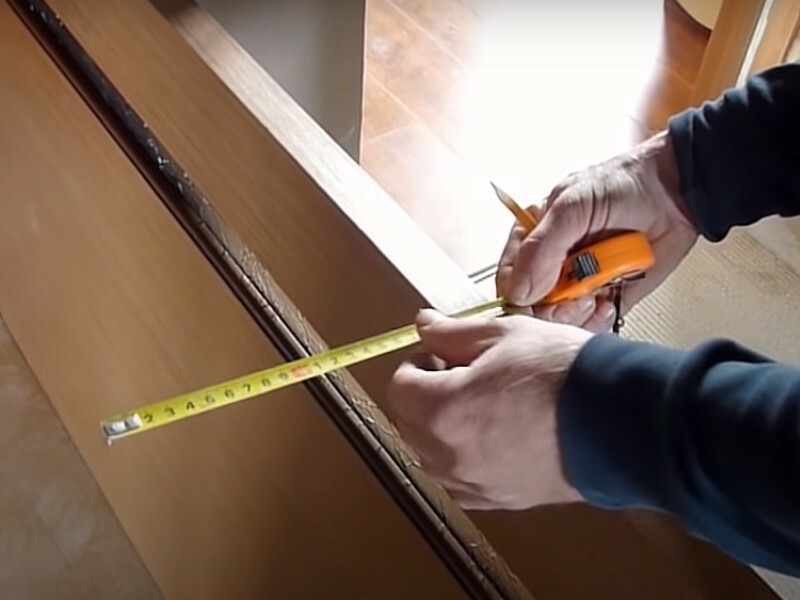
Fittings can be installed at the end of the door installation process. It is more convenient to do this while the canvas is on the floor: it is easier to do all the work this way by holding the door vertically on the side
Consider step by step the stages of inserting a lock:
- From the lower end of the door we measure the distance 1000 mm and make a mark.
- Lay down the size of half of the face plate of the lock and mark the lower and upper points.
- Having measured the width of the door, we subtract the width of the front plate of the lock and divide the remainder in half. It is for this value that you need to retreat from the edge of the door leaf so that the lock is exactly in the center.
- We put the lock face down again and drill the holes for the screws. We screw in the screws, but not completely. It is necessary to temporarily firmly fix the lock in order to circle it with a pencil with a firm hand, and then make a circular incision with a clerical knife.
- You can also use a pencil to mark the top and bottom of the front plate of the lock on both surfaces of the canvas.
- We remove the screws and the lock. Carefully remove the veneer or laminate.
- We mark the width of the lock by placing it sideways.
- We measure its thickness and mark on the end of the door a rectangle corresponding to the size of the invisible part of the lock.
- For recessing under the lock, we drill holes in a checkerboard pattern with a medium-sized drill.
When making a recess, you need to try not to protrude beyond the border, which we marked under the lock. With the help of a chisel and a hammer, we select everything that is unnecessary. We periodically try on the castle.
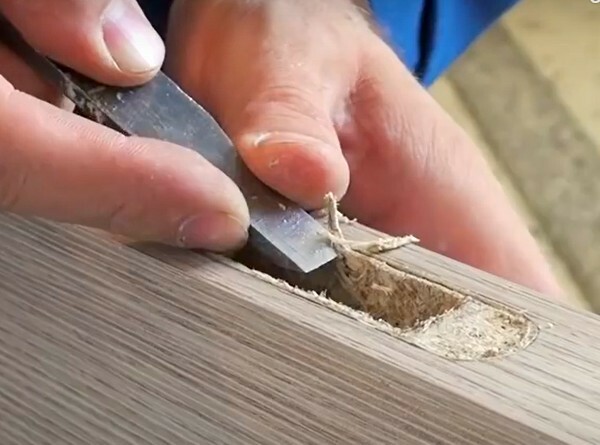
After the hole for the lock has been sampled, the excess is removed for the front panel. It should be flush with the end surface
To make a hole for the handle:
- We apply the lock to the side surface of the canvas, correlating its position with the marks already made earlier.
- We mark the position of the handle on both sides of the canvas, check the accuracy of the mark with a tape measure.
- We put a piece of MDF or a wedge into the niche under the lock and make holes on each of the two sides with a drill of a suitable size, you can also take a "feather" drill.
Next, it remains to insert and secure the lock. We do not mount the handle at this stage. The hole for the lock tongue can be made on the vestibule after installing the box in the opening.
Stage # 4 - collecting the door frame
Consider the option of assembling a box and installing a door without a threshold. Doors and door frames made of wood or MDF come to the retail network already adjusted in size.
To properly mount the door and frame, the uprights must be cut. Their length should be more than the length of the door leaf by about 15 ± 2 mm. To assemble the box, the parts must be laid out in a U-shape, with the porches up. The upper part, 20 mm less than the opening, is placed on top of the racks. If the crossbar exceeds the width of the opening, then the excess can be cut off after the box is assembled.
The door must be placed in a box, leaving a gap of 3 mm on the side of the lock and hinges, respectively. Gaps can be fixed with pieces of cardboard.
The connection of the vertical elements of the box with the horizontal upper crossbar (lintel) can be done in two ways.
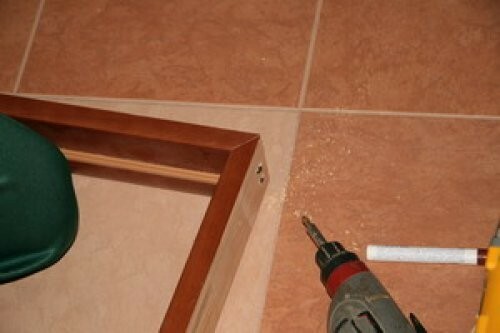
A more complex, but aesthetic option for fixing the corner of the box, which requires experience: the end cuts are made at an angle of 45 °. For accuracy, you need to use a miter box
The connection is fixed with self-tapping screws 60 - 80 mm with anti-corrosion anodized coating. Pre-drilled holes for them. The drill for this operation must be taken with a diameter ¼ smaller than the diameter of the fastener. This rule must always be observed when using screws when installing the door.
The holes are not made to their full length and perpendicular to the oblique cut, that is, the angle of entry of the screw into the surface of the rack should be 45 °.
Since the connection will then be almost completely hidden by the casing, it is easier to make it end-to-end. Some craftsmen attach the upper bar between the posts.
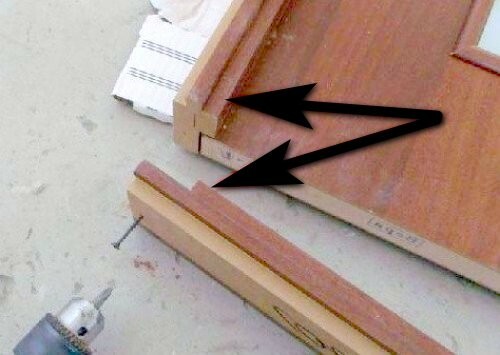
It is recommended to fasten the top bar end-to-end on top of the posts: in case of an error with dimensions, this is not so critical than if the bar is between the posts
On the upper bar under the side bars, you need to make two saws from the edges. Depart from the edge by a size equal to the thickness in the wide part of the box elements, and draw a line.
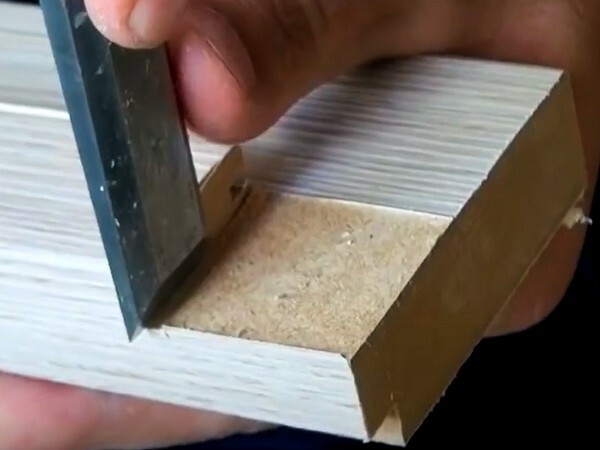
According to the mark, you need to remove the thickened part of the bar, making it flush with the thin one. Do the same with the second side, removing the excess thickness at the junction with the rack
Next, the lintel must be attached to the uprights with two screws on each side. But before that, it's worth checking all the measurements again.
The distance along the inner surface of the lintel from the hinge to the raised post should be equal to the width of the door + 6 mm for two gaps on the sides. To fix the lower part of the door frame without a threshold, a strip is nailed in those places where the platband will subsequently close the holes left over from the nails.
Stage # 5 - inserting door hinges
Before fixing the block in the doorway, you need to cut in the hinges and install the lock, hinges on the door. There are hinge models that, when closed, are nested within each other. In this form, their thickness is 3 mm, that is, the size of our gap between the door and the frame. No deepening is made for such models.
For another type of hinge, you need to make a deepening on the surface of the door and frame. First, we cut them into the door, for which you need to measure 200 mm from the upper edge, attach a loop to the side end with a cylinder close to the edge of the corner, mark the holes with a pencil and drill.
You can put a hinge on the door, drill one hole, fix it with a screw, and then make others. So the loop will not move, and the screws will sit more accurately. But so far they do not need to be screwed in to the end.
We carefully outline the loop with a pencil and then also cut along the contour with a clerical knife. If this is an MDF door, then we try to go through the laminate or veneer film. Remove the loop, carefully remove this layer. If somewhere it was cut badly, then we go through the pencil mark again with a knife.
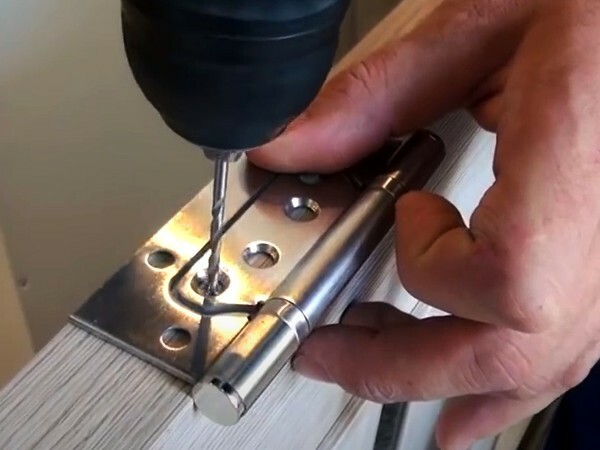
The holes must be made with a drill of a smaller diameter than that of the screws supplied with the set of hinges. If you take a drill of the same diameter, then the doors can then fly off the hinges, since the screws will not hold well
Next, use a chisel to make notches with a depth of 3 mm - this is the thickness of the hinge panel. The notches are made along the length of the loop, the width between them should be narrower than the chisel. We make a selection with the tool. It should be carried out carefully and carefully so as not to damage the coating around. With careful blows of a mallet or hammer on the chisel, we separate layer by layer.
Removal of layers with thin shavings should be done only along the length of the door or pillar. You need to be especially careful in the corners. In the process, you need to apply a loop to the notch to check for accuracy.
This process is repeated in the lower part of the door, also backing 200 mm from the edge of the end. When we outline the hinge with a pencil, then you need to put marks on the door leaf, so that you can then transfer them to the side of the box. If hinges with a one-sided cut are used, then mark the ends of the cylinder. After that, attach the second part of the hinge without choosing a place for the groove.
Unscrew the half-tightened rack, remove it and attach it to the door, not forgetting that its upper inner part should be 3 mm longer than the door - the width of the upper gap. We transfer the hinge marks to the bearing rack. First, we drill a hole and fix one screw, check the accuracy of measurements, then we fix the entire loop completely. For the overhead hinges on the side stand, you do not need to make a recess. We repeat the same with the second.
For flag-type hinges, you must also prepare a place for fastening, as well as on the door. We fix the hinges on the rack and the door.
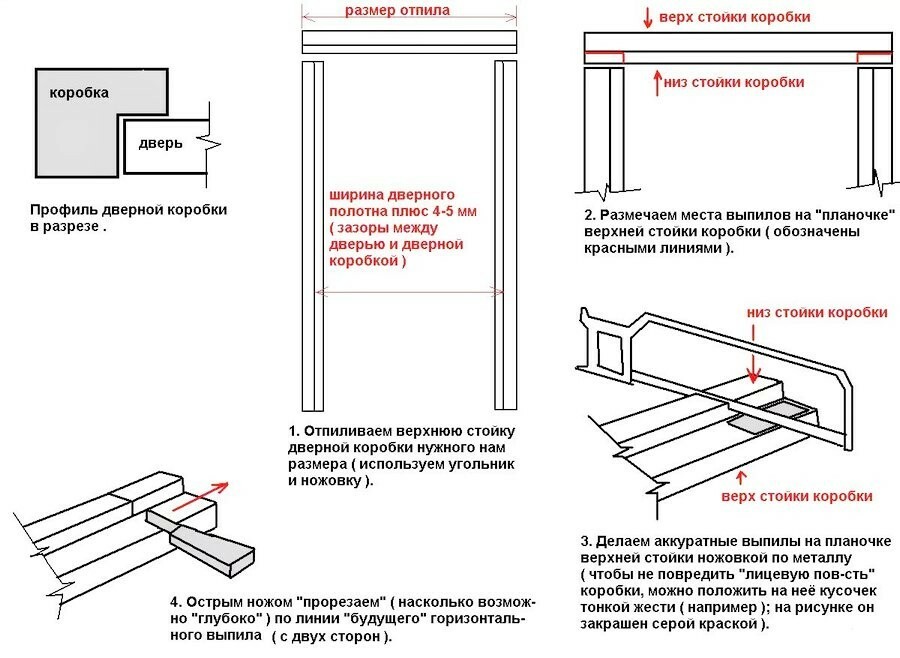
A visual diagram of the step-by-step assembly process of the box. It is shown how to correctly make a wash on the upper bar. But first, the knife cuts through the line.
Before installation in the doorway, we re-assemble the box, tightening the screws to the end, not forgetting to set the gap clamps.
Stage # 6 - installation of the frame and door in the opening
Way fixing on anchors and foam
Sometimes, for greater reliability, especially if the doors are heavy, made of solid wood, the frame is first fixed without a door using anchors. They are placed under the plate of the lock striker and in places where they will then be closed with hinges.
First, you need to note where the anchors will enter the wall opening and make holes there. Then the box is inserted, secured with anchors, without tightening them to the end. Level the box using a long rule. Adjust with wedges. Carefully check the adjustment in the corners.
Tighten the anchors to the end. Then the doors are inserted, spacers are inserted between them and the lintel, with vertical uprights. If only a box without a door is installed in the opening, then 3-4 spacers must be placed in it, placing cardboard or cloth under them so as not to damage the surface of the stands.
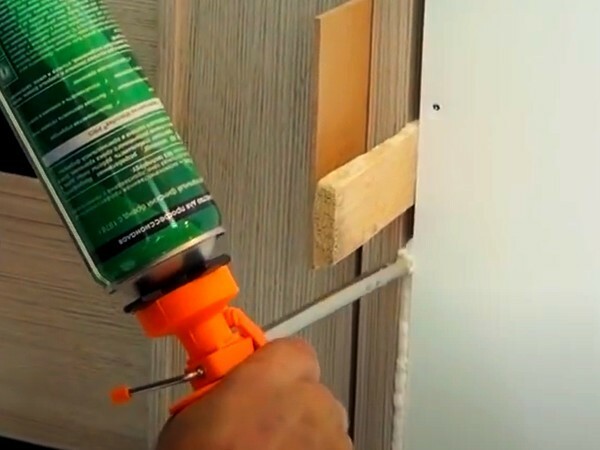
The process of filling the gaps between the door frame and the wall opening with mounting foam: the gap between the opening and door frame, which according to the rules should be within 15-20 mm, foamed by 2/3 continuous outline
Fixing option with polyurethane foam
In order for the entire structure to hold tightly in the opening, good quality polyurethane foam is sufficient. In this case, we first assemble the box again, fixing the screws all the way. Do not forget to insert cardboard between the canvas and the box to maintain distance gaps.
We insert the box together with the door into the opening. We expand it with wedges from the upper plane of the opening and from the sides. At the top, it is important to install necessarily two wedges directly above the posts. We check and level all vertical and horizontal planes using a level.
There should be a space between the opening and the box: from the end of the wall to the box, a gap of 5 - 30 mm is allowed. This gap is filled with polyurethane foam. In this case, it is better to move from bottom to top. Large cavities do not need to be filled to the end, as the foam will increase in volume. In the process of foam hardening, the door should be closed, and the spacer boxes should be between the box and the door to maintain gaps.
If you do not know how to use polyurethane foam well, then the surface near the place of foaming can be pasted over with masking tape. In order for the foam to dry well, it is better to postpone the rest of the manipulations until the next day, when it will be possible to fix the lock striker and make a hole for the lock tongue.
Stage # 7 - installation of the handle and the counter panel of the lock
When the structure is tightly fixed, you can make a hole for the latch of the lock, fix the counter panel. This is done in the same way as installing the lock. In this case, it is not necessary to observe special accuracy when drilling a hole for the latch in the rack.
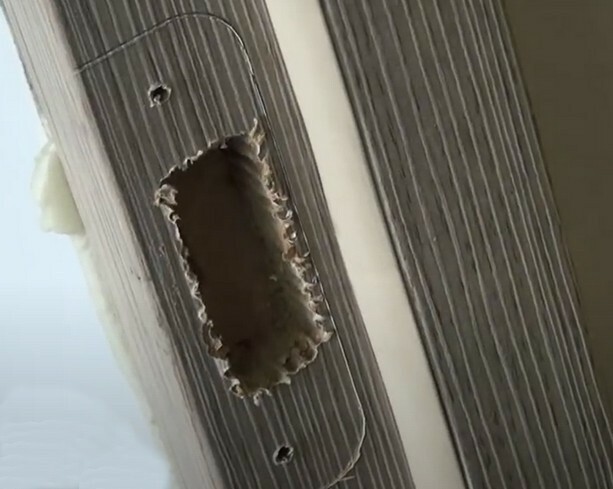
To install the strike plate of the lock on the vertical rack of the box, holes were drilled for screws and a recess for the latch was made using a chisel
Next, you need to fix the handle to the door, first on one side, then on the other.
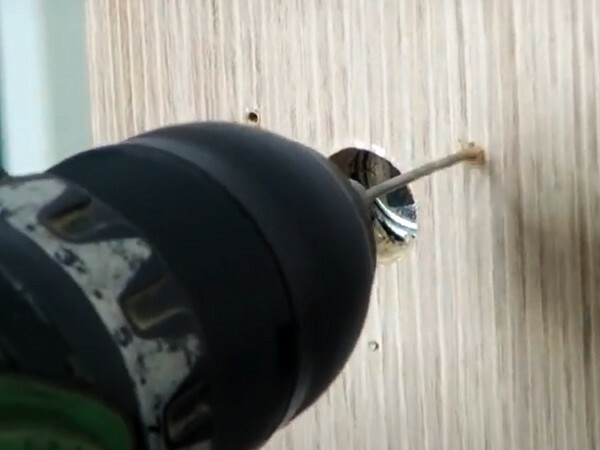
To attach the handle with a thin drill, we drill holes for self-tapping screws at the points marked in advance
The handle is installed according to the instructions supplied with the specific model.
Stage # 8 - installation of platbands
To hide the junction of the box with the wall, platbands are installed.
You need to carefully measure. First, we apply the bar where there are loops and measure the distance that will be visible from the platband to the border of the rack. Suppose that this is 4 mm, which means that 4 mm should be marked along the entire perimeter and a line should be drawn.
We make measurements for the platbands and cut them with a miter box at an angle of 45 ° to the size of the opening. First we attach the upper platband, then the vertical ones.
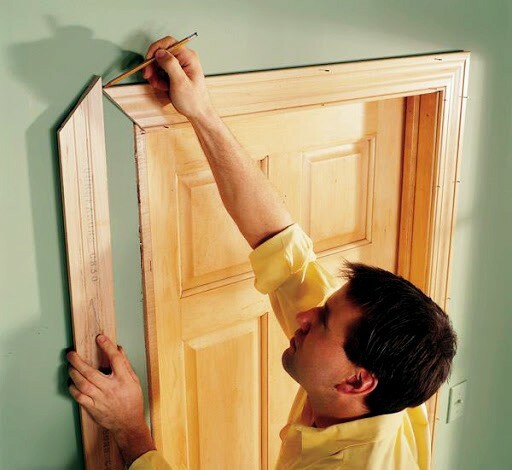
You can fix the platbands on liquid nails, but then you will need to support the parts with a rail. It is better to do this with carnations, picking them up by color.
If the thickness of the wall is much greater than the thickness of the box, then we install the door, aligning it along one wall, where the hinges go. Platbands are mounted on this side.
On the other side of the door, extensions are installed on the butt end (strips of the same color with the door frame). The ends of the wall and the upper part must be measured and cut out according to the measurements obtained, door strips (extensions), considering that their edge will go beyond the wall by 1 mm and to enter the groove of the rack, you need to add 2-3 mm. The cut edge should face the box.
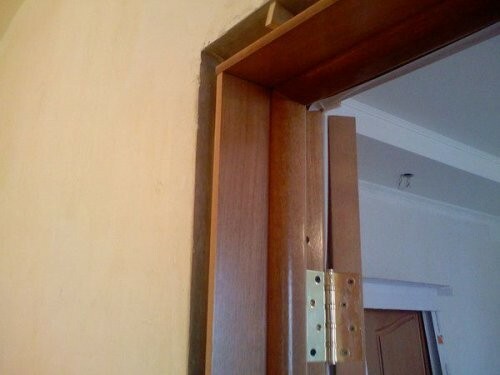
Completion elements are leveled with wedges and fixed in several places with a small amount of polyurethane foam. Excess foam can turn out the extensions.
After fixing the door strips, the platbands are mounted around the opening.
Installation of a door and a frame with a threshold
Interior doors with a threshold are usually installed at the entrance to the toilet and bathroom. The installation steps for a door frame with a threshold are almost the same as for the version without a threshold.
In addition to two vertical struts and a horizontal upper crossbar, you need to prepare a horizontal beam for the threshold. Its dimensions are equal to the width of the canvas, plus twice 3 mm for the gaps, plus two thicknesses of the box bar.
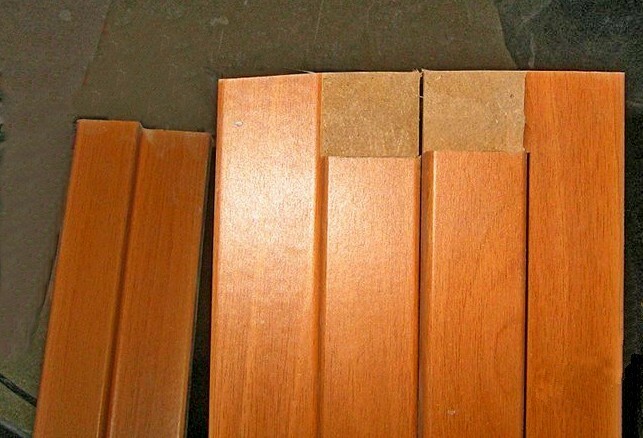
When preparing the threshold, like the lintels, for connection with the posts, the excess thickness of the timber is cut.
The collection of the box takes place in the same way as described earlier, only at the bottom a threshold is attached to two self-tapping screws on each side. It should be noted that the threshold is always attached to the posts at an angle of 90 °. It is fixed to the floor with self-tapping screws or liquid nails.
If there are elevation differences between the room and the corridor at floor level or the border between different floor coverings is visible, then this joint must be closed with a special sill. They come in many shapes and colors. Fastened to the floor with screws or silicone.
Conclusions and useful video on the topic
Video instruction on how to assemble a door frame and install the door:
Tips from professional craftsmen for installing the box and installing it separately from the door:
The recommendations and step-by-step guide given in the article will help you correctly, avoiding mistakes, to assemble the door frame, install the fittings and mount the door structure into the opening.
In this matter, it is important to be accurate in measurements and calculations, slowly and accurately perform each stage of work, then the doors will serve regularly for many years.
Do you have experience in installing doors with or without a threshold? Share it with other visitors to our site - tell us about the difficulties you encountered in the process. The feedback form is located below. Also here you can add original photos of the self-installed door, ask questions to our experts and other site visitors.


