It is not always advisable to buy expensive equipment for organizing heating in a rarely visited dacha, bathhouse or small house. It is especially unreasonable if the suburban property is not constantly supervised and a burglar alarm is not installed. What if heating is still required from time to time?
A home-made gas boiler assembled from improvised materials or used household appliances will quite successfully cope with heating. A device made by one's own hands can become the pride of the owner. The construction of a gas-powered structure will help to show skill.
The article we have proposed describes in detail the steps for assembling and upgrading gas units that can adequately heat private buildings. We have given as examples the most popular, proven homemade options. Our advice will ensure success in a difficult task for home craftsmen.
The content of the article:
- Is it worth it to design a gas boiler yourself?
- Manufacturing process of atmospheric gas burner
- Installing a gas burner in a solid fuel boiler
-
Options for homemade gas boilers
- # 1: Homemade based on a gas column
- #2: Gas Stove Device
- #3: Making a pyrolysis boiler
- Conclusions and useful video on the topic
Is it worth it to design a gas boiler yourself?
Let's start the analysis of the options for making a gas boiler with our own hands with the fact that the fuel they process belongs to the category of toxic and explosive substances. The gas is highly flammable. The slightest miscalculations in the design and implementation of homemade products can result in serious damage, damage to health, loss of property.
Therefore, we do not recommend developing a model of a gas boiler for people who do not have a technical education with a specialization in the design of gas equipment. Yes, often experienced gas workers will not take on such a project.
Image gallery
Photo from
Gas is a popular type of fuel, attracting with its availability, budget rates and minimal damage to the environment. However, with illiterate operation and violation of safety rules, this is the most dangerous type of fuel for boilers.
If you exaggerate to imagine the design of a gas-fired boiler, this is a gas burner installed in a steel or brick case. It is located under the heat exchanger through which the coolant runs, most often water
In the simplest scheme, a metal tank is placed on a gas burner or in its zone of action. The pipes for supplying the coolant to the heating and return devices are connected to it.
The body of a home-made gas boiler can be a used gas cylinder, a thick-walled metal barrel, a brick or metal stove freed from the ash pan and grate
Atmospheric gas burner flame
Installation of a gas burner in a steel case
Heating water in a metal tank
Gas boiler from a used gas cylinder
The optimal solution is quite reasonably considered:
- Converting a solid fuel model into a gas boiler by installing a gas burner in the firebox;
- Improvement of an obsolete, but operable unit with a focus on use in a heating circuit. Complementing the factory model with devices for heating and stimulating movement coolant;
- Production of a pyrolysis boiler - equipment that generates gaseous fuel as a result of the processing of solid fuels at the initial stage. At the secondary stage, the gas released during the combustion of firewood is burned in an additional firebox.
If you still have a desire to thoroughly study the issue and invent a version of a homemade gas boiler for an autonomous heating device in a private house, get ready for a literal “walking in agony." You will have to obtain permissions and confirmation of the safety of the invention in a number of state supervisory authorities.
An independent folk craftsman will need:
- Check the boiler for compliance with safety requirements, and then receive a confirming or refuting document.
- Obtain permits from GosTekhNadzor, Fire Inspectorate of the Ministry of Emergency Situations and GorGas.
- Apply for a patent and certificate, allowing manufacturing in a single or in-line execution.
This, albeit not numerous, but rather impressive list is able to discourage the desire to invent from any national docks. However, he will not be able to extinguish the desire to modernize the existing unit by installing factory-assembled burner modules. The improvement easily combines operational safety with increased efficiency.
The most important working body in gas equipment is the burner. Installing it will turn any boiler into the type of coolant and hot water heater we need for sanitary purposes.
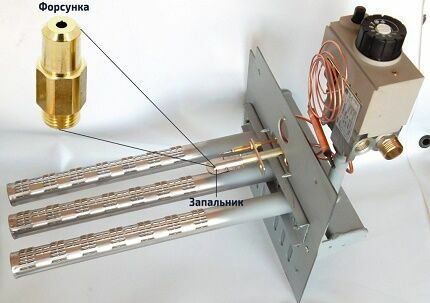
A lit igniter heats the working part of the thermocouple, which eventually begins to generate current. The charge enters the gas valve coil, it acts as an electromagnet and magnetizes the washer, blocking the gas path
Depending on the method of supplying the combustion air required for combustion, burners are divided into two main groups:
- Atmospheric. They are installed in open combustion chambers. atmospheric boilers. In them, air is freely drawn from the room in which the boiler is located.
- Fan (they are blown). Such models are equipped with closed combustion chambers, into which air is forcibly injected with its capture on the street. They require a coaxial chimney and a fan to remove flue gases.
Blow designs are too complicated for home creativity. They are easier and cheaper to buy. After all, purchasing all the adjustment and safety devices for the operation of a fan burner can be more expensive than buying a module ready for installation.
Image gallery
Photo from
According to the type of operation, gas burners are divided into atmospheric and fan. They are sold in the form of blocks prepared for installation with control and security systems.
In atmospheric burner blocks for gas boilers, there are from 1 to 4 (or more) burner manifolds. Burning power depends on how many collectors are currently involved
On the front panel of the atmospheric burner unit, there must be holes for air to enter the combustion chamber
Blast burners equip closed combustion chambers of turbocharged boilers. They are safer to operate, but much more difficult to implement.
You can adapt an old-style burner for installation in a home-made gas boiler, if it is not damaged, not clogged and the gas supply channels are tight
Of course, it is better to install a new gas burner with adjustment and security systems in a home-made gas unit
A simplified version of the burner block involves the supply of gas to the combustion chamber through slotted nozzles. There it mixes with air, as a result of which it burns and heats the heat exchanger.
In atmospheric burners with round and slotted nozzles, the pressure of the supplied gas is practically not regulated in any way. however, this is the easiest option for making your own burner
Front side of the burner block
Block for a gas boiler with two burners
Atmospheric unit installed in the furnace
Blast gas burner for closed chamber
Cast iron burner from end-of-life equipment
Round gas burner with copper jets
Gas block with slotted nozzles
Round nozzles of the gas burner block
It is also desirable to purchase an atmospheric burner, but you can make the simplest variety with your own hands. Below we will consider how and from what it can be assembled.
Manufacturing process of atmospheric gas burner
An atmospheric type burner is easier to build, since it is structurally much simpler than a fan counterpart. The most characteristic and well-known example to most Russians is the burner block in old-style gas water heaters. There are no energy-dependent elements in its design that force gas and air to mix in the required proportions.
Air is automatically drawn into the chamber with the atmospheric burner module as needed. Blue fuel processing products are excreted naturally through standard chimney due to traction. All work consists in the construction of a collector with gas nozzles through which gas will flow at the desired speed.
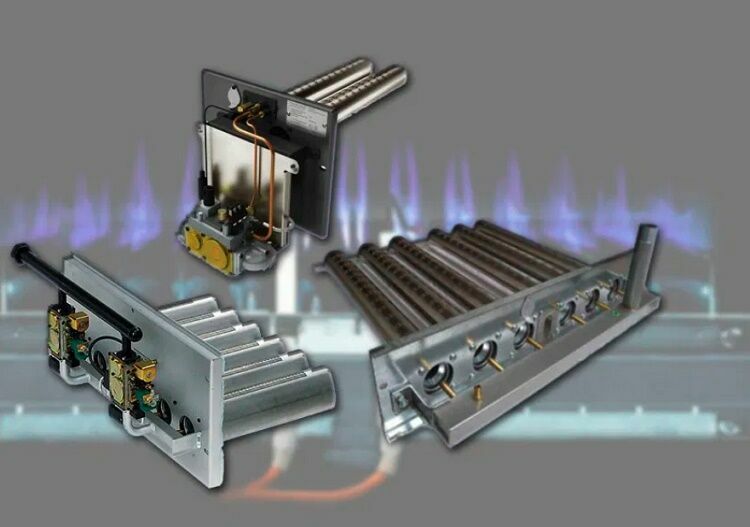
If you want to build a gas burner with your own hands, it is better to take factory products as a basis production, more precisely, the drawing in its data sheet with dimensions and designation of structural elements
To make a burner for equipping a gas heating boiler with your own hands, you will need:
- Valve series VK-74. Usually used on oxygen cylinders, designed for a maximum pressure of 20 MPa. The kit should include a 3/4″ union nut, with which you can tightly connect to the gas supply pipe or hose. The valve will serve as a support base for fixing the nozzle.
- Nozzle cap. The device will hold the gas supply dispenser and form a narrow jet. At the top of the cap, a hole is drilled into which the nozzle is to be placed. The base is screwed onto the valve.
- Nozzle. It is better to buy it ready-made with the expectation of supplying main gas or a liquefied gas mixture. Nozzles have different outlet diameters. Instead of nozzles for boilers, you can use a jet from a gas burner.
- Homemade injector. It is constructed from a steel tube with a wall thickness of up to 2 mm. You will need a piece of pipe about 10 cm long.
- Piezoelectric element. Installed at will, although you can do without it. Homemade can be set on fire with matches.
All of the above elements are assembled mainly by welding. Because the initiative "homemade" skills and minimal knowledge in welding are very useful. However, where it is possible to use a thread, it should remain a priority.
The gas supply channel must be impeccable and tight, because safety depends on its condition. Between the gas inlet to the device and the nozzle, a distance of 10 cm must be maintained, which is necessary for mixing the fuel with air.
Image gallery
Photo from
It makes sense to make even the simplest atmospheric burner with your own hands if it is needed to equip a boiler of non-standard sizes
In homemade gas burners, the combustion process is actually not controlled in any way, there are no flame interruption devices in case of a risky situation.
In addition to the need to constantly monitor a homemade gas boiler during operation, it is still difficult to adjust the gas flow. To some extent, this problem will be solved by the gearbox at the outlet of the gas cylinder
A significant disadvantage of atmospheric burners is the combustion of oxygen in the room where the equipment is located. Given that the work of homemade products must be constantly monitored, this is not safe for the health of the owner.
Large gas burner
The combustion process of a gas burner
Ignition of the atmospheric burner block
Burning oxygen in the room
It remains for the home master to figure out how to fix a home-made gas burner in the combustion chamber of an old column or in the firebox of a former wood-burning boiler. It should be noted that for the flow of air you need to leave the opportunity. Air must regularly enter the chamber, for which round or longitudinal holes must be cut in the door.
Do not forget that the above option can hardly be called a safe gas supply device. There is no automation in the design that interrupts the operation of the boiler in the event of blowing out or an unstable flame. The owners will not have the opportunity to adjust the pressure and flow of gas, therefore, there can be no talk of convenience or savings.
Installing a gas burner in a solid fuel boiler
After common sense and a real assessment of their capabilities, most home craftsmen still prefer modernization solid fuel boilers, previously processing firewood or coal. They simply put a factory-made gas burner in their firebox.
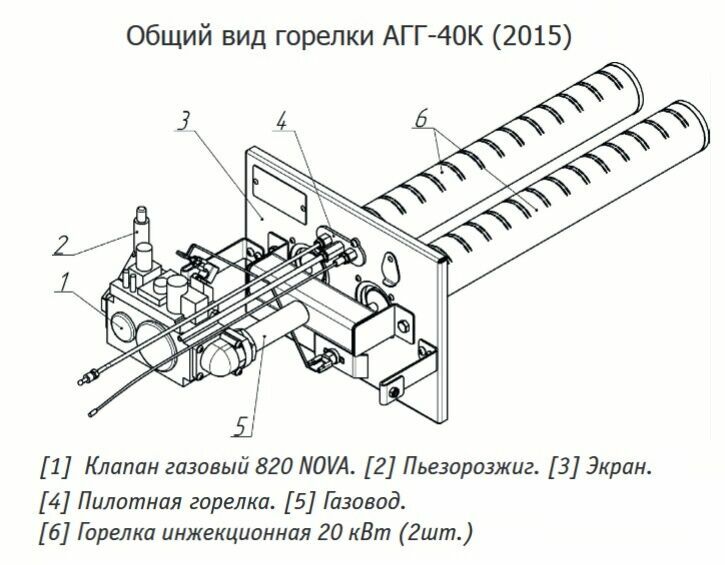
For the arrangement of suburban property, you can purchase a solid fuel unit, which can be converted into a gas one. For example, the Teplodar stove, in which a gas burner is mounted
Consider the installation steps of the burner brand Teplodar AGG:
- Dismantling the firebox door, ash pan damper (or the ash pan itself, if it is made in the form of a retractable lattice box with a monolithic door), a chipper and a grate. In short, you need to remove all structural parts located within the firebox and ash pan.
- Fixing the burner. A burner block is mounted in the firebox channel freed from the above elements. If the Teplodar stove is designed to change fuel, then the burner module is fixed in the channel through standard ears with screws and nuts threaded into them.
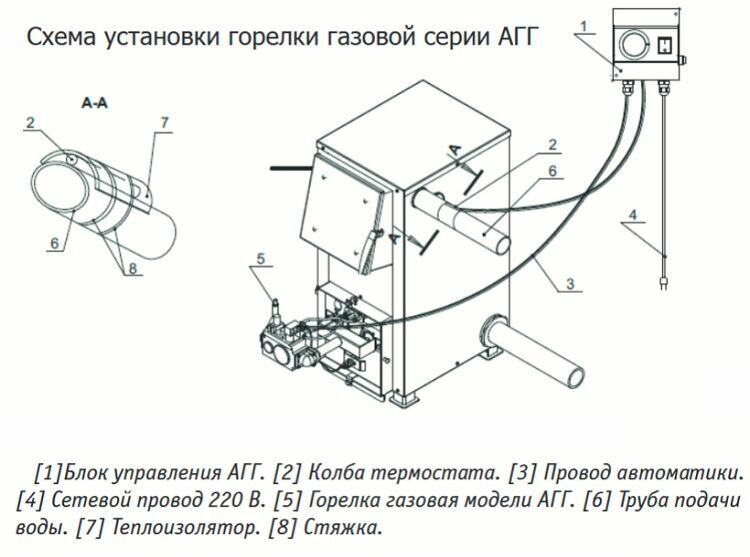
- Connecting automation to the remote control. The devices available in the design of the burner block that ensure automatic operation of the boiler are connected to the control panel.
- Mounting the thermostat sensor. It is installed on the supply pipe, wrapped in insulation to protect against external mechanical and thermal influences, and on top with ties.
- Start to work. It is carried out after checking the draft and volley ventilation of the room with a modernized boiler. With the help of a simple handle, the most suitable mode is selected.
We remind you that in accordance with the requirements specified in the “Safety Rules for Gas Distribution and Gas Consumption Systems”, all installation work equipment, replacement of burners, maintenance of equipment and connection to the network supplying blue fuel must be carried out gasmen.
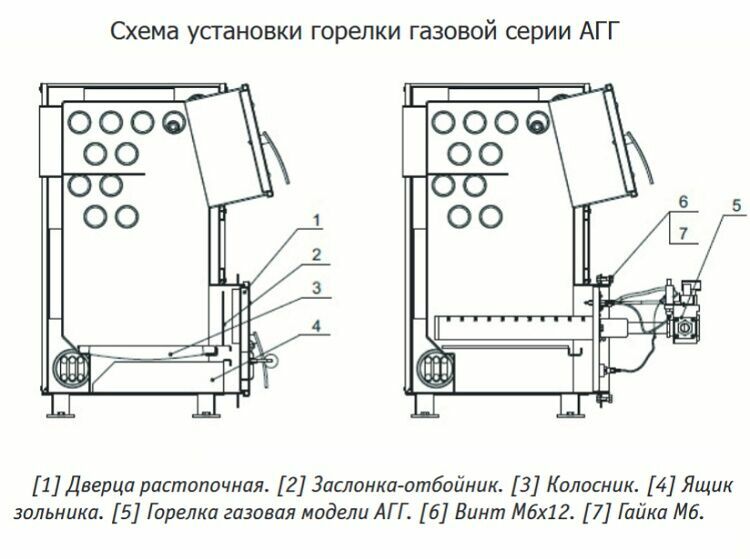
The technical documentation attached to the Teplodar stove contains a detailed description of the process of installing a gas burner for converting a solid fuel unit into a gas one.
In accordance with federal regulations and standards with representatives of the gas services, you must enter into a contract for the supply of gas and related services. It is clear that not all remote settlements will be able to be served by employees of gas organizations. However, it is desirable to adhere to the requirements in order to avoid catastrophic consequences.
With a decrease and a sharp extinction, the current coming from the electric element is weakened, as a result of which the gas supply channel is blocked. Overheating of water in the boiler is fixed by a temperature sensor, which transmits a signal to open the contact pair blocking the burner
Take risks or value and protect the health with the well-being of your loved ones? It's up to you to decide. It is wiser to refuse threatening measures, but it is very useful to know about the process of their implementation in order to monitor how well and honestly the gas workers work.
Options for homemade gas boilers
In fact, all the homemade products presented by us are the modernization of gas equipment in order to operate them as coolant heaters. We give only ideas, we strongly recommend not to take risks, but to put an atmospheric or fan burner in a solid fuel unit.
# 1: Homemade based on a gas column
If you have changed an outdated geyser to a new generation boiler with automation and a closed burner, do not rush to part with old equipment. It will also serve perfectly in a country bathhouse or garage. Improvement will not require a lot of money and effort.
The whole alteration in this case consists in changing nozzles or a complete burner block, if it is planned to burn a liquefied gas mixture outside the city. It will be necessary to buy an atmospheric burner block of the dimensions corresponding to the combustion chamber. Then it will need to be fixed inside the camera.
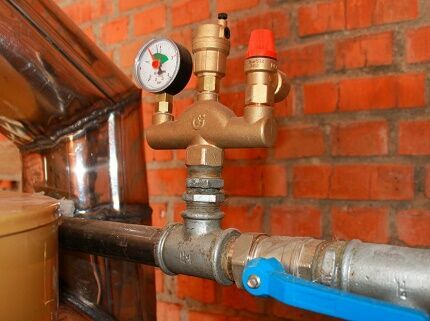
If the owner decides to install a fan burner in a home-made gas boiler, the heating circuit will have to be supplemented with mandatory functional systems. This is a security group, circulation pump, expansion tank, automatic air vent or Mayevsky taps
Those who want to install a ventilation burner will have more expenses. They will also need to purchase a security group that includes safety valve, pressure gauge and device for automatic air bleeding. You will need a small membrane tank, a circulation pump and coaxial chimney to supply fresh air to the burner and remove combustion products.
#2: Gas Stove Device
The old gas stove does not require special transformations, because. converting it into a gas boiler is simply unrealistic. You can only put a metal tank on one of the burners, the volume of which is selected depending on the bearing capacity of the plate and the volume of the coolant in the home-made heating system. Usually it is 100-150 liters.
In the lower third of the metal tank, a pipe is welded into it for connecting the return pipe, in the upper third - a pipe for connecting the supply. When heated, the water will spontaneously rise up and flow into the pipeline, which moves the heated coolant to the heating devices.
Image gallery
Photo from
An excellent basis for a gas stove-based heating device will be a multi-fuel fire source - a mobile model with an efficient gas burner
The design of a portable single-burner stove has control and safety devices. Accidental tipping eliminates the hefty weight of the cast iron burner and housing
Mobile gas stoves run on bottled gas, but can also be connected to a centralized system. Their burning power is adjustable.
Portable models with a gas burner are used mainly for preparing simple dishes in the garage or in the country. They are too powerful to heat the coolant, so they cannot be called an economical solution.
Multi-fuel fire source
Heavy cast iron burner and body
Adjusting the burning power of the appliance
Device for rapid heating of water
Such a home-made system will not need a safety valve or an air vent. Excess heated water will naturally evaporate, bubbles venting through a loose tank lid.
#3: Making a pyrolysis boiler
Pyrolysis boilers are loaded first through the top door with wood or coal. In this case, the throttle on the chimney channel is fully opened and the fan is turned on to stimulate combustion. The process at this stage takes place in the traditional mode for a solid fuel unit.
After waiting for the coal and firewood to fully flare up, the throttle on the chimney is closed to limit the access of oxygen to the place of processing of solid fuel. Due to the weak air supply, it begins to smolder, i.e. the pyrolysis stage starts - the decomposition of fuel into coals and pyrolysis gases.
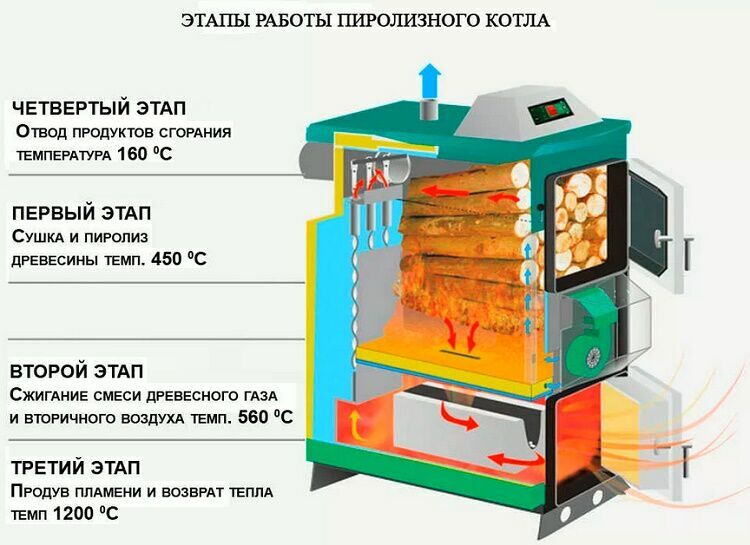
The reasonable advantage of the pyrolysis boiler is economical fuel consumption. The unit, in addition to the main type, also processes gases generated during the combustion of firewood or coal
Pyrolysis gases through the nozzle move into the combustion chamber. Heated secondary air is also injected into it, which is required for the oxidation of pyrolysis gases. Under such conditions, pyrolysis gases quickly ignite and burn at a temperature of 1100º C.
heat exchanger pyrolysis boiler they are placed above the combustion chamber of the same gases, which quickly heat the coolant flowing through the tubes. For those who want to figure out how best to make an efficient and economical gas boiler, we offer a proven pyrolysis design.
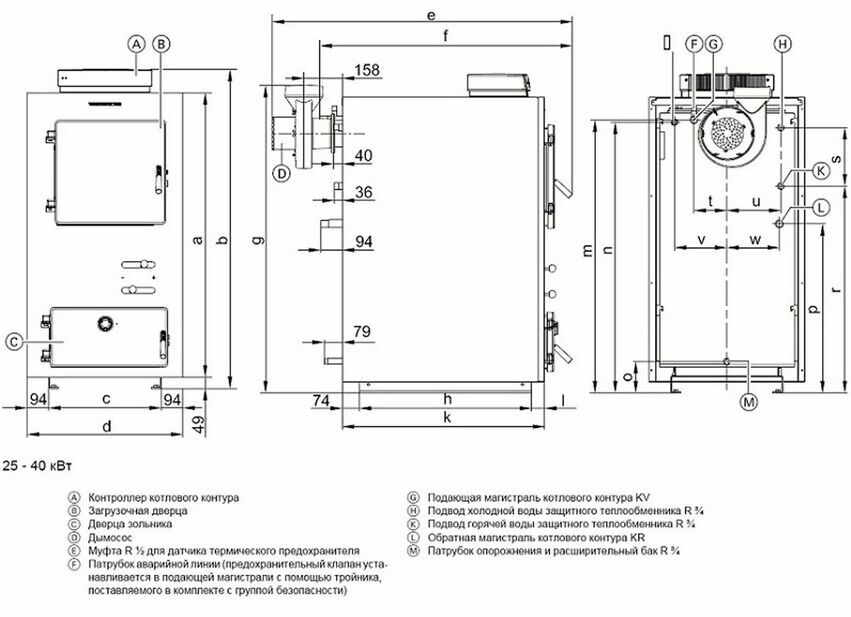
For the construction of a home-made pyrolysis boiler, it is desirable to find a scheme of a proven design in practice. Experiments in this area do not always have a positive result.
The main thing is to understand the principle of the design and operation of boilers that use the gases obtained during combustion. In each design of this type, structural elements are repeated. Well, the body can be either welded or made of a metal barrel, a large diameter pipe or an empty gas cylinder.
For the manufacture of a pyrolysis-type boiler, it is better to use an already proven development. You will need the skills of a welder and a welding machine, an inverter, a drill with a set of various nozzles and a drill for drilling large holes. You also need to prepare the usual locksmith tools and clamps.
You will need to stock up on the material, the list of which we give below:

To build a pyrolysis boiler, you need to stock up on material, an approximate list of which we provide to help independent home craftsmen
If you do not have all the tools required for cutting parts, it is better to order this business in the workshop. Without experience, and even using one angle grinder, an even cut cannot be achieved. Cutting accuracy can also be a problem.
We begin the construction of the pyrolysis boiler with the assembly of the body:
Image gallery
Photo from
Cutting materials is best done on specialized machines. It is advisable to order cutting of sheet steel at the time of purchase
First of all, we assemble the inside: firewood or coal processing chambers and gas combustion chambers with secondary air
In the gasification chamber, we weld air ducts made of a perforated channel. We weld the back panel of the pyrolysis boiler
We introduce a tube into the hole pre-cut in the combustion chamber, designed to supply secondary air. The tube with the boiler front is connected with a profile 20×20
Step 1: Cutting the material to the dimensions of the boiler
Step 2: Assembling the walls of the lower and upper chambers
Step 3: Installation of air ducts in the gasification chamber
Step 4: Entering the air supply channel into the combustion chamber
Now you need to make a heat exchanger, then install it and a throttle valve in the body:
Image gallery
Photo from
In order to correctly and securely fix the heat exchanger pipes, we drill holes 57 mm in diameter in metal plates. This work is also better to order in a locksmith shop
We assemble the heat exchanger from tubes cut according to the size. We weld them to the holes first by spot welding. Then, after checking the correct position, we scald the ends in the holes
We put the heat exchanger in the place designed for it and fix it by welding
To the rear wall of the pyrolysis boiler we weld a throttle and a pipe required to connect the chimney
Step 5: Making the heat exchanger guide plate
Step 6: Assembly of the pyrolysis boiler heat exchanger
Step 7: Welding the heat exchanger to the project site
Step 8: Mounting the Throttle
The inner part of the boiler body is assembled, the throttle device is welded. Let's check how well the welding is done by the simplest method - we light a flashlight inside the boiler and see if light penetrates through any segment.
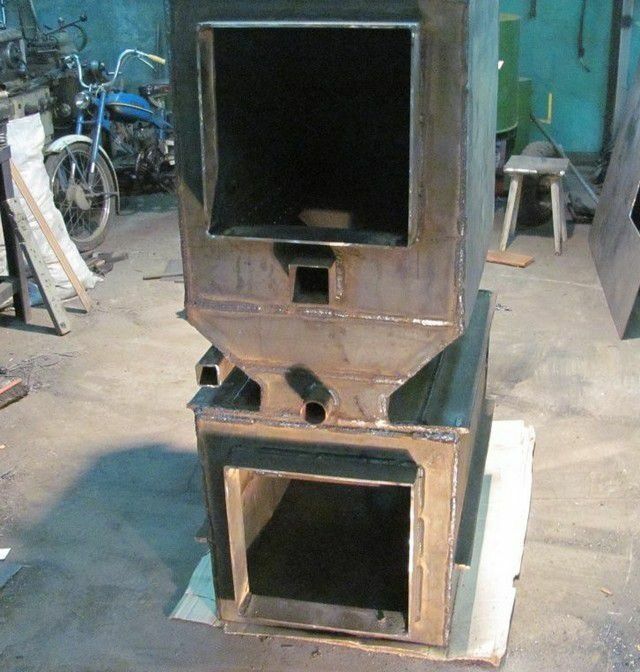
The interior of the pyrolysis boiler is ready. Now it needs to be sheathed. In the sheathing device in the model presented for example, the master used sheet steel 4 mm thick
The outer casing of a home-made boiler is produced on all planes, except for the top panel. It is welded after the installation of control tunnels, with the help of which the condition of the air ducts will be monitored.
Image gallery
Photo from
To install the outer skin, we first weld pieces of a corner with 25 mm shelves to the assembled inner part of the body
In the locations of the corners on the inside of the boiler body, we mark and drill holes
We weld the sheathing sheets through the holes to the remote corners previously fixed on the inner hull
In a similar manner, the steel cladding panels of the boiler are installed on all walls. The weld is then cleaned
Step 9: Welding the Remote Corner
Step 10: Marking holes for attaching the skin
Step 11: Welding the Skin Sheets to the Spacer Corners
Step 12: Cleaning up the welds
Now, before carrying out further work, we check the quality of the welds in the simplest way - by pouring water into the formed "tanks". After that, dry the structure and lightly clean the welded joints with coarse sandpaper or a grinding disc.
And now you can proceed to the device of control systems for the flow and movement of air:
Image gallery
Photo from
Before installing the top panel of the casing into the body, we weld the tubes - these are tunnels for the revision of the boiler air ducts. Only after their installation we mount and fix the panel from above
In order to regulate the volume of air entering the boiler by changing the position of the dampers, we install threaded studs
In order to close the chambers we make doors. We weld to them and to the corresponding holes of the loop. We hang the doors
The doors of the chambers of the pyrolysis boiler, as well as the chambers themselves, require lining and sealing. To do this, we use sawn fireclay bricks and a ceramic cord.
Installation of tunnels for revision of air ducts
Installation of threaded rods
Production and hanging of doors for chambers
Lining and sealing of doors
It remains only to complete the lining of the chambers with sawn fireclay bricks. The cut is made by a grinder with a disc for cutting stone. We refine the cuts with a grinding stone.
Image gallery
Photo from
We produce lining of the bottom and 2/3 of the walls from below in the gasification chamber. In the middle, be sure to cut a hole according to the design dimensions. It determines the power of the boiler
We weld a flange to the profile pipe located on the facade, with the help of which the centrifugal fan is fastened
With a solid brick, we make the lining of the chamber with an air supply channel introduced into it. This will improve the thermal engineering of the unit.
It is recommended to install the so-called turbulators in the gas ducts of the boiler - swirlers that slow down the movement of gases and prevent clogging of pipes
Gasification chamber lining
Installing a centrifugal fan
Chamber lining for solid fuel
Swirlers for optimized heat transfer
Before putting a home-made boiler into operation, it is imperative to check the tightness of all systems that conduct blue fuel and flue gases. To do this, the boiler is pressure tested by placing sealed plugs in the return pipes with the supply. The unit must freely hold a pressure of 3 bar.
Conclusions and useful video on the topic
The following video will acquaint you with an interesting development of a gas heater:
Gas burner device for installation in a solid fuel unit:
The design features and manufacturing process of the pyrolysis boiler are clearly presented in the video:
Homemade products useful in the household are an excellent option for solving the problems of arranging suburban property. They will provide heat to buildings that need heating, while having almost no effect on the family budget. A masterful owner will have a dacha, a garage, a bathhouse in perfect order.
It is important to remember that gas heating equipment is a potential hazard in case of illiterate assembly and violation of operating rules.
Tell us about how the boiler was made for arranging suburban property. Share manufacturing options and interesting design solutions. Please leave comments in the block below, post photos on the topic of the article, ask questions.
