Door and window slopes were traditionally formed from plaster mortar. The wet plastering process is not easy. An experienced master can cope with it. But there is an easier and cheaper option, which refers to dry leveling operations. These are plasterboard slopes.
The content of the article:
- Finishing preparation
- What tools and materials will be needed
-
Step-by-step instruction
- We cut drywall
- Foam mounting
- Putty installation
- Frame installation
- Seal gaps and design the outer corner
Finishing preparation
First of all, you need to deal with the drywall itself. Window openings are in contact with the street. This means that condensation will accumulate inside the slopes. It will not be much, because insulation will be laid here. But water droplets will still form and seep out.
Therefore, the advice is to use moisture-resistant drywall for slopes, it is greenish in color. Sheet thickness - 12 mm minimum. Drywall should be wall, not ceiling.
Now about other materials that will be needed in the process of forming slopes, as well as about the necessary tools.
What tools and materials will be needed
From additional materials you will need:
- profiles for drywall, if the technology for forming slopes using the frame method is chosen;
- gypsum adhesive composition, if the technology will be adhesive;
- mounting foam;
- sealant;
- steel galvanized perforated corner;
- primer;
- putty.
Tools:
- construction knife;
- building level;
- screwdriver;
- drill and mixing attachment to it;
- spatulas;
- chisel with a hammer.
Step-by-step instruction
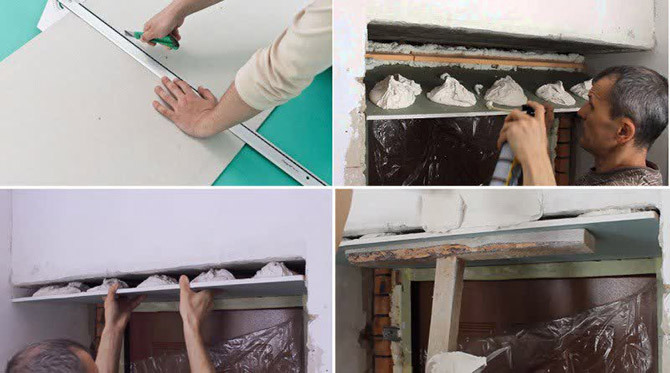
It all starts with the preparation of slopes. Usually the gap between the opening and windows or doors is filled with mounting foam. It expands in the air and bulges onto the window structures, overlapping the slopes. Therefore, the protruding mass of foam must be cut off with a knife.
To prevent a gap from forming between the slope and the window, it is necessary to cut the mounting foam so that a groove 10 mm wide and 5 mm deep remains between the window frame and the end of the opening. Drywall will be inserted into it, which will be pre-cut to the shape and dimensions of the slope.
Next comes the cleaning of the slope plane from the protrusions of the plaster or other material. Here you will need a hammer with a chisel. There is no need to regret anything, you need to remove everything superfluous.
The sloping surface is being repaired. To do this, you can use any repair composition. Even putty will do. It fills the defects of the plane, aligning it to the maximum. But before that, the slope is treated with a primer. The goal is to ensure that particles of the material from which it is made do not interfere with the repair mortar being attached to the sloping plane.
If communications, for example, a cable or wires, will be laid through a window or doorway, then this must be done right now. Before it will be laid on the slope chopped drywall.
We cut drywall
The dimensions of the slope itself must be transferred to a drywall sheet. Then a cardboard layer is cut with a sharp construction knife. In this place, the sheet is refracted with an emphasis, for example, on the edge of a table or workbench. Then the bottom cardboard layer is cut off with a knife.
The edges of the cut piece of drywall are processed to maximum evenness. There is a special tool for this operation, but you can get by with a knife.
If the slope has an intricate shape, then drywall can be cut with a hacksaw or a jigsaw. The hacksaw should have fine teeth.
Foam mounting
This technology for installing drywall slopes differs from the other 2 in seemingly minor nuances. But it depends on them how the slopes will subsequently stand.
The first thing to do is to deepen and expand the groove between the window and the window opening, which is filled with mounting foam. The drywall slope itself is cut out with a larger width so that its part goes deeper into the prepared groove. Mounting foam is poured into it before installation. And while it has not expanded, insert a slope. Subsequently, the remaining foam will be cut off with a knife.
Further, the free space between the GKL and the base surface of the window or doorway is filled with foam. The latter, in contact with air, will begin to expand. An increase in its mass by 3 times will create a serious load on the installed drywall element. From this load, the drywall rate will begin to bend. To prevent this from happening, the drywall slope is propped up. This can be done like this:
- On drywall vertically, if it is a side element, a metal profile or a wooden block is applied, you can board.
- It is supported by 3-4 bars installed horizontally so that their opposite ends rest against the opposite slope.
In this state, the slope element should stand until the mounting foam is completely dry. Usually it takes 3 hours. Next, the supports are dismantled. The installation of another vertical slope begins. The horizontal one is installed last, located above the window or door.
Before installing each subsequent slope element, the protruding mounting foam of the installed ones is cut off completely to the edges.
Do-it-yourself installation of drywall slopes is possible only if the base slope surfaces are as even as possible - without defects and flaws. Therefore, they must first be repaired.

Putty installation
It is necessary to clarify one point that concerns the adhesive composition. For example, Knauf produces a dry mix called PERFLIX. This is a pasty glue, it is universal, so it is also used as a putty. Plasterboard elements can be mounted on it. You can't use regular putty.
Step-by-step instructions on how to glue drywall with putty glue:
- The adhesive composition is evenly applied to the reverse side of the plasterboard slope in small slides.
- The surface near the window or door is moistened, for example, you can use a spray bottle.
- The slope is strongly pressed at the installation site so that the adhesive composition applied to it under pressure is distributed over the entire surface or fills it as much as possible.
- In this case, the slope element must be moved slightly from side to side. So the distribution of putty will be better.
- Supports are being installed. They can be removed after a day.
To make the installation faster, the installation is carried out simultaneously for all elements. For example, the upper horizontal element is mounted. It is propped up with the installation of props on the windowsill. Then 2 side ones with supports that will rest against the installed slopes.
Installation nuances:
- The slope is installed with an inclination towards the end of the opening. To do this, on the window sill, if the opening is a window, or on the floor, if it is a door, a line perpendicular to the wall is applied. From the edge of the window towards the room.
- The outer edge of the applied segment is shifted towards the wall by 1 cm.
- Another line is drawn from the window, connecting the vertical plane of the window with the plotted point. This will be the place where the drywall slope will be installed.
- The laser level is set exactly along the edge of the opening.
- A slope element is applied in its place.
- Laser beams will show the excess of the latter, because it is unlikely that it will be possible to immediately cut it out of the drywall sheet.
- The excess is cut off, the slope can be mounted.
Usually putty does not fill the entire space under the installed element. Therefore, mounting foam comes into play. No need to wait for the adhesive to set, you can fill the space with foam immediately after installation is completed. It doesn't have to be filled in though. Just empty zones are areas with low strength.
Frame installation
This method of decorating slopes with drywall is more complicated than the previous two, because under the sheet material it is necessary to build a frame structure from metal profiles. Therefore, this technology is used when the walls of the room are also finished with drywall sheets.
The hardest part is putting together the frame. To do this, you need to assemble a box of guides or wall profiles. They are attached to the sloped plane with self-tapping screws. Way of installation on a sidewall, instead of on a crossbar.
For example, the vertical part. Install 2 profiles vertically: one close to the window frame, the second at the edge of the opening. They are attached not only to the plane on which they are mounted, but also to each other using wall profiles. The latter are laid horizontally. And in the frame structure, they perform the functions of crossbars. One should be installed from below, the other from above, and several intermediate ones - 3-4 pieces.
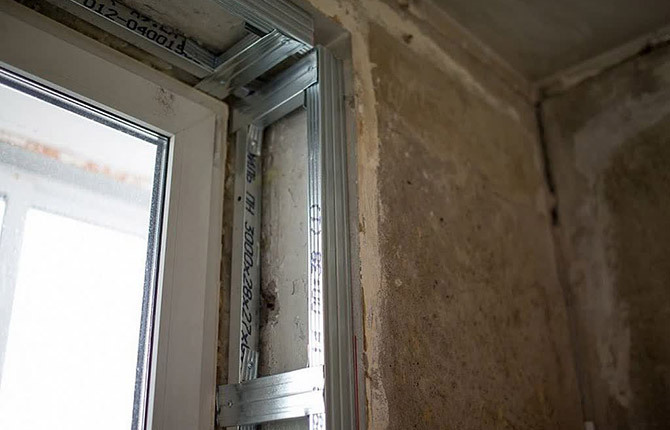
In the same way, the frame was assembled on the upper part of the opening. Usually horizontal and vertical frames are not connected to each other. This is not necessary, because the structures are securely attached to the ends of the opening separately.
Now you need to start trimming the sloping drywall element. Because not the ends, but the frame becomes the basis to which the drywall cut out element will be attached. Until it is assembled, it is useless to take measurements, and not from where.
The slopes cut out of the plasterboard sheet are laid exactly at the place of their installation and fastened to the metal profiles with self-tapping screws.
Some useful tips for using self-tapping screws:
- they are screwed in every 10-15 cm;
- screwing point - 1-2 cm from the edge of drywall;
- the hat is sunk to a depth of 0.5 cm, the recesses will be filled with putty.
The slopes of the openings of the front door and windows are insulated. This must be done after assembling the metal frame - before installing drywall. In the gap between the frame elements, a heat-insulating material is laid, for example, basalt wool or polystyrene foam boards. It is important to lay it in such a way that there are no gaps and cracks left, which will subsequently become cold bridges.
Seal gaps and design the outer corner
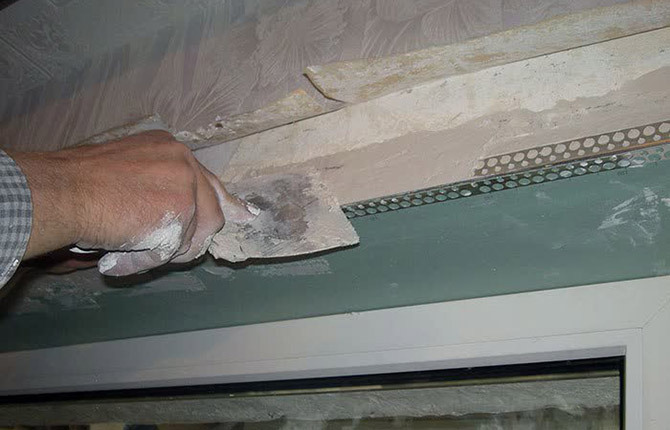
Drywall is not the most durable material, especially its edges. Therefore, they must be protected. To do this, perforated galvanized steel or plastic corners are laid on the edges.
Perforation is needed so that the putty mortar applied to the edges can freely pass through the holes of the corners, without remaining below and without creating pressure. The corners will tightly press against the edges, protecting them from mechanical stress.
It is done like this:
- putty mixture is applied to the edge of drywall, and this is usually the outer corner of the slope;
- a perforated corner is laid on top of it, which is strongly pressed against the edge;
- the putty mixture that has come out of the holes is not removed anywhere, it is leveled over the protective corner;
- if there is not enough putty, it is added, drowning the protective element in the solution.
It remains only to seal the cracks and carry out a rough finish. Everything here is done with putty. But first, drywall surfaces must be primed, preferably in two layers. The second is applied after the first has completely dried.
The putty is applied with a spatula in a thin layer, while all the cracks are closed with a solution. The main purpose of putty is to level the drywall surface, because after fixing it in any way indicated above, it will still remain a little uneven.
After the putty layer has dried, it must be sanded with fine sandpaper. Here it is important to remove small noticeable particles of the putty mixture and traces of the spatula. That is, it is not necessary to polish the surface. It would be nice to apply a primer, it will provide high adhesion of the putty to the material that will be used to finish the slope.
Usually finishing is painting. Apply water emulsion in 2-3 layers. She paints drywall better. Each layer is applied wet - no need to wait for the previous one to dry.
Another finishing option is wallpapering. Here, standard technology is used using an adhesive composition for wallpaper. There are other ways to finish drywall slopes, but painting is the best.
In fact, it is possible to form door or window slopes from different materials: laminate, lining, stone, brick, decorative plaster and others. Drywall in this regard is cheaper and easier to install. Even if some errors were made during installation, it can always be replaced with a new one. And this will not greatly affect the budget allocated for the design of windows and doors.
The only big drawback - GKL is afraid of high humidity. Even a moisture-resistant model, if it is constantly loaded with moisture, will someday delaminate. Therefore, it is important to securely close all the cracks and gaps between the plasterboard slope and the window or door frame.
If one of the readers independently made drywall slopes in their own house or apartment, write in the comments about your experience. Even the most insignificant useful tips will be interesting.


