In the summer heat, after working on the beds or active games with children, nothing beats the freshness of a summer shower. A small neat building on the sun patch or just a compact fixture on the wall of a country house is a temporary substitute for a bathroom.
We will tell you how to build a summer shower with your own hands. In the article presented by us, all types of structures that are popular among gardeners are described in detail. Provides instructions for the construction of self-made shower stalls that increase the level of comfort of suburban life.
The content of the article:
-
Popular summer shower designs
- Shutter on the metal frame
- Light wooden structure
- Capital building with tank
- Two-section facility with toilet
- Open options without fencing
-
Instructions for the construction of the soul
- Choosing a place on the dacha
- Drafting and drawing
- Preparation of tools and materials
- Build a wooden structure
- Installation of watering can and crane
- Conclusions and useful video on the topic
Popular summer shower designs
The shower device for the garden, which is usually installed near the wall of the house or at some distance from the building, is quite simple. Usually it comes down to a set of “volumetric tank + tap watering can”. The tank is mounted on the roof of a light structure, and the watering can should be no higher than at arm's length.
But we will move away from the primitive structures of the summer shower and consider various models that differ in both the external design and the method of water supply.
Shutter on the metal frame
A simple and budget solution - a product of frame type. It is a metal frame, in the upper part of which is mounted a water tank. Capacity can be made from barrels, but factory models are most often initially equipped with a flat tank of 100–200 l.
Water enters the tank in two ways: pumped from the water supply system (well, well) or worn by hand, in buckets. The second method is time consuming, but sometimes is the only possible.

A great solution for taking water treatments in the summer period is a mobile cabin with a shower and a washbasin attached from the outside. The function of the drive for water is a plastic barrel, securely mounted on top.
The metal frame can be sheathed with sheets of polycarbonate, plywood or profiled sheet and equipped with a door, then it will turn into a closed shower stall. It can be easily transferred from place to place and installed where it is needed at the moment: in the garden, in the garden, near the house, in the summer kitchen or in the pool.
With summer shower construction technology with polycarbonate sheet covering will introduce the articlededicated to the analysis of options and the construction of such structures.
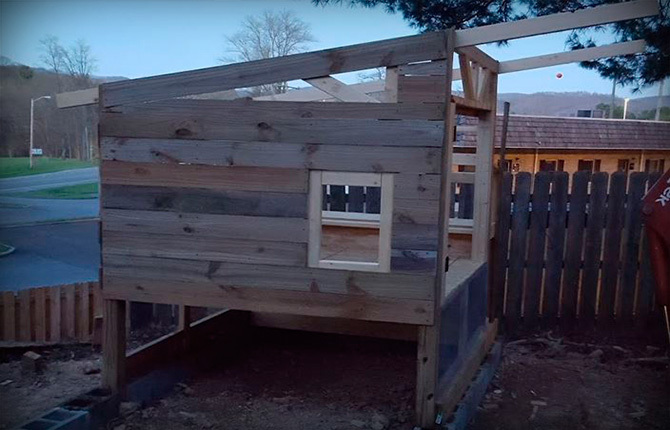
Light wooden structure
The construction, sheathed clapboard, planks, timber or siding - a more serious decision. If the project is designed for several years, it is recommended to make a foundation that will ensure stability and reliability. Sometimes it is enough metal struts, dug into the ground, on which the whole structure rests.

Lightweight half-open portable model, assembled from thin wooden slats, installed vertically and fixed with metal hoops. Suitable for areas equipped with plumbing
You can show ingenuity and create a unique structure, at the same time simple and stylish.

Such buildings are well installed near the pool connected to the water supply system. But any systems related to plumbing, are more likely for a cottage than for a country house temporary residence
If the site is built fully furnished house, wooden summer shower You can attach to the wall of the house by organizing the supply of water.

Wooden buildings and partitions can become a design element if they are assembled from well-treated wooden parts, and then coated with decorative paint or varnish.
Wood is valuable in that it perfectly combines with brick and wooden houses, fences, green plantings. In addition, it is a soft, easy-to-process materials, so you can do it yourself in the summer cottage to create a comfortable summer shower.
As you have noticed, to create a comfortable booth you do not need complicated drawings and schemes - just a small amount of wooden parts and a little imagination.
Capital building with tank
If you live in the country constantly or spend more than half a year, a capital building made of bricks, timber, foam blocks will come in handy. In order for the shower to be provided with water, the storage tank must be connected to the water supply system, and to use the room even in October or in early spring, you can make it warm.

For the best functionality of the equipment it is placed inside the building, under the roof. In the lower part, they mount a watering can with a tap, fix the tap for supplying water to the side, and on the other hand, the heating element.
When cold weather occurs, the system must be completely free from water, otherwise it will freeze and damage all equipment.
An exception is made only if the building is insulated - for example, it is an extension to the house and is partially heated by a common heating system.

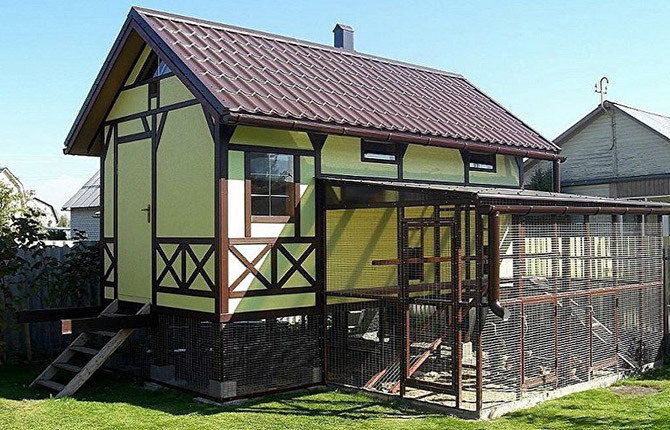
Option of household construction of brick with a tank. There are three rooms under one roof: a shower, a toilet and a cabin, a separate door leads to each compartment.
At the device heated shower All parts can be purchased separately or buy a ready-made model.

The design of the tank tank for the shower connected to the water supply system. TEN with a temperature regulator is fixed at the bottom of the tank, the water inlet is placed on top
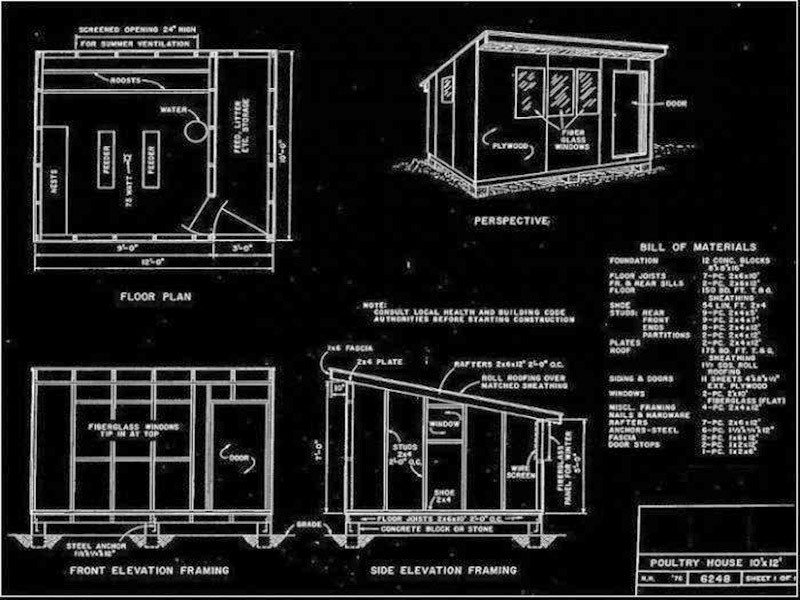
Before building a room, it is better to draw up a project - at least draw a diagram with all the important elements, calculate the consumption of materials, draw up an action plan.

The scheme of the summer shower for giving from the wooden frame, sheathed by boards. The drive is fixed on the "roof". There are several ways to heat water - the supply is already warm, heating the heating elements or the sun's rays
When drafting a project, it is worth remembering that the more serious the construction is, the more expensive it will be.
Two-section facility with toilet
One of the popular options is a shower combined with a toilet. For ease of use, two rooms of the bathroom are separated by a thin wooden partition.
There are two ways to design the entrance:
- one door and a small "waiting room" equipment;
- two doors leading to the premises from the street.
In the first case, an extra area will be required for arranging the vestibule, in the second - the cost of the second door.

Another option for registration is a small veranda. Indoor lighting is organized with small glazed windows, but electricity can be supplied.
The shower is equipped according to standard principles: water connection from the water supply system or installation of a storage tank.
Toilet design may vary. Some summer residents are satisfied with the traditional version with cesspool, others, more economic, do peat closet. Sewage waste processed with peat can be used as organic fertilizer in the garden.
Practical owners are unlikely to use the territory of the dacha for the construction of several important objects - shower, toilet and cabins. Most likely, they will create one structure for them, but with different entrances.

Diagram of a summer shower with dimensions. In addition to the shower room, there is a toilet, changing room and storage room for garden equipment in the building.
The choice of the size of each room depends on the availability of free space. Usually in a smaller compartment arrange toilet, in large - shower.
The following photo selection will introduce one of the options for the construction of an integrated shower-toilet:
Image Gallery
A photo of

In a shallow trench dug 0.5 m from the surface, we arrange a formwork of ready-made plywood boards and boards. The width of the future foundation is 0.3 m. We put reinforcement inside the formwork

Fill the formwork solution. Filling is carried out in one step with simultaneous mixing to release air bubbles. Anti-deformation install struts from the bar

We install outlets into the sewer system, connect them to one sewer pipe, which discharges drains into the drive located on the street

We put polystyrene foam and reinforcing mesh on top of the gravel sewage system, pour cement screed from above.

We lay ruberoid on the walls of the strip foundation to prevent direct contact of concrete and wood. We construct and fasten the bottom strapping to the foundation

We assemble the skeleton: we install angular vertical supports, we connect them with upper strapping, we put ordinary vertical posts, we construct the truss roof system

The slanting truss legs are joined at the top with metal corners. For the formation of supports for pitched planes nails fasten planters

On the truss system we construct a continuous crate of plywood or edged boards. It is needed for laying shingles

Step 1: Formwork and reinforcement installation

Step 2: Pouring the concrete into the formwork

Step 3: Sewage System

Step 4: Floor Thermal Insulation

Step 5: Install the bottom trim on the foundation

Step 6: Build the skeleton for the hopper device

Step 7: Installing a hip truss system

Step 8: The construction of a continuous crates
The integrated bathroom for the dacha is almost ready, it remains to sheathe the walls and decorate the building inside:
Image Gallery
A photo of

We insulate the inside of the dacha bathroom with foam plastic, outside the frame we sheathe the rail, which will serve as a support for fastening the sheathing. We sheathe a plastic or metal siding

The sewer pipe, to which two outlets were connected, is brought out of the construction and connected to the storage tank

We sheathe the walls inside the hopper block clapboard. Arrange it so that the castle comb looked up

Floor in the shower stall fill in two stages. During the second fill, we form a slope in the direction of the drain. Concrete is treated with waterproofing mastic and non-slip floor tiles are laid.

Step 9: Insulation and wall cladding

Step 10: Disposal of the canadian pipe into the storage tank

Step 11: Covering the walls of the hozblok clapboard

Step 12: Facing the Floor in the Shower Stall
Details of the design and instructions with a step by step description of the process of construction of complex construction given here. We recommend to get acquainted with useful material.
Open options without fencing
If the country house has a stationary shower or bathroom, where you can comfortably wash, a summer shower is a lightweight open design, the main functional part of which is a watering can with by crane. It is installed directly on the street, near the house, pool or in the garden - depending on the purpose or convenience of use.

Shower under a canopy among garden plants. Pipes for water supply and watering can are fixed on the wall, through which the necessary space is fenced
Thanks to the ease of implementation of the project, the shower can be turned into a decorative summer art object.

An interesting option in the form of a mosaic surfboard. It is convenient to use this flexible shower after bathing in a river or swimming in a pool.
For the device of an open summer shower a minimum of building materials is necessary.

The modern version of the southern shower in the form of two partitions. For the construction will require wooden bars and equipment for connecting water
One of the advantages of open models is the location right in nature: among flowers and trees, near a pond or vegetable garden.

Stylized shower in a natural style. The role of the pallet is played by a large flat stone, and the pipes for water supply are mounted on a hollow tree trunk, on which the tap is located
The easiest way to remove the pipe in the wall of the house and equip a watering can.

One of the popular modern solutions: arranging a summer shower near the wall of the house (summer kitchen) - a room in which there is a water supply system
If it is necessary to block the open type of shower for a while, you can use a portable screen or a light aluminum frame covered with a piece of cloth.
Instructions for the construction of the soul
As a simple sample for self-production, we present an open model that can be installed at any convenient site. This shower is not designed for a full wash.
If it becomes necessary to use it as the only alternative to the bath, a partition should be erected, which covers the person receiving the shower from prying eyes. Consider how to make a wooden dacha shower of the boards.
Choosing a place on the dacha
The place for installation of a light construction should be chosen based on the purpose of use. If it is necessary to rinse after swimming in the pool, it is logical to install the structure directly on the lawn or area near the reservoir.
For ablutions after working on the beds of souls, it is better to install them right in the garden. The device of a universal nature is located as close to home as possible so that any member of the family can see if the shower is not busy.

If the shower will be used by children - it must be in the field of view of adults. Good place - near the porch, on the lawn or on the backyard
Equipping the shower, do not forget about the organization of water drainage. The sandy and sandy soil on which lawn grass often grows is a natural drainage that does not require additional improvement.
But clay soil does not pass water well, therefore it requires additional installation of a pallet with a drain mechanism. Used water flows into the pipe leading to the ditch or filter well.
Drafting and drawing
Choosing a place, you need to make a design diagram. We offer a ready-made version that can be improved if necessary - to add a pallet or a screen.

Diagram of the summer shower device (side view): 1 - a pipe holder with a watering can; 2 - wooden base; 3 - details of a wooden lattice
The installation of the holder with the water supply pipe is secondary, first you need to correctly calculate the base. For convenience of calculations and creating a template, you can use a drawing paper sheet.

The templates are prepared taking into account the fact that the base consists of 3 parts: the first two are two circles with holes in the middle in the form of a square, the upper one is a grid
Details are collected in the following order:

The two lower circles with square-shaped holes are constructed from four planks, the lattice is made of thin strips with bridges, the shower holder is fixed with a metal corner
If the project is made correctly, the assembly will not take much time.
Preparation of tools and materials
Wood is chosen as the main material for construction, therefore the set of tools will be standard:
- hacksaw or jigsaw for sawing boards into fragments and cutting rounded parts;
- sandpaper for grinding the surface of all elements;
- screwdriver for tightening screws.
A hammer, screwdriver, pliers, and wrenches for assembling shower equipment may also be required.

To prepare the holes for the screws, a drill with a thin drill is required. Self-tapping screws are more practical than nails - if necessary (for repair or transportation) the structure can be quickly disassembled / assembled
Material:
- boards 21 mm thick;
- metal corners;
- self-tapping screws;
- pipe, nozzle-watering, shower faucet.
As you can see, a set of budget enough - if you want, you can easily meet the 1000 rubles. All tools should be prepared in advance. Timber is bought in the building supermarket, equipment for the shower is in the plumbing shop or a special department for the dacha.
Build a wooden structure
First cut and assemble the base using four boards. The surface of the boards is corrugated, so that the water quickly leaves or evaporates. We cut the boards in such a way that we get a circle on the outside and a square on the inside.

For measurement and accurate calculations we use a drawing tool. If there are no special devices, you can use a simple device for circle delineation - a cord, on one side of which a nail is attached (for installation in the center), on the other - a pencil
Prepare two parts, then to put one on another.

On each side we fasten a metal corner. A support for fixing shower equipment will be installed between the two corners.
We connect the two parts of the base with screws.

To make the construction more durable, for the connection we use the triangular details left over when cutting the boards. Before mounting the rack should get such a two-layer workpiece with a pair of corners
Install the rack between the metal corners, fasten. We collect the top coating of thin boards or bars.

The strips are not arranged with a continuous coating, but with gaps so that the water immediately goes into the ground. To do this, between the wooden planks from two sides we put small identical sticks
Each bar at the edges is fastened with screws.

The remains of wooden elements that go beyond the boundaries of the circle, cut off with an electric jigsaw. For durability and aesthetic appeal, the lower part of the support with the corners is covered with a wide board
Wooden base with stand for fixing the shower is ready.
Installation of watering can and crane
It remains to fix the plumbing equipment on the rack - a curved pipe with a watering can and a tap that regulates the water supply.

We fix the L-shaped pipe on a wooden support with a neat bracket, then fasten the nozzle to the upper end, and the water supply hose to the lower end.
You can use a regular watering hose, equipping it with a fitting for quick attachment to the pipe.

The last thing to do is screw the faucet - the simplest model with a crankcase, which you can easily turn on the shower or turn off the water
Attaching the hose and turning on the water, we test the work of the shower. If everything is properly installed, the water should flow without interruption, with sufficient pressure.
A guide for independent home craftsmen, which describes in steps the process of making a shower tank, in the next articlein which you will find a lot of useful tips.
Conclusions and useful video on the topic
Several interesting ideas on the arrangement of the dacha shower are presented in the following videos.
Video # 1. A beautiful combined bathroom shower / toilet in the marine style:
Video # 2. Bright design with a shower for rest:
Video # 3. Build a polycarbonate booth:
To freshen up in the country, it is enough to design and install a light wooden structure or, if desired, a more serious construction with a toilet and water heating. Building a shower is not much different from the construction of another household building, but you need to take care of the water supply and sewage system.
Tell us how you or your neighbors built a soul in their own summer cottage. Share important technological details not covered in the article. Please write comments in the block below, ask questions, post a photo on the subject of the article.