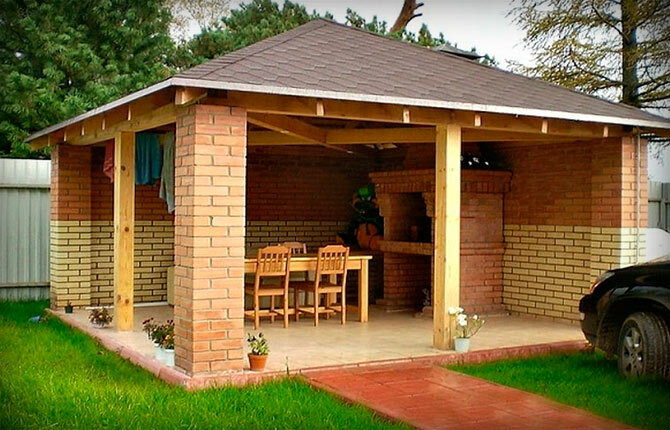
A gazebo is something that a home craftsman can build with a minimum of carpentry skills. And building a gazebo with your own hands from wood will become more accessible if you get acquainted with the drawings and diagrams at the planning stage, watch suitable videos. Is not it?
Next, we will tell you how to properly draw up a gazebo project, calculate the required amount of materials for construction and independently build a stylish wooden gazebo.
The content of the article:
-
Site selection for construction
- Design of wooden arbors
- The choice of materials for construction
- Lumber pretreatment
-
Construction of the foundation for a gazebo made of wood
- Making the bottom and top trim
- Fastening of support posts and top trim
- Flooring and railing construction
- The roof of a wooden gazebo
- Finishing the building
- Conclusions and useful video on the topic
Site selection for construction
A place for construction must be chosen where a good view opens. Much depends on the size of the site on the functional task of the building. It can be done in a secluded corner, away from
gate, where nothing will disturb during the rest.Sometimes they are erected where it is planned to make a brazier and there is access to water in order to turn this structure into a kind of place for a summer dining room.
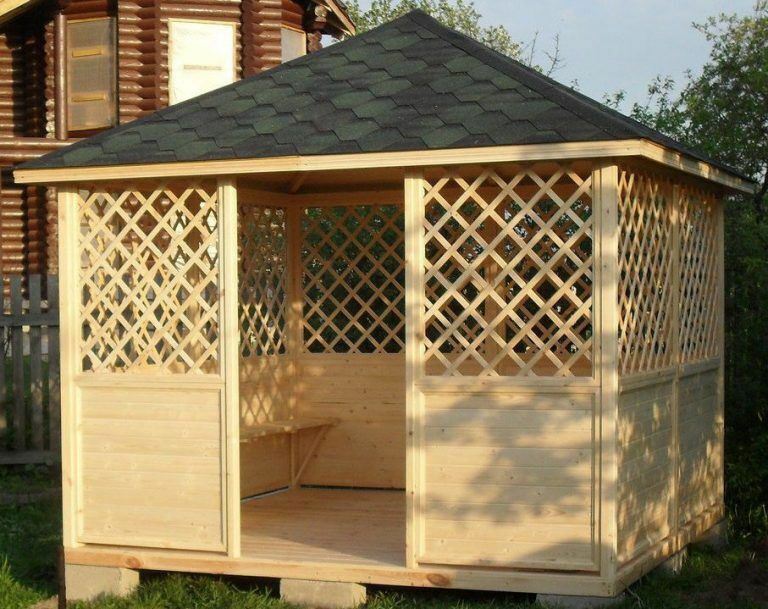
Rectangular wooden gazebo with hipped roof. The lower part of the gazebo with full plank lining and lattice trellises in the upper part
If the cottage has a swimming pool, then it is reasonable to build a gazebo next to it. On the site of a country house, where there is “wild nature” in the form of birches or pines, spruces, then it is better to build a light building in this place, but not among the beds. It is better to separate the garden from it with a hedge of shrubs, tall flowers.
If you are used to arranging your own site on your own, then you will probably be interested in reading an article about arranging garden shower.
Design of wooden arbors
The gazebo should be an architectural whole with a country house, this is especially important if it is built next to it. In other cases, it is not necessary that she copy the main structure by the choice of walls or by the shape of the building. It is enough that one of the elements is combined, for example, the roof structure or the details of the openings.
If the gazebo is located quite far from the house or under the canopy of trees, then you can deviate from this rule. In the case of planning its construction near the fence, then it is also necessary to think about the combination of elements.
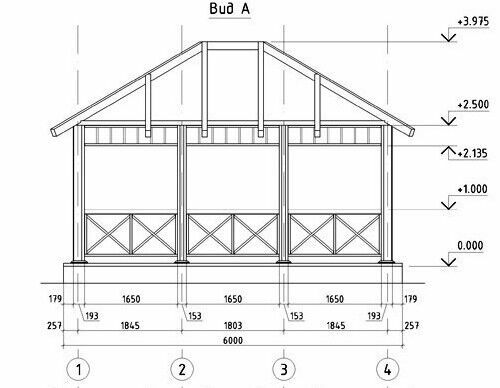
Scheme No. 1. Arbor size 4x6 m, view along the long side. The numbers 1, 2, 3, 4 correspond to the same numbers in the following scheme No. 2. The dimensions of the main elements are indicated in mm
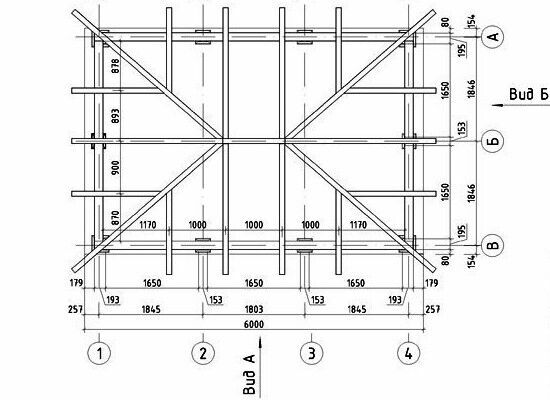
Scheme No. 2. Arbor 4x6 m, top view. The numbers 1, 2, 3, 4 correspond to the same numbers in the scheme No. 1, the letters A, B, C in the scheme No. 3. The roof of the gazebo is hipped, hipped. Two side elements - hips, in the form of triangles, the other two - in the form of a trapezoid
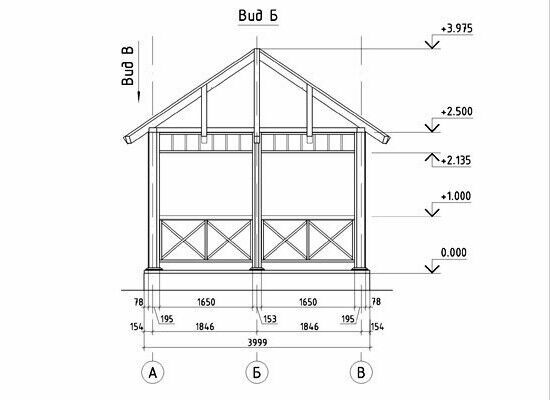
Scheme No. 3. Arbor 4x6 m, view along the short side with the main parameters of the building. Letters A, B, C correspond to the same designations in diagram No. 2
Depending on the functionality of the gazebo, you need to take care of the need for removable screen frames that will help protect from the weather or lattices for climbing plants. In advance, you need to think about whether there will be lighting in the gazebo, as well as what material to make the track from.
The shape of the gazebo can be round, rectangular, in the form of a six- or octahedron. Rectangular or quadrangular shape in the construction of a wooden gazebo is the most popular. Such projects are easier to implement.
The roof, most often, is four-pitched, for multifaceted options - according to the number of faces. The simplest option is single-sided. It is not difficult to make a gable roof, but you can also make a structure with four slopes. It provides better weather protection.
Home craftsmen often do not stop at simple solutions and approach the construction of wooden arbors with imagination. They use different designs and materials, ranging from reeds and willows, ending with intricately curved tree trunks. Consider some options for ideas for wooden gazebos from such skilled craftsmen.
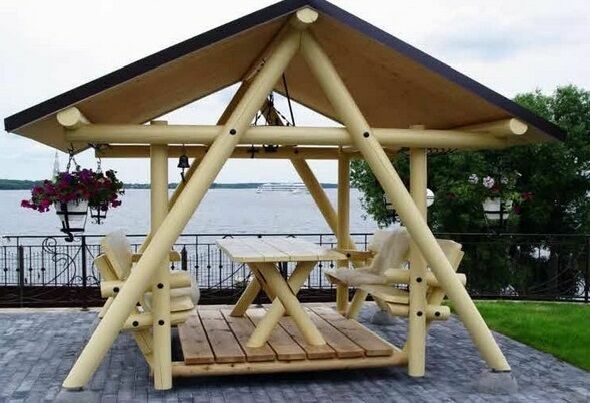
An open gazebo made of logs, a very simple option. The table and benches are also made of this material, the roof is gable. Due to the columnar foundation, the building seems to soar in the air
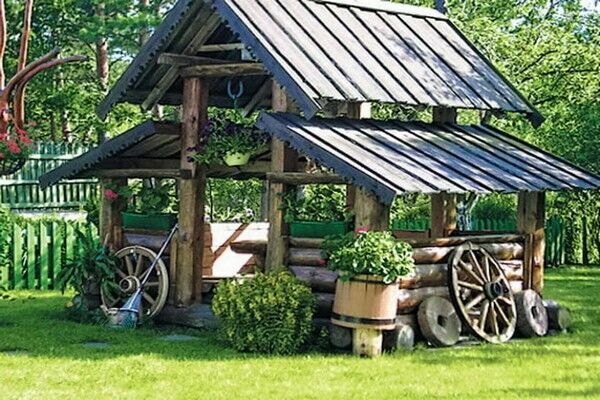
Made in rustic style. Wood tinting "ages" the building. For sheathing the bottom of the arbor, not a log was used, but only its side cut - a processed oblapol. Shingles roofing and openwork overhangs enhance the effect of antiquity
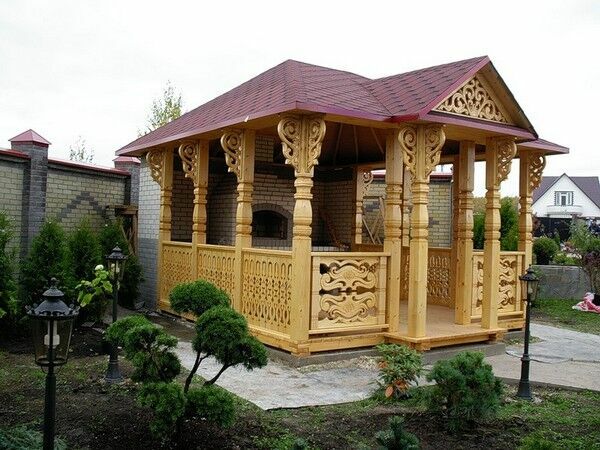
In this arbor, the Russian style is emphasized by figured supports and various carvings in the form of openwork balusters and a patterned pediment. This building with a hearth for cooking serves as a kitchen, dining room and outdoor living room.

A very interesting idea for a closed gazebo. First of all, these are glazed openings. Inside there is a hearth for cooking. The back wall is shingled. The gazebo has two doors, one of which leads to a balcony-terrace. An unusual detail for a gazebo is an envelope-type roof, it is also called folding
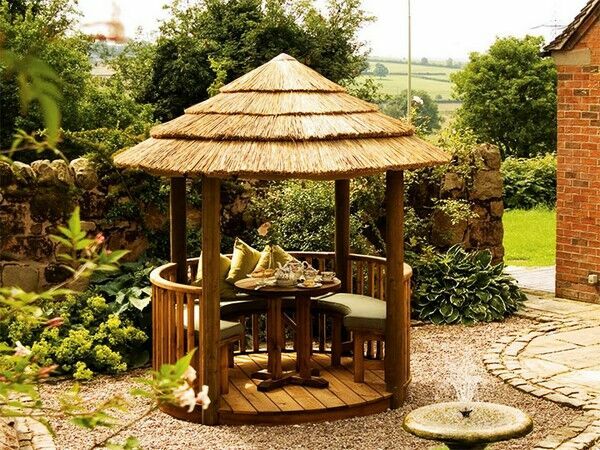
The original idea of a small round arbor of a round shape. The main highlight here is the multi-layered thatched roof, supported by four log-like supporting pillars. She gives the impression of a tropical hut.
At the design stage, you need to find and download or draw the simplest drawings and diagrams of the gazebo yourself. Based on them, you can calculate the amount of materials needed. It is always necessary to buy them with a small margin, so that in case of a shortage, you do not have to stop work.
Interesting: Do-it-yourself gazebo with a pitched roof.
The choice of materials for construction
A wooden gazebo can be cut down from a log or timber, it looks especially beautiful if the house itself is also made of this material. This design harmoniously looks against the backdrop of pines and firs.
As a basis for the gazebo, as supporting pillars, you can take rounded logs or timber. The rest of the trim and decor elements can be made of lighter material:
- block hausa;
- lining;
- grooved board;
- rails of different widths;
- wooden balusters;
- fence elements.
As you can see, the choice of materials for construction is quite large, which makes it easy to build the gazebo of your dreams.
Useful: How to make a gazebo from a profile pipe with your own hands.
Lumber pretreatment
An open-air gazebo is subjected to constant destructive effects of water, snow, sun, fungus, mold, and insects can live in it. Pre-treatment of materials is necessary to protect wood.
Special mixtures have antiseptic and water-repellent properties. Prior to their application, the lumber must be well dried.

It is important to impregnate the ends of wooden elements with antiseptic compounds, especially after marking and fitting
Final painting or varnishing can be done after construction is completed.
Construction of the foundation for a gazebo made of wood
Lightweight gazebos with a wooden roof can be built without a special foundation. This is especially true for those structures where the roof and truss system does not have much weight. This option is also suitable where it is not planned to make a floor - you are going to leave it earth or fill it with sand.
First you need to level the site for construction, removing the surface nutrient layer. Next, you can fill the area with gravel, it is desirable that it has an elevation to the center. This will prevent water from seeping under the floor.
Holes are dug under the wooden support poles. The number of pillars is determined by the size and shape of the gazebo. For a square gazebo with a size of no more than 3x3 m and a sandy floor, four supports are enough. For large structures or for those where a complex truss structure is planned or a roof made of natural tiles, other heavy material, intermediate supports will be needed. Also, intermediate supports are needed for laying the log.
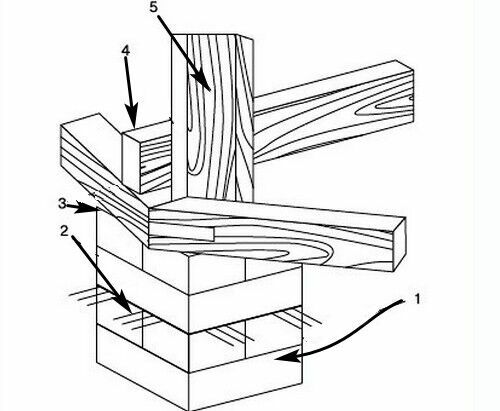
Drawing of a columnar foundation made of bricks for a wooden gazebo: 1 - brick column, 2 - soil surface level, 3 - roofing material layer, 4 - lag, 5 - support pillar
The diameter of the logs must be at least 200 mm. Particular attention should be paid to the antiseptic treatment of the underground part of the support. It can be covered with pitch or, in extreme cases, burned over a fire. Holes about one meter deep are dug under the support beams. Gravel, brick fragments, etc. are poured to the bottom. mixed with sand.
The layer of such a compacted pillow should be about 20 cm. After the support is installed in the pit, the gap between it and the soil is covered with a sand-gravel mixture and compacted. Such a foundation can last 15 years.
For a longer service life, it is necessary to make a columnar foundation with a shallow laying depth.
Stages of construction of a columnar foundation for a gazebo:
- In places of supports, holes are dug half a meter deep.
- A gravel-sand mixture is poured at the bottom.
- A formwork 400 x 400 mm in size and 150-200 mm high is installed along the perimeter.
- For pouring, concrete is used in the proportions: cement + sand + gravel - 1: 2: 2.
- Reinforcement must be placed before concrete is poured. Concrete hardening time is 2 days.
- This foundation can be completed from above with brick columns, so that there is an elevation of two bricks above the soil level, or the columnar foundation can be completely made of brick.
In a quadrangular arbor, supports are made in the corners, in the middle of each side and one in the center of the arbor.
As a basis, you can also do slab foundation with shallow depth. First, the entire perimeter of the site deepens by 10-15 cm and formwork is installed around the perimeter. Next, the surface is backfilled and gravel is leveled with sand. Consolidation of the mixture can be done with water from a hose.
Reinforcement is laid on top and a concrete platform is poured. It can already serve directly as a floor or a base for ceramic tiles, but you can lay wooden floorboards on the logs on it.
Making the bottom and top trim
A strapping made of timber with a profile side of 150 or 200 mm is laid on the foundation. The harness can be fixed on the mustache when the corners at the junction are cut at an angle of 45 degrees, this is true if the gazebo is rectangular in shape.
You can use the half-wood method, when part of the wood is removed and the bars are inserted into each other or butt-joined.
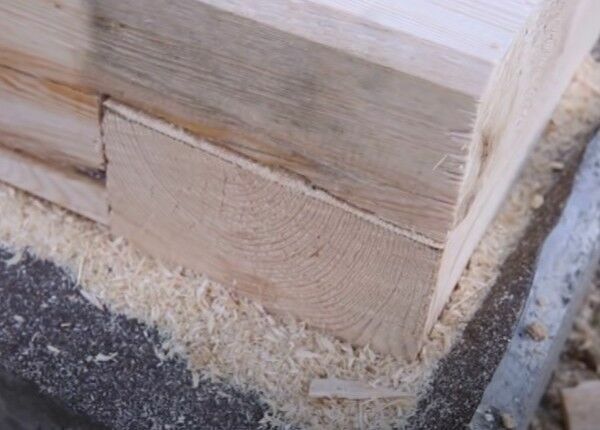
Joining a beam using a half-tree method is a fairly simple but reliable connection method. It allows you to connect two identical parts at a right angle
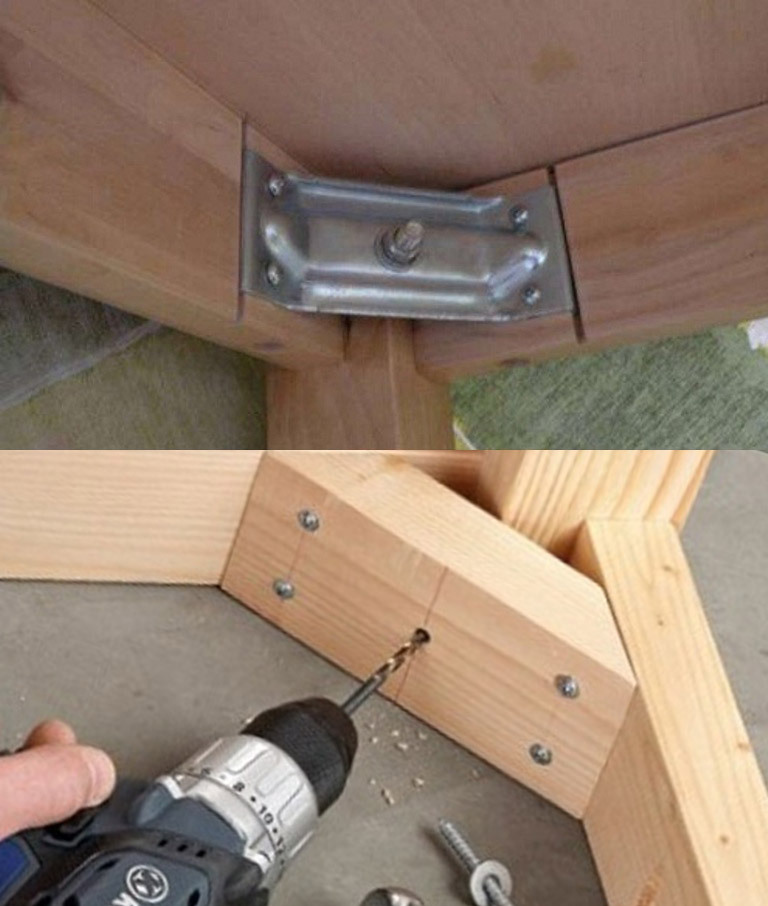
The strapping beam is attached to the foundation posts using metal corners. You can immediately make the top harness, so that after installing the pillars, lift it and install it on the supports. She just copies the bottom harness.
Fastening of support posts and top trim
The corner posts of the support are attached to the harness. They can be fixed in different ways. Let's consider one of them. First, the support is attached to the strapping with metal corners. Then it is leveled and temporarily fixed with an oblique rail on both sides.
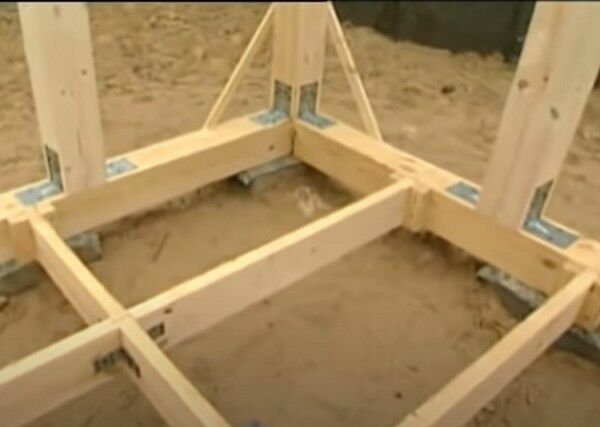
The photograph shows the attachment points of the support poles to the strapping from the timber, as well as temporary fixation with oblique rails. You can see how the lags are attached to the harness
The top harness is also attached to metal corners. For greater reliability, you can drill holes through the strapping into the support post and screw in a 250 mm screw.
At this stage, you need to install entry posts or additional railing posts if the gazebo is more than three meters long.
Flooring and railing construction
The basis of the floors are logs and chernopol from boards. Logs are laid on a concrete base or strapping of beams. As insulation, it is necessary to use a roofing felt bedding. The draft floor is mounted with small gaps.
For the floor, a board of 20 mm or more should be used. Leave a small gap between the boards. This is done so that the water from rain and melted snow does not stagnate on the floor, goes into the cracks.
Railings can be attached to metal corners. This is also done in another way: first, attach to the supporting pillars on self-tapping screws slats. Put railings on them and secure. Set one bar diagonally, it will add additional rigidity.
During the full stitching the lower part of the gazebo with boards, they will be attached to this beam. It can also be an additional decorative element in the fachwerk style, if you add two more short bars to give an X-shape.
The roof of a wooden gazebo
The roof that will crown the gazebo can be: single-pitched, gable, four-pitched or multi-pitched.
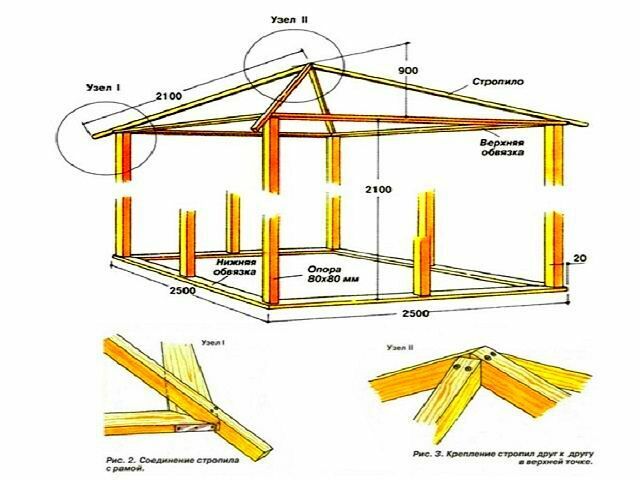
Installation drawing of the rafters of a hipped roof. In node 1, the fastening of the rafters with the upper harness is visible. Node 2 is the place where the rafters are connected at the top point
For a hipped roof, it is possible, during the installation of the upper trim, to make a cross by connecting inhalf a tree. To give the structure greater rigidity, wooden blocks 40 x 40 mm are attached in the center.
A bar with an octagonal profile is attached to the center of the cross. It must be made independently from a bar with a side of 100 mm and fixed in the center of the cross. A cut is made in it from above for attaching the first pair of rafters. They must first be fastened half a tree, and then inserted into the cut of the bar.
We put another pair of rafters perpendicular to the first pair on the octahedron and attach it. We do the same with the rest of the rafters. Their ends should lie on the upper trim, falling below them by about 30-40 cm.
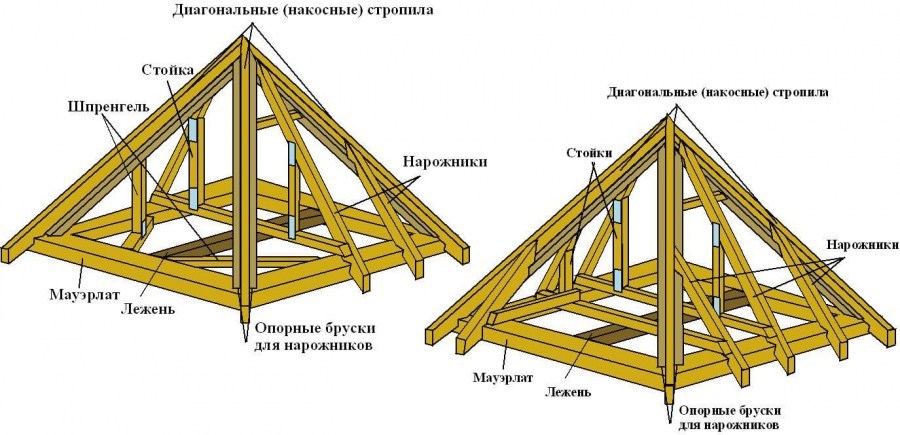
Detailed diagram of the installation of hipped roof rafters for heavy roofing material. Here are more elements to enhance rigidity
Next, you need to make a crate. Depending on the choice of roofing material, it can be solid or rare. The roof should be made identical with the house for a harmonious combination.
In addition to the usual roofing materials: natural tiles, metal tile, metal profile, shingles, slates, etc. you can use a board, shingles. There are rarer materials, such as wooden shingles.
These are planks, shingles of a small size. The shingle is overlapped on the crate and looks very original, is environmentally friendly material. Another natural material is reed. Mats are made from it, which should be treated with a flame retardant from fire. The crate for such a roof is not made solid, but in increments of 35 - 40 cm.
Finishing the building
To decorate the gazebo, you can use different types of materials. Even the railings themselves are made from the same timber, but wooden railings with beautiful balusters will be ready to look much more beautiful. For their fastening, holes are made in the lower bar using the “feather” nozzle.
Each part is inserted into the prepared hole. To temporarily fix them on the support poles, you need to nail the rail. Next, a bar from the railing is superimposed on the upper part of the balusters and fixed with self-tapping screws. Glue is applied to the bar and to the underside of the railing where the notch is. PVA. The railing is pressed against the plank. For strength, they need to be fixed to the pillars with the help of corners.
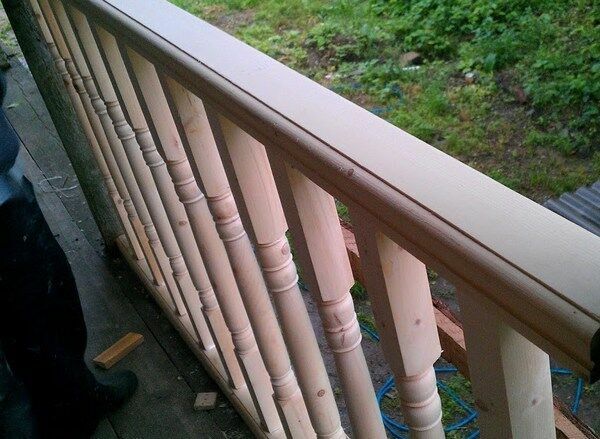
Wooden railings mounted on figured balusters using a special plank. Balusters were mounted in specially drilled holes in the bottom bar
You can also make lattice screens in order to close the inside of the gazebo from prying eyes. Such rack trellises can be made by yourself.
First you need to make a frame of bars, connecting them with a mustache or butt. On the frame you need to make markings. The first rail will go diagonally, the rest will run parallel to it with a certain step in both directions to opposite corners. Fastening is made self-tapping screws.
In the same way, the slats are attached in the second row to create a lattice. Reiki does not have to be cut exactly to size first. They can be trimmed to the edge of the frame after fixing. Such a trellis can be fixed between the railing and supporting pillars of the gazebo. The frame will look inward, and the attachment points of the grille outward. If you close the attachment points on top with slats of the same width as the frame bars, then the whole structure will look neater.
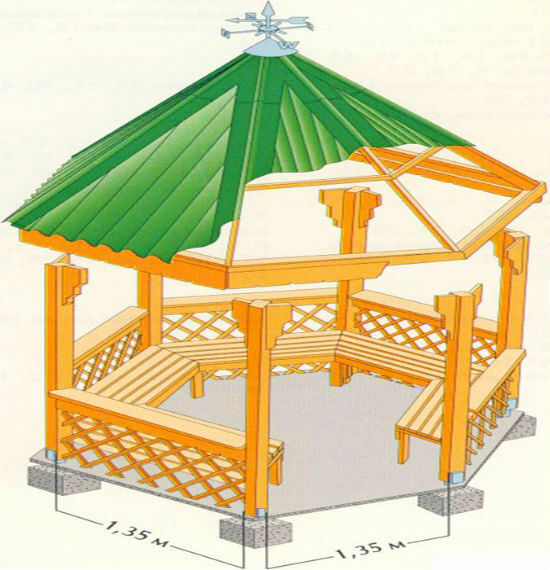
Scheme for constructing a hexagonal gazebo made of wood. The bottom is finished with lattice screens, which visually gives the gazebo lightness.
Some craftsmen use natural materials found in the forest for railings and balusters: tree trunks and branches, peeled and varnished.
If you plan to make the gazebo warm, so that you can stay there in cooler weather. Then the lower part must be completely sewn up with a board. In the upper part of the gazebo, a beam-lintel is attached to the supporting pillars.
Such jumpers are installed parallel to the railing, below the upper point of the supporting pillars by 200 - 300 mm. This upper gap also needs to be sewn up with boards. Between the railing and the upper lintel, special double-glazed windows are installed for the cold period of time. For insulated gazebos, a light shield door should be installed.
In places where there are often winds, one of the walls of the gazebo can be completely sheathed with a board. You should also do it if the neighboring area is close, and you want to isolate yourself from prying eyes.
Upon completion of construction, in addition to antiseptic treatment, a wooden gazebo must be painted or varnished. This will protect the building and give it a more noble look. The painted surface is easy to clean and maintain.
For you: We build a modern gazebo with a barbecue for a summer residence with our own hands.
Conclusions and useful video on the topic
Video instruction for building a rectangular wooden gazebo:
Video with instructions for building a hexagonal gazebo:
Building a gazebo out of wood is not such a difficult thing. To do this, you will need tools: a circular saw, screwdriver, drill, chisels, planer, grinder. Some woodworking skills, free time and the desire to decorate your site with a new functional and beautiful gazebo will also come in handy.
You can ask questions on the topic of the article or share your own experience in building a wooden gazebo. The contact block is located immediately below the article.
