Decorative plaster is a classic finishing coating based on synthetic or mineral material with the addition of binders, fillers and additives. The application of Venetian plaster is the most impressive, but at the same time complex and expensive type of finishing.
The content of the article:
-
What is Venetian plaster
- Compound
- pros
- Minuses
-
Venetian plaster application technology
- Preparatory work
- Mixing and tinting
- Application rules
- Ironing
- Waxing
What is Venetian plaster
This method of wall decoration is noticeably different from the usual design. The result is a perfectly smooth base. The decorative effect is formed through the layer-by-layer application of a special material, each of which has its own color.
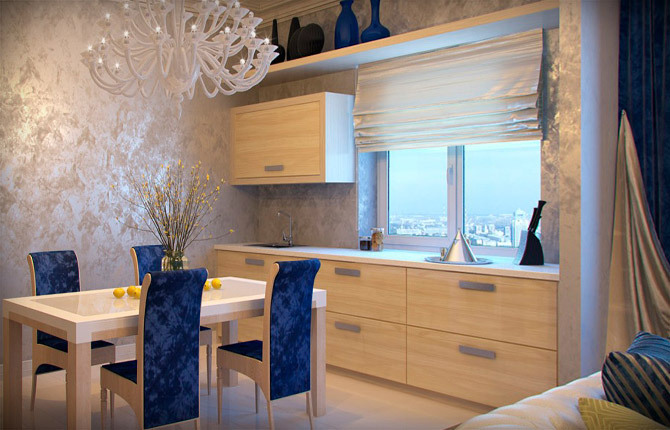
The basis of Venetian plaster is lime, as well as marble and granite chips, quartz, and types of stone dust. Natural oils and wax are used as additives. The universal material allows you to create several coatings with a thickness of 0.5 to 1 mm. Thanks to a special technique, works of art appear - smooth and shiny textures like marble and natural stone.
The application of Venetian plaster came to us from the Middle Ages from the masters of Venice. For this reason its name arose. Many architectural works have survived to this day: ceilings, walls, columns of palace halls, castles. Currently, it is used in hotels and cafes, office premises, as well as in residential buildings and apartments.
Compound
The classic set is building mixture, which is used for finishing finishing work. Venetian plaster contains granite, marble, quartz dust, and malachite. Its binding elements are slaked lime, cement or acrylic polymers, silicone, and silicate components. Another component of the material is pigment. It can be of either organic or synthetic origin.
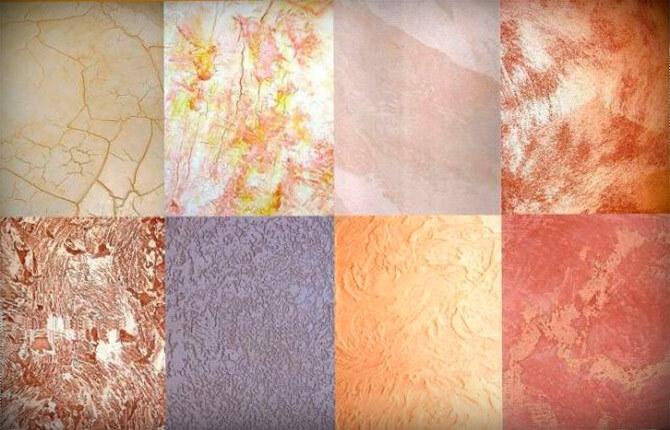
To achieve the proper effect of the coating, the composition must be elastic, thin, easy and even on the wall. Venetian stone often imitates natural polished marble. Decorative putty, in contrast, can replicate sand, wood, silk, velor and other materials.
The most popular types:
- limestone, as close as possible to the original Venetian;
- acrylic is in no way inferior to it in quality, especially since it is a modern and affordable material;
- artistic, includes at least four different colors, and is a complete leader.
The most expensive type is carrara; special marble is used for it. The technique involves applying multiple coatings, alternating contrasting shades. The finish looks luxurious due to the shimmer.
Craquelure imitates an aged coating with cracks. A peculiar pattern appears after applying varnish under the finishing layer. "Marseille wax" creates a deep relief on the surface.
The veined base is revealed using a special application technique with a thin tool. The surface may include some artistic elements: images of fruits, floral patterns.
We read:
- Wall decoration with silk plaster
- Plaster for foam concrete internal and external
pros
Venetian plaster is considered the final finishing of interior spaces: walls, ceilings. Suitable for application in private homes and city apartments. It can be applied in the bathroom and kitchen, as well as in living rooms. The surface imitates stone or noble marble. It reflects light, visually expands the area, and gives a translucent effect. Positive aspects of Venetian plaster:
- even and smooth wall covering;
- variety of colors;
- a variety of textures allows you to make a choice for any room;
- environmentally friendly composition is fireproof;
- dries quickly;
- durable, durable material that is easy to care for;
- high wear resistance - from 10 to 30 years.
This type of finishing is not afraid of dampness, fungi, mold. After application there are no seams or joints left. Can be repaired or restored. Minor coating defects can be easily corrected. Withstands temperatures from -40 to +70°. The elastic surface easily copes with temperature fluctuations when the heating is turned off or during ventilation.
Coating carefully Can be washed with a natural cloth using warm water. Apply a soft sponge with a soap solution or diluted dishwashing detergent to contaminated areas.
Minuses
Despite its many advantages, Venetian plaster has its drawbacks. First of all, this is the high price and complex application technology. Made on a mineral basis, the connecting link is cement. Such mixtures are easily diluted with water. Despite its durability, over time the material can collapse under strong mechanical stress. May crack if the base underneath the Venetian plaster is not strong enough. It has a limited range of colors, mostly light.
If damage, chips, scratches, or abrasions occur, recoating will be required to restore shine. Some types, mainly for materials with acrylic, have insignificant vapor permeability, that is, they absorb moisture. Others, having many colors, are exposed to direct sunlight. Venetian plaster cannot be painted over if you want to change its color.
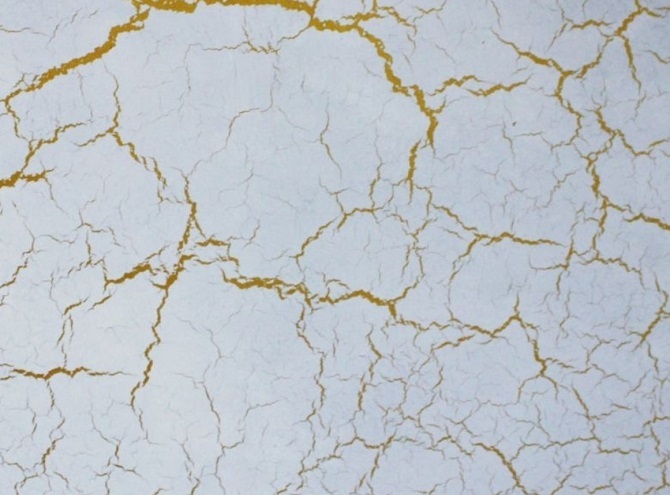
Craquelure
Venetian plaster finishing is expensive. It is recommended to entrust its application to a specialized construction organization, a craftsman who has not only relevant knowledge regarding the material, but also practical skills in its application, which, of course, entails additional expenses. Another minor drawback is compliance with the requirements for preparing the base before use.
Venetian plaster application technology
This is a special type of material. If the application technique is followed, a durable coating is formed that will not peel off, crack, or change color. Contrary to the opinion that “this is a job worthy only of professionals,” applying Venetian plaster with your own hands is quite possible. The whole process occurs in stages. You can follow the brief step-by-step instructions:
- treating the area with a primer suitable for a particular mixture;
- coloring the base;
- alternate application of decorative coatings with intervals for drying (6–12 hours) and sanding;
- ironing of the finished surface;
- waxing followed by polishing.
If desired, you can prepare Venetian plaster yourself. To do this, dust or chips of marble, quartz, granite and acrylic are added to the usual putty, which will make it plastic. Since the choice of dry mixtures packaged in plastic buckets and ready-to-use is huge, it is not rational to make the mixture yourself.
So, applying Venetian plaster with your own hands does not present any particular difficulties when it comes to simulating ordinary marble finishing. The greatest difficulty in this case is the process of preparing the foundation.
Preparatory work
Regardless of what type of topcoat is applied, the walls must be properly prepared. The less textured the finishing composition is, the more thorough the preparation should be. If work is carried out indoors, you should remove furniture, shelves, and remove paintings. Free the walls from whitewash, wallpaper, old oil paint, and clean them from dirt. Fill all cracks and holes for unnecessary communications.
Concrete, brick, stone are suitable as a base. They must first be treated with an acrylic primer. It will protect against dampness, strengthen the surface, and improve the adhesion of materials. Walls in rooms with high humidity are also treated with an antifungal agent. A primer based on quartz sand is used to treat the surface for decorative, non-smooth plaster. For silicone or silicone-silicate, Atlas primer is used.
For Venetian plaster, the base must be perfectly flat, since the thickness of its layer does not exceed 1 mm. Therefore, the surface of the wall is puttied several times using starting and finishing putty or fiberglass is glued. It is important to remember that each layer must be given time to dry. Then you can start sanding it.
In order to level, clean and sand the walls, you will need a considerable set of tools. These are paint brushes, spatulas of different sizes, a smoothing iron, a level, and a set of screwdrivers. An impact drill is essential, you will need a grinder, a removable mixer attachment, as well as containers of different sizes.
Mixing and tinting
Venetian plaster is a paste-like structure. Can be tinted by the manufacturer. If you order it in a salon, the desired color will be prepared immediately before purchase. A homogeneous paste purchased at a building materials store will have to be painted yourself using a special pigment.
After opening the container, the solution should be thoroughly mixed using a drill with an attachment. The color mixes especially poorly near the walls of the bucket. A block with a small cross-section will help to cope with this problem. It is enough to walk it along the walls of the jar. To prevent the mixture from drying out, cover it with water. Before adding dye or before applying the composition, the water must be drained.
Tinting should be done according to the manufacturer's instructions. It is better if the entire volume of paste is mixed at once. When it suddenly turns out that there is not enough material, it is impossible to mix the pigment and repeat the shade at home. Therefore, it is better to buy ready-made mixtures tinted by the company.
In a specialized supermarket, you can use computer technology to give the paste the desired color. Moreover, you will need two types of Venetian: one mixture is darker, the other is lighter. They should differ only in shade, which is difficult to do on your own.
Venetian plaster is sold in two bases. The first “A” is intended for painting in light shades, the second “C” – in dark shades. To obtain a variety of effects, there are additives: glitter, pearlescent and other inclusions.
Application rules
The main question that arises after the preparatory work stage is how to apply Venetian plaster. The embodiment of the method lies in treating the surface in several layers with a metal spatula made of special steel to avoid scorching of the material. The mixture is applied “casually”, with haphazard movements, but evenly. As a rule, this is the application of 2-4 layers, sometimes more, up to 10. The greater their number, the brighter the depth effect is felt.
The composition is applied in different ways. Drying time is required after each application. The surface is then sanded until it is even and smooth. The final layer is rubbed with wax. If it is beeswax, the plaster will be glossy. Mineral makes the wall matte. It also has water-repellent properties. Particularly suitable for damp areas.
It is important to know, the Venetian has very low consumption, since each layer is thin. Therefore, you should not tint several buckets of paste at once, especially since the consumption is indicated on each package. It’s easy to calculate the required amount; taking into account coatings, add 25% just in case. Then there will be enough material.
Base
The first layer is considered the base one. It should cover the entire surface. It is necessary to create a “pattern”, it determines the shade of the entire area, and is the basis for further work. It is tinted to the desired color, pastel or rich, just before use.
The application of Venetian plaster begins at the top of the wall using a trowel or spatula. Gradually treating 1 m areas2. After applying the putty, leave it until it dries. Next, grind with sandpaper to remove dust.
Second and subsequent
The next layer is applied step by step, in short strokes, and allowed to dry for several hours. The third level and those following it determine the texture of Venetian plaster. The material is picked up on the edge of the spatula and applied randomly, moving in different directions.
The place where the tool first touches is covered with another glaze. It is important to strictly follow the coating application technique: the length of the strokes, the randomness of the lines, the force of pressure on the tool, the shape of the bends.
To level the surface, smooth it with a large-pored foam sponge, periodically moistening it with water. Working using the “butterfly” technique, make short, double movements with narrow spatulas, from top to bottom. Eventually, versatile veins appear.
Finishing
The last layer should be applied especially carefully, carefully leveling the plaster. It should be as thin and transparent as possible. The work is done with a trowel, removing excess material. The final finishing of Venetian plaster involves sanding with emery cloth. It dries from one to ten hours, which is determined by the components of the paste, the manufacturer, humidity and temperature in the room.
Ironing
This method involves grouting a well-dried surface. Ironing is carried out by moving a metal tool in a circle. The spatula must be smooth, free from defects and scratches, and free from particles and grains of plaster. You should control the uniformity of pressure so as not to touch the wall surface with the edges of the trowel. At the same time, in some areas the top layer is removed, which emphasizes the texture and enhances the depth of the resulting pattern. Dark stripes are clearly visible through a thin layer, which is why natural marble is valued.
Waxing
Ironing is considered the final stage of surface treatment in a living room. Walls in the kitchen, bathroom or hallway need additional protection. Wax treatment is carried out 24 hours after the Venetian plaster has dried. Its layer should be as thin as possible. Excess wax will flake and peel over time.
Waxing is done with a spatula or cloth, rubbing the wax into the plaster. After an hour, the surface is polished using a grinder or drill with soft bristles that will not crumble. In this case, the rotation speed of the nozzle does not exceed 3000 rpm. Otherwise, the composition is not polished, but removed. Venetian plaster gains strength within a month after application. Then it can be washed and rubbed until shiny.
A surface resembling marble or fabric does not require additional painting, especially if glaze varnish was used. Decorative plaster with a pronounced texture can be repainted if desired.
Applying Venetian plaster yourself is an expensive proposition. From the description it is difficult to understand the technique of applying strokes and how to do them. Therefore, it is better to find your own way of making plaster and practice on plywood. This will give you an understanding of what effect you can achieve. There is a chance that using a different method, the result will please you.
Finishing in the Venetian style makes it possible to create an exquisite original surface that will look noble and rich, matching a classic or modern interior.
If you have ever applied Venetian plaster yourself, tell us about your method of work and its intricacies. Share the article on social networks, bookmark it.
How much does Venetian plaster cost?
| Product | Price |
| Venetian plaster Marble Ircom Decor 4.5 kg | 942 ₴ |
| Venetian plaster Feidal Venedigputz 1 kg white | 554 ₴ |
| Venetian modeling plaster Alpina Marmor Effekt 2.5 l translucent | 2730 ₴ |
| Venetian plaster Feidal Veneciano 10 kg translucent | 6668 ₴ |
How much does it cost to apply Venetian plaster?
| Name of works | Unit | Cost of work (cu) |
| Venetian plasters | m 2 /м.п. | from 12 USD |
| Relief plaster 3D (bas-relief) | m 2 | from 100 USD |
| Decorative plaster “Shuba” | m 2 /м.п. | 3 USD |